Coast

Five Questions: Super Resolution, Ghosts, Intervalometers and More

If you have questions, we have either answers or opinions, and we’re not shy to share either.

This installment of our “Five Questions” series features inquiries about Adobe’s new Super Resolution, the work of Alexey Titarenko, Milky Way lenses for the Nikon Z 7, intervalometer recommendations, and the efficacy of carrying two Coast flashlights.

If you have any questions you would like to throw our way, please contact us anytime. Questions could be about gear, national parks and other photo locations, post-processing techniques, field etiquette, or anything else related to night photography. #SeizeTheNight!


1. Seeing Quadruple

Question:

Regarding your post about Adobe’s new Super Resolution feature, I was surprised to see the headline mention “quadruple” enlargements. I thought the new feature was “2X.” Did I read it wrong or misunderstand the feature announcement? — Robyn

Answer:

It’s just a math thing. You are correct that Super Resolution doubles the pixel count of an image in both the horizontal and vertical linear directions. For example, a 200 x 300 image would become 400 x 600.

That results in the total area of the image being quadrupled. In that same example, the resolution would go from 60,000 square pixels to 240,000 square pixels—i.e., quadruple, or four times the number of pixels. See the image above for a graphical representation. — Chris

2. Ghosts in the Composition

Question:

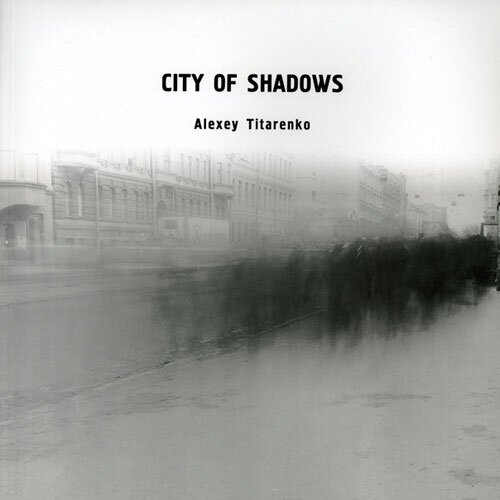
I am trying to mimic Alexey Titarenko’s work, especially the movement he puts in. I used native ISO, an appropriate aperture and a long shutter. Would you mind giving me help in this type of work? — David C.

Answer:

I assume you are talking about Alexey’s “City of Shadows” series. Interesting human movement happens in exposures from 1/15 to 15 seconds, because most people can’t hold truly still for more than 1 to 2 seconds.

In order to create the “ghosts and shadows” effect that Alexey is getting during daytime, you need to use a 3-, 6- or 10-stop neutral density filter to allow for a long enough exposure. Operating under overcast skies will help, as will lots of experimentation.

A lot depends on how much stillness you want to show in the chaos of movement. That is important. For example, for Alexey’s shot of the handrail, it was critical that the rail remain sharp amid the mass of bodies moving past. It works beautifully. However, many of his other photographs feature just a little movement, which allows him to capture a “soul” that is still.

On the other hand, reaching longish shutter speeds like that at night is easy, because you’re already working with minimal light. In fact, the challenge in dark conditions is actually adding light so you can see the human subjects in all that darkness. For more info on how to do that, see my blog post “Photographing Phantoms.” — Gabe

3. Z 7 Milky Way Glass

Question:

I have a Nikon Z 7 and would like to try Milky Way photography this summer. I have the Nikon Z 14-30mm f/4 S lens and believe the f/4 aperture will not be fast enough to prevent star streaking. Would the Nikon Z 20mm f/1.8 S or the Irix 15mm f/2.4 be an acceptable alternative? — Jerry

Answer:

You’re right that the f/4 lens will be very limiting for star-point images in general. They would require you to shoot at an ISO of 12,800, which I would not recommend with the Z 7 unless you’re planning to stack multiple frames in software such as Sequator or Starry Landscape Stacker. Since you have a Z 7, I suggest going with a native Z lens. Though I haven’t shot with most of them, word is that they’re all truly outstanding.

I have not shot with the Z 20mm f/1.8,  but I love that focal length for Milky Way. So I think that either that lens or the more-expensive Nikon Z 14-24mm f/2.8 would be your best bets.

The Irix lenses are excellent, though they require an adapter to use on a Z-mount camera. (Irix will no doubt release Z-mount lenses in the future, but we don’t know how near that future is.)

If you’re still stuck about which lens to buy, you could always rent to try before committing. We can recommend Borrow Lenses or Lens Rentals. — Lance

4. Intervalometer Recommendation

Question:

I just reviewed your 2017 article on wired versus wireless intervalometers. Are you still recommending the wired Vello Shutterboss II? — Hadley

Answer:

Yes, it’s still on the recommended list for wired intervalometers. Though it does share the one weak spot of all wired intervalometers, which is the connection point to the unit, which often wears down over time.

If you’re open to a wireless solution instead, my favorite intervalometer overall is the Phottix Aion. Not only does it not suffer from that weak spot, but it also allows for exposures of fractions of seconds, which is useful when shooting with NPF Rule shutter speeds.

To learn more about the Aion, see my post “A Better Intervalometer.”

Though I do champion my favorite, either of the above options will suffice. You really can decide based on your personal priorities and be happy and successful either way. — Matt

5. Are Two Coasts Better Than One?

Serpent—Borrego Springs. Nikon D4s with a Nikon 14-24mm f/2.8 lens set at 24mm, light painted at close range with a Coast HP7R flashlight. Three exposures at 15 seconds, f/4, ISO 6400.

Question:

I notice that you guys seem to all have both Coast HP7R and HP5R flashlights. I want to buy a more powerful small flashlight than I have now. Do you own both because the HP7R is too powerful for some applications? If you were to buy just one, which would it be? — Mark

Answer:

Yes, we all own both the HP7R and the HP5R because the difference in power is useful for different applications. The HP7R is a very bright flashlight (300 lumens), while the HP5R is less bright (185 lumens). Both have a second power setting that drops the output by 90 percent, so the combination essentially gives us four different lumen options.

How do we use this versatility? One example: If we’re shooting the Milky Way under a new moon (pitch black, no moonlight at all), then our apertures are very wide (f/2 or f/2.8) and we are using very sensitive ISOs such as 3200 or 6400. That makes 300 lumens overkill and more difficult to control, whereas 185 lumens can be very effective. You just don’t need a powerful flashlight for that kind of sensitive exposure.

An opposite example is when we’re shooting under the much brighter conditions of a full moon, when our apertures may be set to f/5.6 or f/8 and the ISOs to 100 or 200. These less-sensitive exposures require a stronger flashlight to paint the scene.

The different flashlights can also be more or less useful when considering the distance of the subject from where you’re light painting. A rock formation 100 yards away obviously requires a more powerful light than a flower 2 feet in front of you.

So yes, it’s nice to have both models to cover all the possible situations. But if you are looking to purchase just one, I would recommend one of these strategies:

  1. Purchase the more powerful HP7R and use some neutral density gels to knock down the power when needed. You can get a sample pack that contains all you might need for less than $10.  Remember, you can always make a bright flashlight dimmer, but you can’t make a dim flashlight brighter.

  2. Decide which conditions you favor for night photography. If you mostly shoot under a new moon, get the HP5R. If you find yourself doing a lot of work under brighter conditions (full moon, city scenes), purchase the HP7R.

Either way, both of these Coast flashlights are excellent night photography tools that are worth every dollar you spend on them. — Tim

Chris Nicholson is a partner and workshop leader with National Parks at Night, and author of Photographing National Parks (Sidelight Books, 2015). Learn more about national parks as photography destinations, subscribe to Chris' free e-newsletter, and more at www.PhotographingNationalParks.com.

UPCOMING WORKSHOPS FROM NATIONAL PARKS AT NIGHT

Five Questions: Meteor Shower in Death Valley, Leveling Bases, Coast Flashlights and More

If you have questions, we like to try to have answers. Below are five examples.

This installment of our “Five Questions” series features inquiries about photographing meteor showers in Death Valley National Park, diffusing an LED panel, saving stacked files, Coast flashlights and using leveling bases for panos.

If you have any questions you would like to throw our way, please contact us anytime. Questions could be about gear, national parks and other photo locations, post-processing techniques, field etiquette, or anything else related to night photography. #SeizeTheNight!


1. Meteor Shower Locations in Death Valley

Moon over Mesquite Flat Dunes, Death Valley National Park. © 2016 Chris Nicholson. Nikon D5 with a Nikon 17-35mm f/2.8 lens. 10 seconds, f/5.6, ISO 3200.

Question:

My wife and I and our two dogs are going to Death Valley National Park to shoot the Geminid Meteor Shower in December. Finding a foreground subject is going to be a challenge because the radiant is relatively high (72 degrees according to PhotoPills). Here is a list of potential foregrounds I have come up with: Mesquite Flat Dunes, twenty-mule team wagons, Ashford Mill, Keane Wonder Mine, Twenty Mule Team Canyon, Badwater Basin, the palm grove at Furnace Creek Ranch. Any thoughts would be much appreciated. — H.J.

Answer:

Yay! What a great idea. We love photographing meteor showers, and we love Death Valley.

As for locations: If you want the radiant in the frame, you’re looking for a view toward east-northeast. With that in mind …

  • Mesquite Flat Dunes always works. Be ready to walk in a bit to find dunes without footprints. Also be ready (food, water, second camera) to stay out there, because you’re likely not going to be walking back and forth to the car.

  • Twenty-mule team wagons: I assume you mean the ones at the Borax Museum. I wouldn’t shoot there. The wagons are surrounded by a fence. Also, the east-northeast view will have the road in the background of your frame, and being so close to Furnace Creek, cars will definitely be driving through.

  • Ashford Mill could be interesting. You could get an east-northeast angle from behind the structure; the road would be in the background, but I’d be surprised if another car goes back there at night. The downside is that there’s not a lot of variation to the location. It’s primarily just two structures, and one of them is more visually interesting than the other. I’d definitely scout it in daytime before committing to a night shoot there, because it’s just isolated enough so that changing locations midstream would be impractical.

  • Keane Wonder Mine is a fun location generally, but you’d have a tough time finding a good east-northeast angle.

  • I love shooting in Twenty Mule Team Canyon. Interesting rock formations that aren’t difficult to navigate on foot, and plenty of foreground material from east-northeast angles.

  • Badwater Basin is great any time of day or night, but it wouldn’t be the easiest spot for this particular shoot. From any east-northeast angle you’ll have either the parking lot and/or road in the background, so you’ll be dealing with headlights. My other concern is that when the shower is peaking, the radiant will be so high that you’ll need to be pointing upward with a wide-angle lens. That would minimize any flat foreground at the bottom of the frame. I’m sure there are creative ways to make it work, but my hunch is that making it work well would be challenging, so I’d definitely day-scout any ideas before trying.

  • The palm grove at Furnace Creek is an interesting place to shoot, but there’s a lot of artificial light in the area. You’d need to fight with that to find a balance that would work with star captures.

Golden Canyon, Death Valley National Park. © 2020 Chris Nicholson. Nikon D5 with a Nikon 24-70mm f/2.8 lens. 43 stacked images shot at 4 minutes, f/4, ISO 400.

Here are a few spots I like besides what you’ve mentioned:

  • I’d consider the Wildrose Charcoal Kilns. The caveat is that it will be cold up there in December, and there’s even a chance the road will be snowed in, so I’d ask a ranger before committing to the drive. But you’d surely find an east-northeast view you like, with a very interesting foreground.

  • The east-northeast view at Ubehebe Crater is spectacular. It would be cold up there at night, but the east-northeast view is also right next to the parking lot, so you could wait out the exposures in your warm car if needed. However, the crater is very dark without moonlight, which you won’t have on the peak nights, so you’d probably want to get a twilight exposure to blend in. That would require some precise positioning and waiting around for quite a while without moving the camera. Also, the rim of the crater sometimes gets too windy for even a tripod, so there’s a possibility you’d have to abandon the location mid-shoot.

  • Golden Canyon could be fun. Steep walls, but you’ll be pointing up anyway. Also, it’s close to the services at Furnace Creek.

Good luck, and please let us know how this goes! We would love to see the results. — Chris

Note: If you’re also interested in getting out to shoot next month’s Gemenids, be sure to pick up a copy of our e-book Great Balls of Fire: A Guide to Photographing Meteor Showers.

2. Viola Diffusion

Question:

I have been playing with the Luxli Viola for few months. Do you ever use the diffuser for it? Any tips on using it? — Steve W.

Answer:

I do use the diffuser on occasion, and sometimes even add a piece of neutral density gel inside if I’m looking for the subtlest kiss of light. Mostly, I pull out the diffuser when I’m aiming for a subtle natural effect, or for night portraits.

Another great tool to diffuse the Viola is a 2- or 3-foot square scrim that mimics the effect of a softbox. That’s not always practical on location, and it requires some additional grip equipment, but it is a nice option to have. An old picture frame with a piece of white sheet stretched across it is all it takes! — Lance

3. Saving or Deleting Files for Stacking

Question:

How do you manage the number and size of photo files when stacking? For example, Starry Landscape Stacker uses TIFF images to combine into one huge file. Can I delete those individual files and keep just the final image? When I create a stack in Photoshop, can I delete the images the final photo is composed of? — Sue W.

Answer:

For Starry Landscape Stacker or any other program that creates JPEGs or TIFFs to bring them into their program: Once you finish your processing and are 100 percent happy with it, you can definitely delete those individual JPGs/TIFFs. Save yourself some storage! However, if you do that, make sure you have the final file organized somewhere that makes sense to you. I typically will import this new TIFF into Lightroom, where I can do a final edit and store it in my catalog.

However, there is a caveat: What if you want to re-process the idea later? For example, I just recently revisited and reprocessed my “Road to the Milky Way” image that I originally worked on two years ago. I still had all those individual TIF files in a folder on my hard drive—that was a time-saver for me, because I didn’t have to re-export them all.

Road to the Milky Way. © 2019 Gabriel Biderman. Nikon D5 with an Irix 15mm f/2.4 lens. Foreground: 13 minutes, f/2.5, ISO 1600; background: nine frames shot at 25 seconds, f/2.5, ISO 6400 and stacked in Starry Landscape Stacker.

So there can be benefits to keeping or deleting those raw materials. The key is that whatever you do, have them organized. Whenever I create JPGs or TIFFs for third-party software or any other use, I always store them in a subfolder that is clearly marked so that I can find them down the road.

If you do delete those images, be sure you are deleting only those exported files—not your original RAW files.

Stacking in Photoshop is a different matter. For this you’re not creating multiple exported files and importing them, you’re instead opening a new Photoshop file with all those images as layers. This creates one very large file. So the question isn’t really about saving lots of individual files, but rather whether to save one giant file with tons of layers or to flatten the layers and save a smaller file. That’s a personal choice, and can be affected by circumstances.

I try to get all my layer editing adjustments done in one take, then flatten the file and save it back to Lightroom. However, if I am not done editing, or if I want to keep a version to revisit at a later date, I’ll save the layered file as a PSB (Photoshop’s large-file format), which Lightroom can absorb as part of the catalog. — Gabe

4. Value of Coast Flashlights

Question:

In your gear list and blog posts you pretty much always mention the Coast HP7R, Coast HP5R or another Coast flashlight for light painting. I’m curious why. If I have another brand of flashlight that has the same lumens output, what’s the difference? — Lynn

Answer:

You can use just about any flashlight for light painting, but we like Coast for the quality of the light (i.e, the high CRI value), as well as the precision of the focusing. Most flashlights have a lot of “spill” around a bright center spot, but Coast lights have a patented focusing mechanism that concentrates the light more intensely, as well as evenly across the beam with less spill around the edges. This makes for much more control when light painting. — Lance

5. Is a Leveling Base Redundant?

Bryce Canyon pano. © 2019 Matt Hill. Nikon Z 6 with a Zeiss 15mm Distagon f/2.8 lens. 14 stitched frames shot at 16 seconds, f/2.8, ISO 6400.

Question:

I read your blog post on night panoramas and I have a question. I have a Really Right Stuff TVC34L tripod with a BH-55 ball head, both with levels. Do I also need a leveling head? — Brien

Answer:

Technically you do not need to have a leveling base if your tripod gets leveled first. After that, anything mounted to it will pan without tilting to the left or right.

However, sometimes it’s annoying to have to separately adjust three legs to level the tripod, especially on uneven ground. Seriously. That’s the moment you wish you had a leveling base. It’s pretty much always faster to level with one. I find them invaluable when I’m serious about shooting for pano stitching.

If you shoot panos only occasionally and you’re willing to tolerate the minute adjustments to legs and then checking the bubble level on top of the tripod over and over, then no sweat—it can be tedious, but it’s easy enough. But if panos are going to be a regular thing for you, a leveling base will improve the experience.

For the record, I use the Acratech Leveling Base. I love it. — Matt

Chris Nicholson is a partner and workshop leader with National Parks at Night, and author of Photographing National Parks (Sidelight Books, 2015). Learn more about national parks as photography destinations, subscribe to Chris' free e-newsletter, and more at www.PhotographingNationalParks.com.

UPCOMING WORKSHOPS FROM NATIONAL PARKS AT NIGHT

Five Questions: Coast Flashlights, Lightning, Custom Menus and More

Everyone knows the answers to some questions, and below you’ll find five of the answers we know. That might sound impressive, but it took all five of us to answer these, so …

This installment of our “Five Questions” series features inquiries about Coast flashlights, lightning processing, custom menus, books and panos.

If you have any questions you would like to throw our way, please contact us anytime. Questions could be about gear, national parks and other photo locations, post-processing techniques, field etiquette, or anything else related to night photography. #SeizeTheNight!


1: Which Coast is King?

coast_hp5r_master.png

Q: If you could have only one model of the Coast flashlight, what would it be? — Larry B.

A: If I could have only one, it would be the HP5R. It has two brightness settings, is bright but not too bright, feaures a focusing beam and sports a rechargeable battery. For another $10, I'd also get the low-powered G9 and use that for shooting in moonless astro-landscape situations and for seeing in the dark without ruining night vision. — Lance

2: Layering Lightning

Lightning at Devils Tower National Monument. © 2019 Matt Hill. Nikon Z 6 with a Sigma 35mm f/1.4 Art lens. Six stacked frames photographed at Bulb, f/8, ISO 200.

Q: There’s a photo on your website you made at Devils Tower—how did you get the lightning in the shot? Did you just stack the exposures in Photoshop then use the Lighten blend mode? Or did you use some light detector to trigger the shots? — Ed F.

A: The former. I composed, set the aperture and ISO for a good lightning strike, then let the camera run through continuous shots. I set the camera to Bulb mode, then I held the shutter open until a bolt hit, and then I closed the exposure and immediately started another.

Why did I just keep the shutter open for, say, 30 seconds each time? I didn’t want too many strikes in one frame, because that would make it harder to select specific strikes to composite later.

As for post-production, your hunch is right— it works exactly like stacking star trails. Open all the images as layers in Photoshop, select all the layers and then change the blend mode to Lighten. I then used layer masks to call out specific strikes and block out everything else. — Matt

3. Custom Menu Contents

Q: Regarding your recent post “Five Field Tips to Make Night Photography Go a Little Smoother,” could you elaborate on which menu options you include on your custom menu? — Larry B.

A: As I mentioned in the post, I set the custom menu in my camera with the settings I use most often, so I can access them quickly in the field. Here is the list of what I include in my Nikon Z 6 custom menu:

For night photography

  • Long Exposure Noise Reduction

  • Monitor Brightness

  • Viewfinder Brightness

For general photography

  • Format Memory Card

  • Auto Bracketing

  • Double Exposure

  • Focus Peaking

  • Clean Image Sensor

For comparison, here’s what Chris includes in his Nikon D5 custom menu:

  • Virtual Horizon

  • Monitor Brightness

  • Long Exposure Noise Reduction

  • Exposure Delay Mode

  • Self-Timer

Remember, every camera is different, so your camera might allow you to easily access some items that I find more difficult to access on mine. You also might not use some features that I do, and vice versa. But this is all exactly why the custom menu is so powerful—it’s custom to exactly what you want! — Tim

4. The Elephant Book in the Room

Q: Thank you for the recent awesome blog post and video on night photography books. That combined three of my favorite things: history, books and art. Another night photography-related book you may find interesting is Thirty Times a Minute by Colleen Plumb. She photographed images of captive elephants projected onto landscapes. I found it a very unique way to shoot at night, and her stories about the elephants are touching. — Vince G.

A: One look at the production and importance of Thirty Times a Minute and I had to add it to my cart! I love that the publisher added a video walk through of the book.

Not all art fits inside a book, and when you look at Colleen's projections, you have to ask how these moving images become two-dimensional stills. I love the “transparency” images, though I'm curious what it would have looked like to have the transparency of the original film placed over where it was projected—like those history books wherein you lift the transparency of what it used to look like to reveal what it looks like now.

I’m glad you like our coverage of our favorite night photography books and the Bookshelf page on our website. Books can be a universal inspiration, and this was a long-overdue project that we were excited to share and that we want to continue to grow. — Gabe

5: Full Moon Pano

Ubehebe Crater, Death Valley National Park. © 2020 Chris Nicholson. Nikon D5 with a Nikon 14-24mm f/2.8 lens at 24mm. Eleven stitched frames photographed at 10 seconds, f/5.6, ISO 2500.

Q: Thank you for the many instructive and inspiring blog posts, and particularly for this one about Ubehebe Crater. Either you planned well or were lucky to be there during a full moon. Could you have gotten a good image with quarter moon? Crescent moon? No moon? — Paul B.

A: Did I plan or was I lucky? A little bit of both.

I made that pano during a workshop, which we had planned for a moonlit week. We love light painting under moonlight, and Death Valley has a lot of subject matter conducive to that strategy. But shooting at the crater on that particular date during moonlight was just a matter of using the conditions at hand in the best way possible.

In other words, while planning for a specific photo has plenty of merits, successfully shooting as a long-term endeavor can have less to do with sticking to strict guidelines about when to shoot and more to do with knowing what and how to shoot in different conditions. With the latter approach, I can be productive regardless of the situation. So, I didn’t plan to be at Ubehebe Crater during a full moon so I could shoot that pano; rather, I was at Ubehebe and knew what I could and couldn’t do under the full-moon sky I was presented with.

And yes, I definitely could have made the image under a quarter or crescent moon, when the light is even gentler. I just would have needed to shoot at a higher ISO to keep the stars sharp. Honestly, I may have preferred that, because the sky would have revealed even more stars. Next time! Because successful photography can also be about going back to re-shoot in different conditions. 😃 — Chris

Chris Nicholson is a partner and workshop leader with National Parks at Night, and author of Photographing National Parks (Sidelight Books, 2015). Learn more about national parks as photography destinations, subscribe to Chris' free e-newsletter, and more at www.PhotographingNationalParks.com.

UPCOMING WORKSHOPS FROM NATIONAL PARKS AT NIGHT

Five Questions: Flashlights, Big Bend, Fireflies and More

Once again, we’re ready to take a swing at the questions you pitch. This installment of our “Five Questions” series features inquiries about light painting tools, built-in timers, hot parks, dewy lenses and bright bugs. If that all seems fuzzy, read on and it will all come into focus.

If you have any questions you would like to throw our way, please contact us anytime. Questions could be about gear, national parks or other photo locations, post-processing techniques, field etiquette, or anything else related to night photography. #SeizeTheNight!

1. Shedding Light on Coast

The Twins, Capitol Reef National Park. Nikon D750, Zeiss Distagon 15mm f/2.8, Coast HP7R flashlight. 26 seconds, f/3.2, ISO 6400. © 2018 Matt Hill.

Q: Can you tell me what you like in particular about Coast flashlights? Other than sturdy durability, which seems obvious. Are the beams adjustable? The couple of times I’ve fooled around with light painting, I found it was difficult to be exact with what I had. — Therese I.

A: You hit it the nail on the head. The Coast flashlights feature an adjustable zoom optic. At its widest, it is an even illumination with a crisp edge. This is fantastic for slowly illuminating a large area evenly. At its narrowest, it is very intense with a rapid falloff from center to edge. This is ideal for lighting something distant.

We often add a Light Painting Brushes Universal Connector as a snoot for very small detail work, or we cup our hands around the end and squeeze open a small crack for fine lighting work. On top of that, Coast lights are waterproof and the rechargeable versions have long-lasting batteries you can charge via USB.

The only downside is that the color temperature of Coast lights is kind of cool for night photography work. But a small CTO gel fixes that. Warms it right up. (You can read more about this in Tim Cooper’s blog post “Level Up With Light Painting: Correcting the Color of Your Flashlight.”)

Light painting is part science and part art. Exact is something you obtain only after thousands of hours of practice. And even then it’s generous to call the craft exact. — Matt

2. Built-In Intervalometers

Q. I just got a Fuji X-T2 and I have a question. Do I still need an intervalometer? There’s one built in, so I’m not sure if I need another. — Anne K.

A: Generally speaking, the built-in intervalometers are more complex to use than an external intervalometer. There’s also the issue that in many cameras, the length of the shutter speed is limited (often to a maximum of 30 seconds) with the internal option. Not ideal for long-exposure work.

However, with the X-T2 in particular, I’ve used the built-in intervalometer with star stacks and had no problem. The built-in shutter speeds for that camera (with the latest firmware upgrade) go to 1 minute, 2 minutes, 4 minutes, 8 minutes, 15 minutes! It’s awesome. If you are comfortable with the internal option, then go for it! If not, nothing wrong with using an external option. — Chris & Tim

3. Big Bend in Summer

Agave on the South Rim, Big Bend National Park. Nikon D850, Nikon 14-24mm f/2.8. 2 minutes, f/5, ISO 1000. Light painted with a Coast HP7R. © 2018 Chris Nicholson.

Q: I noticed you haven’t offered a workshop at Big Bend last year or this year. I am headed there this summer in hopes of photographing the Milky Way and other nighttime objects under a new moon sky. Do you not offer workshops there because the location just isn’t that great? I’m wondering if you’d turn me on to any spots that are preferred for astro-landscape photography. — Alison C.

A: It’s not that we don’t offer a workshop in Big Bend, just that we haven’t yet. I can assure you that this Texas park is amazing for photography, day or night.

However, as for your trip, not to dissuade you, but summer is an incredibly uncomfortable time of year to be in Big Bend. There’s always a chance that you’ll catch a break with the weather, but generally summer there is stifling and unbearable. Moreover, that same heat at night will likely create considerable long exposure noise in your Milky Way photos. I’d avoid any exposures over 30 seconds or so (depending on your camera), and I’d certainly use Long Exposure Noise Reduction.

As for locations, probably the best in the park is the South Rim, but I wouldn't advise hiking out there in summer. There are a lot of fantastic spots accessible via the primitive roads, but again, I can’t advise venturing out those ways at this time of year, because of safety in the extreme heat should the car break down or get a flat tire.

However, you can find plenty of great spots to photograph that are closer to the safety of the main roads. I would definitely check out the Chisos Basin and Santa Elena Canyon, and you can find interesting ruins in the surrounding towns that are good for light painting.

No matter where you go, always have a good supply of extra water in the car—not just enough to drink for the shoot duration, but enough to drink in desert heat should you run into car issues. Have I mentioned this place is hot in summer? — Chris

4. Aurora and Condensation

Aurora, Westfjords, Iceland. Nikon D750. © Lance Keimig.

Aurora, Westfjords, Iceland. Nikon D750. © Lance Keimig.

Q: I’ve taken an interest in nighttime photography in Canada to capture the aurora. It appears to my eyes to be just a white glow (only my rods are sensing the light), but when I take the photo, voila, it is green! One of the main problems I’ve had—both in Yellowknife, Northwest Territories, in February (-24 C), and in Ontario in September—is condensation on my lens or filter as the camera cools off. I recently purchased a wrap-around lens heater, and am excited to try it in Ontario this August during the Perseids meteor shower. — Gil J.

A: Yes, faint aurora can be hard to differentiate from plain old clouds sometimes, which is why using an app like Aurora Forecast can give you a heads-up to be on the lookout.

As for lens wraps for condensation, they can make the difference between the end of your night and a killer shot. Once the temperature reaches the dew point, condensation can form quickly. I’ve been in situations where I had to wipe the lens mid-exposure, which can introduce all sorts of problems. For a DIY version, I’ve cut a beer koozie so it can wrap around the lens, and put a chemical hand warmer inside. Sometimes even a hand warmer with a rubber band to hold it to the lens will work in a pinch! — Lance

5. Fireflies

Fireflies in Cuyahoga Valley National Park. Nikon D3s, Nikon 24-70mm f/2.8. 90 seconds, f/2.8, ISO 1600. © 2018 Chris Nicholson.

Q: I have a pressing summer question: How does one photograph fireflies? I’ve seen them and I want to try it! — Susanne H.

A: That’s a fun question, and definitely a fun thing to do. We’re about to start our workshop on the Blue Ridge Parkway, and we’re hoping to see some fireflies on those mountain nights!

I recommend a few strategies:

  • Get into into a dark, wooded area, or at the edge of one, that has lots of firefly activity.
  • Focus on the closest trees or a solid subject.
  • Use a fast telephoto lens, like a 70-200mm f/2.8, so that you can zoom into the area of activity and concentrate a bunch of fireflies in the frame. I was recently trying with a wide-angle lens and didn’t get any good results.
  • Shoot wide open to collect all the light.
  • To really maximize the effect, shoot a lot of frames and stack them in Photoshop (using the Lighten blend mode, just like we do for star stacking).

Have fun and please share your results in the Comment section! — Gabe

Chris Nicholson is a partner and workshop leader with National Parks at Night, and author of Photographing National Parks (Sidelight Books, 2015). Learn more about national parks as photography destinations, subscribe to Chris' free e-newsletter, and more at www.PhotographingNationalParks.com.

UPCOMING WORKSHOPS FROM NATIONAL PARKS AT NIGHT