Adobe Photoshop

Size Matters: Understanding Image Resolution, and Why and When to Boost It

This week we’re showcasing post-processing. Want to learn even more about developing your digital photographs? Join Tim Cooper and Chris Nicholson on the Seattle waterfront this July for a weeklong Post-Processing Intensive workshop, including night shooting along the city shores of Puget Sound.


As we discussed in a recent blog post (“Supersize Me: Adobe Brings Us High-Quality Quadruple Enlargements”), Adobe’s new Super Resolution is a fantastic new tool to enlarge images for print. But how do you know when it’s needed? For a full understanding of image enlargement, we need to take a deep dive into file size, resolution and image resizing.

File Size and Resolution

The size of a file is talked about in several different ways. You could talk about the megapixels, megabytes or even file dimensions (width x length). For example, a photo from my Nikon Z 6 can be said to be a 25-megepixel file, or a 45-megabyte file, or a 6048 x 4024 file. In Figure 1 you can see how the Metadata panel in Lightroom shows a Z 6 image as having a file size of 44.93 megabytes and dimensions of 6048 x 4024.

Figure 1. Metadata panel in Lightroom.

If any of this seems unintuitive, then think of a piece of 4x8 plywood. It measures 4 feet wide and 8 feet long. Its area is 32 square feet. In addition, it has a certain weight.

Likewise, my Z 6 file is 6048 x 4024. It measures 6,048 pixels wide and 4,024 pixels high. Its area is 25 megapixels (6,048 pixels x 4,024 pixels = 24,337,152 pixels = 24.34 megapixels). Its “weight” is 44.93 megabytes.

Figure 2. 6048 x 4024 = 24.34 megapixels.

“Resolution” is the number of pixels in an image, expressed either as a total number or as dimensions (width x height). My Z 6 creates an image with a resolution of 25 million pixels (25 megapixels). But while megapixels is a great term for advertising camera models, as photographers we’re better served thinking in file dimensions.

Image Sizing

Screens and printers create images in very different ways. Screens are measured in pixels per inch (ppi) while printers are measured ­in dots per inch (dpi). Regrettably, these terms are often seen as interchangeable, even though they are not.

Screen Resolution

For example, my BenQ SW270C is a 27-inch monitor. Its resolution is 3840 x 2160. This means that the screen has 3840 pixels across its length and 2160 pixels from top to bottom.

Figure 3. Pixel dimensions of a BenQ SW270C photo monitor.

When you enlarge your image in Lightroom or Photoshop to 100 percent, you see only a portion of the photograph. This is because images from modern cameras have a higher resolution, or a higher pixel count, than the monitors they are displayed on.

At 100 percent magnification, one pixel on the monitor represents one pixel of the image. For this reason, 100 percent is sometimes called “actual pixels.” Figure 4 shows what is really happening behind the scenes: The image is much larger than the screen resolution can show at 1-to-1, so we see only the portion of the pixels that fit onto the screen.

Figure 4. The actual image size compared to the resolution of the monitor.

When you are viewing at 100 percent you are getting a very accurate view of the quality of your image. This is why it’s important to perform certain tasks such as noise reduction, sharpening and spot removal at this magnification.

These days tablets and phones are also used to view imagery. These devices have even less resolution than your computer monitor. Because modern cameras have such high resolutions, and because screens have comparably smaller resolutions, it’s very rare that you would need to enlarge or use Super Resolution on your photos just to view them on computer monitors or mobile devices.

Print Resolution

Printing, however, is a different story. Printers need a bigger file to create a quality image. To understand why, let’s look at the printer’s resolution. All printers (even the professional ones at labs) have a resolution of 300 dpi, with the sole exception being Epson printers, which print at 360 ppi.

The easiest way to understand the relationship between ppi and dpi is to look at the image in Photoshop’s Image Size dialog (Figure 5). To get there:

  1. In Lightroom select your image and choose Photo > Edit In > Edit in Adobe Photoshop.

  2. Once your image opens in Photoshop, choose Image > Image Size.

Figure 5. The Image Size dialog in Photoshop.

Notice the familiar pixel dimensions of 6048 x 4024. To see how large a print you can make from this file (without enlarging), simply change Pixels to Inches, and enter the ppi of your printer in the Resolution field. In this case (Figure 6), I can see that I could make a print of 13x20 inches on a 300 dpi printer without having to enlarge the image. (Or, as we see in Figure 7, I could make an 11x17 print on a 360 dpi Epson.)

Figure 6. This file could be printed at 13x20 on most printers.

Figure 7. The same file could be printed at 11x17 on an Epson printer.

Resizing Your Photographs

Changing the size of your images is completely normal. It actually happens often without you even realizing it. If you send a full-size JPG to Bay Photo and ask them to make a 30x45 print, they resize it. Every time you upload an image to Instagram, unless you specifically pre-size your image to 1080 pixels square, then it’s resized for you. Images you see on any website have all been resized.

Simply put, resizing is either throwing out or adding pixels to an image to make it fit its eventual use.

For example: Instagram currently displays images at a resolution of 1080 x 1080. To display my Z 6 image of 6048 x 4024 pixels on Instagram, it needs to be downsized (throwing out pixels). Conversely, to make a 30x45 print on a 300 dpi printer, my native resolution (as we saw in Figure 6) of 13x20 is not enough. I’d need to upsize it (adding pixels).

The act of upsizing or downsizing is also called “resampling.” Resampling can be done to an image in Photoshop or when exporting from Lightroom.

Resizing in Photoshop

When you want to resize an image using Photoshop, open the Image Size dialog seen in the above examples. If the Resample box is checked, then changing the pixels or inches will add or remove pixels from the image. Figure 8 shows that with the Resample box checked, changing the pixels to 1080 in width downsizes the image from 139.3 megabytes to a mere 4.44 megabytes.

Figure 8. The Image Size data shows how changing the width to 1,080 pixels downsizes the file from 139.3 megabytes to 4.4 megabytes.

Likewise, if you were making a print, you would open the Image Size dialog, change Pixels to Inches, and type in the desired width or height. Figure 9 shows that changing the height of this image to 30 inches will enlarge the file (adding pixels) from its original size of 139.3 megabytes to 696.6 megabytes.

Figure 9. The Image Size data shows how changing the height to 30 inches upsizes the file from 139.3 megabytes to 696.6 megabytes.

Notice that the aspect ratio in both cases has stayed the same. This image (as with most digital cameras) has an aspect ratio of 2x3. As long as the chain icon (circled in red in Figure 10) stays locked, then changing either the height or width will also change the other proportionally.

Figure 10. The chain icon on the left is locked, which keeps the aspect ratio constant. On the right the chain is unlocked, meaning you could disproportionately squeeze or stretch your image while resizing.

Resizing in Lightroom

If you want to resize with Lightroom instead, then you need to export the image (Figure 11):

  1. Select your image and choose File > Export, or click the Export button at the bottom left of the screen.

  2. In the Image Sizing section, check the Resize to Fit box and type your desired pixel length.

Figure 11. Exporting and resizing an image using Lightroom.

You have many choices within the Image Sizing box (Figure 12). If you want to size an image to use it on a screen (such as a monitor, website, Instagram, etc.), then all you care about is the number of pixels—the Resolution section, or pixels per inch, is irrelevant. Whether that’s set at 72 or 300 will have zero impact on your file and how it appears on a screen.

Figure 12. Options for resizing within the Image Sizing box.

However, if you want to size that file for print, then the Resolution section of this dialog becomes very important. Here’s the process:

  1. Select your image and choose File > Export, or click the Export button at the bottom left of the screen.

  2. In the Image Sizing section (Figure 13), check the Resize to Fit box and change “pixels” to “in” (i.e., inches).

  3. Type your desired length.

  4. Choose either 300 or 360 for Resolution (to match the dpi of the printer).

Figure 13. The proper settings for enlarging a file to make a 30x45 print for a 300 dpi printer.

As we saw earlier, if I wanted to use a file from my Z 6 to make a print larger than 13x20 on a 300 dpi printer, or 11x17 on an Epson printer, then I would need to upsize that file. Of course, if I crop the file, then I might need to upsize even for smaller print sizes. Figure 14 shows the same file that has been cropped. Now I could make only a 10x15 print—for anything larger, I would need to add pixels by resampling.

Figure 14. Our example image has been cropped. Now the maximum print size would be 10x15 at 300 dpi. If I wanted to print larger, I would need to upsize the cropped photograph.

Super Resolution

The problem with all of this is that from the beginning of digital photography, enlarging, or resampling, has been an obstacle. No one has yet found a way to add pixels to the resolution of an image that results in the same quality as the original, smaller file.

But programmers have always been chasing that goal. In the late 90s, third-party solutions such as Genuine Fractals were the answer. Then Photoshop caught up, and could produce the same quality with its upsizing algorithm. Then Adobe made that even better with the Preserve Details tool. All of these options (and more) were better than the previous best options, and that improvement continues with Super Resolution.

In short, Super Resolution is a superior way to enlarge your images, in the cases where you need to do so—which, as you’ve seen above, is only when you are making large prints.

A trip to Photoshop’s Image Size dialog will give you all of the information that you need to make the decision to upsize or not. If the answer is yes, then, for the best results, refer to my previous post on using Super Resolution.

And then what comes next? Keep an eye out for another upcoming post on this topic, wherein we’ll further explore image upsizing and demonstrate how to properly sharpen your upsized images for printing.

Tim Cooper is a partner and workshop leader with National Parks at Night. Learn more techniques from his book The Magic of Light Painting, available from Peachpit.

UPCOMING WORKSHOPS FROM NATIONAL PARKS AT NIGHT

Five Questions: Super Resolution, Ghosts, Intervalometers and More

If you have questions, we have either answers or opinions, and we’re not shy to share either.

This installment of our “Five Questions” series features inquiries about Adobe’s new Super Resolution, the work of Alexey Titarenko, Milky Way lenses for the Nikon Z 7, intervalometer recommendations, and the efficacy of carrying two Coast flashlights.

If you have any questions you would like to throw our way, please contact us anytime. Questions could be about gear, national parks and other photo locations, post-processing techniques, field etiquette, or anything else related to night photography. #SeizeTheNight!


1. Seeing Quadruple

Question:

Regarding your post about Adobe’s new Super Resolution feature, I was surprised to see the headline mention “quadruple” enlargements. I thought the new feature was “2X.” Did I read it wrong or misunderstand the feature announcement? — Robyn

Answer:

It’s just a math thing. You are correct that Super Resolution doubles the pixel count of an image in both the horizontal and vertical linear directions. For example, a 200 x 300 image would become 400 x 600.

That results in the total area of the image being quadrupled. In that same example, the resolution would go from 60,000 square pixels to 240,000 square pixels—i.e., quadruple, or four times the number of pixels. See the image above for a graphical representation. — Chris

2. Ghosts in the Composition

Question:

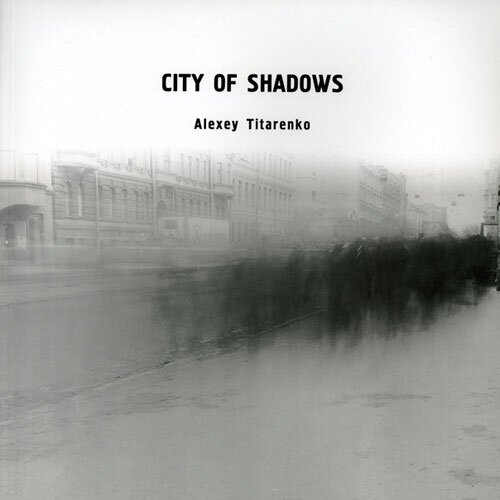
I am trying to mimic Alexey Titarenko’s work, especially the movement he puts in. I used native ISO, an appropriate aperture and a long shutter. Would you mind giving me help in this type of work? — David C.

Answer:

I assume you are talking about Alexey’s “City of Shadows” series. Interesting human movement happens in exposures from 1/15 to 15 seconds, because most people can’t hold truly still for more than 1 to 2 seconds.

In order to create the “ghosts and shadows” effect that Alexey is getting during daytime, you need to use a 3-, 6- or 10-stop neutral density filter to allow for a long enough exposure. Operating under overcast skies will help, as will lots of experimentation.

A lot depends on how much stillness you want to show in the chaos of movement. That is important. For example, for Alexey’s shot of the handrail, it was critical that the rail remain sharp amid the mass of bodies moving past. It works beautifully. However, many of his other photographs feature just a little movement, which allows him to capture a “soul” that is still.

On the other hand, reaching longish shutter speeds like that at night is easy, because you’re already working with minimal light. In fact, the challenge in dark conditions is actually adding light so you can see the human subjects in all that darkness. For more info on how to do that, see my blog post “Photographing Phantoms.” — Gabe

3. Z 7 Milky Way Glass

Question:

I have a Nikon Z 7 and would like to try Milky Way photography this summer. I have the Nikon Z 14-30mm f/4 S lens and believe the f/4 aperture will not be fast enough to prevent star streaking. Would the Nikon Z 20mm f/1.8 S or the Irix 15mm f/2.4 be an acceptable alternative? — Jerry

Answer:

You’re right that the f/4 lens will be very limiting for star-point images in general. They would require you to shoot at an ISO of 12,800, which I would not recommend with the Z 7 unless you’re planning to stack multiple frames in software such as Sequator or Starry Landscape Stacker. Since you have a Z 7, I suggest going with a native Z lens. Though I haven’t shot with most of them, word is that they’re all truly outstanding.

I have not shot with the Z 20mm f/1.8,  but I love that focal length for Milky Way. So I think that either that lens or the more-expensive Nikon Z 14-24mm f/2.8 would be your best bets.

The Irix lenses are excellent, though they require an adapter to use on a Z-mount camera. (Irix will no doubt release Z-mount lenses in the future, but we don’t know how near that future is.)

If you’re still stuck about which lens to buy, you could always rent to try before committing. We can recommend Borrow Lenses or Lens Rentals. — Lance

4. Intervalometer Recommendation

Question:

I just reviewed your 2017 article on wired versus wireless intervalometers. Are you still recommending the wired Vello Shutterboss II? — Hadley

Answer:

Yes, it’s still on the recommended list for wired intervalometers. Though it does share the one weak spot of all wired intervalometers, which is the connection point to the unit, which often wears down over time.

If you’re open to a wireless solution instead, my favorite intervalometer overall is the Phottix Aion. Not only does it not suffer from that weak spot, but it also allows for exposures of fractions of seconds, which is useful when shooting with NPF Rule shutter speeds.

To learn more about the Aion, see my post “A Better Intervalometer.”

Though I do champion my favorite, either of the above options will suffice. You really can decide based on your personal priorities and be happy and successful either way. — Matt

5. Are Two Coasts Better Than One?

Serpent—Borrego Springs. Nikon D4s with a Nikon 14-24mm f/2.8 lens set at 24mm, light painted at close range with a Coast HP7R flashlight. Three exposures at 15 seconds, f/4, ISO 6400.

Question:

I notice that you guys seem to all have both Coast HP7R and HP5R flashlights. I want to buy a more powerful small flashlight than I have now. Do you own both because the HP7R is too powerful for some applications? If you were to buy just one, which would it be? — Mark

Answer:

Yes, we all own both the HP7R and the HP5R because the difference in power is useful for different applications. The HP7R is a very bright flashlight (300 lumens), while the HP5R is less bright (185 lumens). Both have a second power setting that drops the output by 90 percent, so the combination essentially gives us four different lumen options.

How do we use this versatility? One example: If we’re shooting the Milky Way under a new moon (pitch black, no moonlight at all), then our apertures are very wide (f/2 or f/2.8) and we are using very sensitive ISOs such as 3200 or 6400. That makes 300 lumens overkill and more difficult to control, whereas 185 lumens can be very effective. You just don’t need a powerful flashlight for that kind of sensitive exposure.

An opposite example is when we’re shooting under the much brighter conditions of a full moon, when our apertures may be set to f/5.6 or f/8 and the ISOs to 100 or 200. These less-sensitive exposures require a stronger flashlight to paint the scene.

The different flashlights can also be more or less useful when considering the distance of the subject from where you’re light painting. A rock formation 100 yards away obviously requires a more powerful light than a flower 2 feet in front of you.

So yes, it’s nice to have both models to cover all the possible situations. But if you are looking to purchase just one, I would recommend one of these strategies:

  1. Purchase the more powerful HP7R and use some neutral density gels to knock down the power when needed. You can get a sample pack that contains all you might need for less than $10.  Remember, you can always make a bright flashlight dimmer, but you can’t make a dim flashlight brighter.

  2. Decide which conditions you favor for night photography. If you mostly shoot under a new moon, get the HP5R. If you find yourself doing a lot of work under brighter conditions (full moon, city scenes), purchase the HP7R.

Either way, both of these Coast flashlights are excellent night photography tools that are worth every dollar you spend on them. — Tim

Chris Nicholson is a partner and workshop leader with National Parks at Night, and author of Photographing National Parks (Sidelight Books, 2015). Learn more about national parks as photography destinations, subscribe to Chris' free e-newsletter, and more at www.PhotographingNationalParks.com.

UPCOMING WORKSHOPS FROM NATIONAL PARKS AT NIGHT

Pixel Perfect: 3 Workshops (1 Brand New!) for Leveling Up Your Processing Skills

Post-production. It’s the second rail of photography. But so many photographers chug along knowing only the very basics, honing just enough skill to get images off the camera and onto social media.

It’s understandable. In the film days, most people didn’t develop their own negatives nor make their own prints. So the transition to do-it-all-yourself in digital might not have been an obvious jump, nor even desired. Or maybe it’s that most modern photographers were introduced to post-processing via early versions of Photoshop, an anvil of software that’s hard and heavy to comprehend. Or maybe some photographers are just new to the game and haven’t yet had time to learn the keystrokes and mouseclicks that turn a series of 0s and 1s into an artistic masterpiece.

Regardless of the reason, plenty of folks with a great photographic eye could use more assistance learning how to turn RAW files into great photographic images.

National Parks at Night is here to help:

  • Since 2016 we’ve published post-production blog posts.

  • In 2019 we launched and ran our first Post-Processing Intensive workshop.

  • In 2020 we launched our first Lightroom Live online courses.

  • And now, in 2021, we are thrilled to announce our first Photoshop Live online course!

Here’s a rundown of all the post-production courses and workshops we’re running over the next few months. Want to level up? Come join us!


Photoshop Live

This sentence constitutes the very first time we’re publicly mentioning this brand new course—Photoshop Live: The Next Step in Post-Processing. This summer and fall, on a computer screen near you, we’ll teach how to take precise control of your images with skills such as:

  • understanding the architecture of Adobe Photoshop, including the different editing and selection tools

  • the strategy and best practices of using layers

  • mastering advanced local adjustments and masking

  • creating and editing star trail photographs

  • stacking light-painted images

  • blending Milky Way shots with blue hour foregrounds

  • and more!

We’re capping each session of the course at 12 attendees, so each will have a good amount of personal attention to their questions. And as a bonus, each attendee will receive one hour of one-on-one time to with an instructor.

tim promo benq.jpg

We’ll be running this course in sessions of four classes, each 2 hours long, on Tuesdays and Thursdays for two consecutive weeks. As of now, we’re offering three sessions:

Session 1: July 13, 15, 20 and 22 (waitlist only)

Session 2: October 19, 21, 26, 28

Session 3: December 7, 9, 14, 16

This Photoshop course is a perfect successor to our Lightroom Live course, the next session of which will be held in May (see below). So you could take both courses and—in just 16 online sessions—become proficient in these two pillars of digital photography!

For more information, see our Photoshop Live webpage by clicking here:


Lightroom Live

We launched this course last spring, and we ran three sessions of it in 2020. Now we’re offering it again—an online course designed to teach Adobe Lightroom, the most important piece of software for photographers, focused on the two most important modules, Library and Develop.

Learn everything from how to import and organize your images, to how to develop them with both basic and advanced tools and techniques. We’ll cover:

  • understanding the Lightroom catalog

  • making full use of the Library module in Lightroom, including keywords and collections

  • gaining a complete understanding of Lightroom’s Develop module

  • mastering advanced adjustments using the local adjustment tools

  • and more!

Again with this course, the session will be capped at 12 attendees in order to ensure personal attention. Each attendee will also receive one hour of one-on-one time to with an instructor, plus a free copy of our video Lightroom: Correcting Your Catalog Chaos.

Just like with Photoshop Live, we’ll be running Lightroom Live in four classes, each 2 hours long, on Tuesdays and Thursdays for two consecutive weeks. The dates are May 18, 20, 25 and 27.

For more information, see our Lightroom Live webpage by clicking here:


Post-Production Intensive: Seattle

If you want a really deep dive into both Lightroom and Photoshop, in a vibrant and beautiful location, then join us in Seattle this July for the only Post-Production Intensive workshop we’re running in 2021.

While the online courses mentioned above each entail 8 hours of total instruction, the Post-Production Intensive workshops involve 6 full days of on-site, hands-on instruction in Lightroom and Photoshop.

Moreover, on at least a couple of nights, we’ll head out as a group to photograph the urban scenery of the Seattle waterfront. That’ll be pretty easy to get to, as we’re staying in a gorgeous hotel right on the city shores of Puget Sound, in walking distance from great shoot locations, scrumptious food and plenty of baristas pressing that famous northwest espresso.

For more information, see our Post-Processing Intensive: Seattle webpage by clicking here:


Other Opportunities

We also have other ways to learn about post-processing! Including:

Night Photo Summit Replays

In February we ran the very first online conference dedicated to night photography, the Night Photo Summit! All 43 presentations from the online conference are available as streaming videos with the purchase of a Replays ticket.

Of those 43 presentations, half a dozen are heavy on post-production, from basics such as “Capturing and Processing the Milky Way” by Tim Cooper and “Noise-Reduction Strategies for Night Photography” by Michael Frye to more advanced topics such as “Blue Hour Blends & Composites” by Jess Santos and “Creating a Basic Time-Lapse Video” by David Marx.

Meteor Shower e-Book

Four meteor showers in 2021 will rate as decent to excellent for photography, including the Eta Aquarids in May! Do you know how to shoot and process a meteor shower radiant? You can learn in our e-book Great Balls of Fire: A Guide to Photographing Meteor Showers.

Blog POsts that were and Will Be

As mentioned earlier, we’ve written a few blog posts on post-production, all available to read for free anytime you want. Some examples:

To see what we’ve done in the past, here’s a link to all our posts. Scroll down to the Post-Production section to see the 22-and-counting titles we’ve written about the topic.

And … you caught the “and counting” part, right? We have more on the way! (Tips on printing, anyone? How about using Sequator for sharp stars? Keep your eyes peeled right here.)

Chris Nicholson is a partner and workshop leader with National Parks at Night, and author of Photographing National Parks (Sidelight Books, 2015). Learn more about national parks as photography destinations, subscribe to Chris' free e-newsletter, and more at www.PhotographingNationalParks.com.

UPCOMING WORKSHOPS FROM NATIONAL PARKS AT NIGHT

Supersize Me: Adobe Brings Us High-Quality Quadruple Enlargements

This week we’re showcasing an exciting new feature from Adobe. Want to learn even more about developing your digital photographs? Join Tim Cooper and Chris Nicholson on the Seattle waterfront this July for a weeklong Post-Processing Intensive workshop, including night shooting along the city shores of Puget Sound.


The folks at Adobe have done it again. They’ve taken a good process and made it even better. This time they have made use of advance machine learning to drastically increase the quality of enlarged images in a new process called Super Resolution.

If you’ve been paying attention to news in the photography world this past week, then you already know all of that. But what we wanted to know is this: How well does Super Resolution work with night photos?

Let’s have a look …

What is Super Resolution?

Super resolution is a new process that enlarges your image files while maintaining (creating!?) an extremely high level of detail. (For more info, see Adobe’s explanation.)

Over the years, Adobe has done a great job of tweaking and creating new algorithms for enlarging image files, but this time they have outdone themselves. A direct side-by-side comparison of enlarged photographs shows the superiority of this new process, even in finicky long-exposure and high ISO images. You can see the difference between the newer Super Resolution files and the same files upsized with Adobe’s previous enlargement algorithm, Preserve Details (enlargement), in Figures 1 through 3. (These are best viewed on a larger display to more clearly differentiate the results.)

Figure 1: Lighting painting, ISO 200. This shows an upsized image at 100 percent (actual pixels), enlarged with both the old method and with Super Resolution. (Click to enlarge.)

Figure 2. Milky Way, ISO 6400. The traditionally upsized version appears a slight bit sharper, but the Super Resolution version shows much better grain structure. It’s always easier to add a bit of sharpening as opposed to trying to reduce noise, so again Super Resolution wins. (Click to enlarge.)

Figure 3. Moonlit landscape, ISO 6400. In this comparison the Super Resolution version shows better sharpness and a smoother sky.

As you can see in the above examples, overall the new process produces better detail and smoother gradients in the areas with less detail. Super Resolution does seem to add a bit more color noise in the shadows, but that’s easily remedied.

Who Needs Super Resolution?

While this is an awesome new feature, you may not have to use it all that often. You typically need to enlarge images only when making prints. Even the resolution of older cameras exceeds what’s needed for posting on websites and social media. So when you’re Instagramming, you don’t need this. But if you are making large prints from your files, you might want to use Super Resolution to upsize the file before you send it out or send it over to your home printer.

Another possible use would be upsizing images that have been dramatically cropped. I’m not talking about trimming a bit around the edges or cropping your image into a square, but rather a severe crop (you know, the kind of crop that you feel guilty about). Super Resolution can get those files back up to a more usable size.

How to Use Super Resolution

At the time of this writing, Super Resolution is available only through Adobe Camera Raw (ACR), but will soon be available in Lightroom as well. (We’ll keep you up to date. Be sure to watch our Facebook channel for the announcement.)

1. Launch Photoshop and choose File > Open.

2. Navigate to the desired RAW file and choose Open. This will open the image into the ACR editor (Figure 4).

Figure 4. Resulting ACR dialog after opening your RAW image in Photoshop.

3. Control-click (Mac) or right-click (PC) on the image and choose Enhance (Figure 5).

Figure 5.

4. In the resulting dialog, choose Super Resolution and then click Enhance in the lower right corner (Figure 6).

Figure 6. The Enhance Preview dialog.

5. Photoshop will create a new image from the original RAW file that is twice as tall and twice as wide as the original. Click on the resulting image to highlight it, then click Open in the lower right corner (Figure 7) to open the image into Photoshop.

Figure 7.

At this point you are back in Photoshop with an image that has four times as many pixels as the original, and is ready to be edited or printed.

Now What?

If you are ready to print through Photoshop, you are all set. File > Print will bring up all of the necessary dialogs for you to make a print on your home printer.

If you want to send out this file to a professional print house such as Bay Photo Lab, simply choose File > Save. A dialog will offer options of file type and location. I suggest saving the file in Photoshop format (i.e., PSD, for future use) and as a JPG to send to the lab. To keep things organized, save the file back into to its original folder.

At this point, Lightroom may not be aware that a new photo has been created from the original. If you would like to be able to access the image via Lightroom, open your catalog and navigate to the folder with the newly created file. In the Library module, Control-click (Mac) or right-click (PC) on the folder in the Folders panel and choose Synchronize Folder. Lightroom will see your new image and make it accessible.

If you want to just make a print, you can simply navigate (outside of Lightroom) to the folder with the new file, select the image and upload it to the printer of your choice.

The Long and Short of Super Resolution

Super Resolution is awesome—for making large prints. It is not a tool that is needed on a day-to-day basis. If you want to upsize an image to make a large print (say, 20x30 inches or larger), this should be your go-to tool. Likewise, if you have an image that has been severely cropped, Super Resolution can be a good way to regain the resolution needed to display the image as you envisioned.

Note: This blog post is a quick reference on how to use Photoshop’s new Super Resolution upsizing algorithm. It begs a lot of related questions, such as, “When is your current resolution not enough?” or even “What is upsizing?” For a deeper dive into understanding resolution and upsizing, keep an eye on our blog.

Tim Cooper is a partner and workshop leader with National Parks at Night. Learn more techniques from his book The Magic of Light Painting, available from Peachpit.

UPCOMING WORKSHOPS FROM NATIONAL PARKS AT NIGHT