Tools for Illuminating the Night: Building a Light Painting and Writing Kit

One of the most fun parts of being a night photographer is experimenting with light during long exposures. Some people do it for practical reasons, like adding light where it's dark. Some use it to add creative or artistic flair to an image. Whatever your purpose, I am going to show you how to build a kit for both painting and writing with light.  

I want to first establish some definitions:

Light painting: adding light to something within your frameβ€”e.g. shining lights on the grass, trees, people, rocks, etc. This light bounces off those objects, defines them, and comes back to the lens.

Light writing: turning your light source toward the lensβ€”in effect, you are "writing" with the light, capturing its vector, or path, through space in single or multiple exposures.

For the record, my definitions are not universally adopted or applied. Many people refer to "writing" as "painting." It's neither right or wrong, as long as we all get along. ;-) But for the purpose of this article, let's agree on the above.

I use both methods to make long exposures at night. Both practices have a practical purpose and identifiable effects.

Identifying Light Painting versus Light Writing

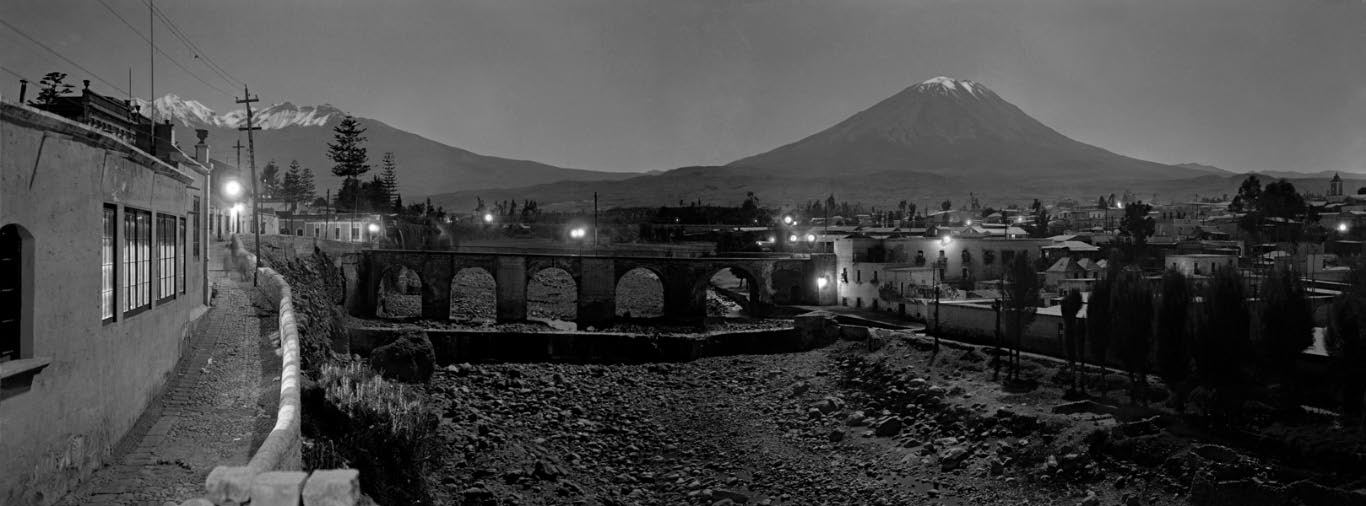
In Figure 1, you'll note that a proper exposure that does not blow out highlight details in the sky leaves the foreground lacking sufficient detail. Light painting to the rescue in Figure 2. Both images are from the backcountry of Valley of Fire State Park in Nevada. 

In Figure 3, you'll see a starlit scene with a Pixelstick used to light-write around a tree in the foreground.

Figure 3. The Windows at Arches National Park just before moonrise, with light writing done with a Pixelstick. 68 seconds, f/2.8, ISO 6400 with a Nikon D750 and Nikkor 16mm f/2.8 fisheye lens.

And just for fun, Figure 4 is an example where I played catch with my friend using a Frisbee with a blue LED in it. 

Figure 4. Three 2-minute exposures stacked. You try vigorously throwing a Frisbee for six minutes in Denver. I'm still catching my breath.

Figure 5. From left to right: Coast HP14 (629 lumens, 813-foot beam), Coast HP7R (300 lumens, 754-foot beam), Coast HP5R (185 lumens, 600-foot beam) and Coast A8R (low-power, 62-foot inspection beam).

Light Painting Starter Kit

If you're just starting out with light painting, let me be the first to say, "Welcome!" You're going to have a blast. You'll want just a few items to get you on your way to opening up more creative roads than you'll know what to do with. Here's what you need to get started:

1. One high-power flashlight with a tight or focusing beam for illuminating objects in the distance. I suggest 300 lumens or more. I use the Coast HP7R (Figure 5) most often.

2. One penlight for writing stuff in the air and for observing things on your camera. (I just fell in love with the Coast A8R, seen in Figure 5.)

3. One pack of Rosco sample gels to warm or cool your light temperature or to make funky colors.

4. Some gaffer tape. Because, you know, gaff solves nearly anything for a night.

Figure 6. Coast FL75R dual-beam focusing rechargeable headlamp.

Light Painting Advanced Kit

Wanna level up and get serious? Roll up your sleeves and bring a bigger bag. Include all of the above, plus:

1. One headlamp (Figure 6) for hands-free safety while trekking around in the dark, and/or for hands-free gear operation. Just be careful not to ruin anyone else's shots when wearing it. Or to blind them by looking at them when it's on.

2. One massively high-power flashlight for light-painting distant objects. I carry the Coast HP14 for this (Figure 5).

3. One kinda-low-light flashlight for delicate workβ€”around 100 to 200 lumens at most. See the Coast HP5R (Figure 5).

4. One good incandescent flashlight for painting with a warmer color temperature than sans-filter LEDs. It might stay in your bag a lot, but sometimes it's just the right solution.

5. One roll of Cinefoil. Cut some, fold it up and put it in the bottom of your bag. Use it to make your own snoots anytime.

LIGHT WRITING KIT

Mechanisms for light writing are a bit different, and come in all shapes, sizes and builds for varied situations. You can learn how to use these tools for their intended purposes, and then use them for anything else you can think of too. Creativity is the key.

Here are some good options to get ya going.

1. One Pixlelstick (I was backer No. 243 on Kickstarter!), or the similar Lumibrush, or any of the fabulous DIY LED arrays if you are technically inclined. (Figure 3.)

2. One Light Painting Brushes Deluxe Starter Kit. This collection of awesome creative tools will keep you playing around in the dark for months. It has everything from the essential Universal Connector (which alone is a great snoot to control light spill), to color cones, a fiber optic wand (I call it the light octopus) and a Jedi-esque light sword.

Figure 7. (No audio.) See the light-beam spread demo from a Coast HP7R, and a quick overview of Light Painting Brushes items mounted on same flashlight, with zoom in/out.

Figure 8. EL Wire.

3. EL Wire. It's inexpensive and makes soft, glowing trails like foxfire. Be careful, thoughβ€”it's sometimes delicate when transporting and swinging around.

Figure 9. Battery-powered Christmas lights.

4. Battery-powered Christmas lights. With the advent of LEDs, you no longer have to use C or D cells to power themβ€”now it's a pair of AA batteries (light!) and you're good to go. Swing them around to make orbs and light trails. I like to buy them for a dollar or so right after Christmas!

Additional Toys (um ... Tools)

Here is a brief list of other things you may consider using on your path to becoming the night photographer you aspire to be:

  • fire (be carefulβ€”and do not use inside national parks!)
  • fireworks (be even more careful, and be legal!)
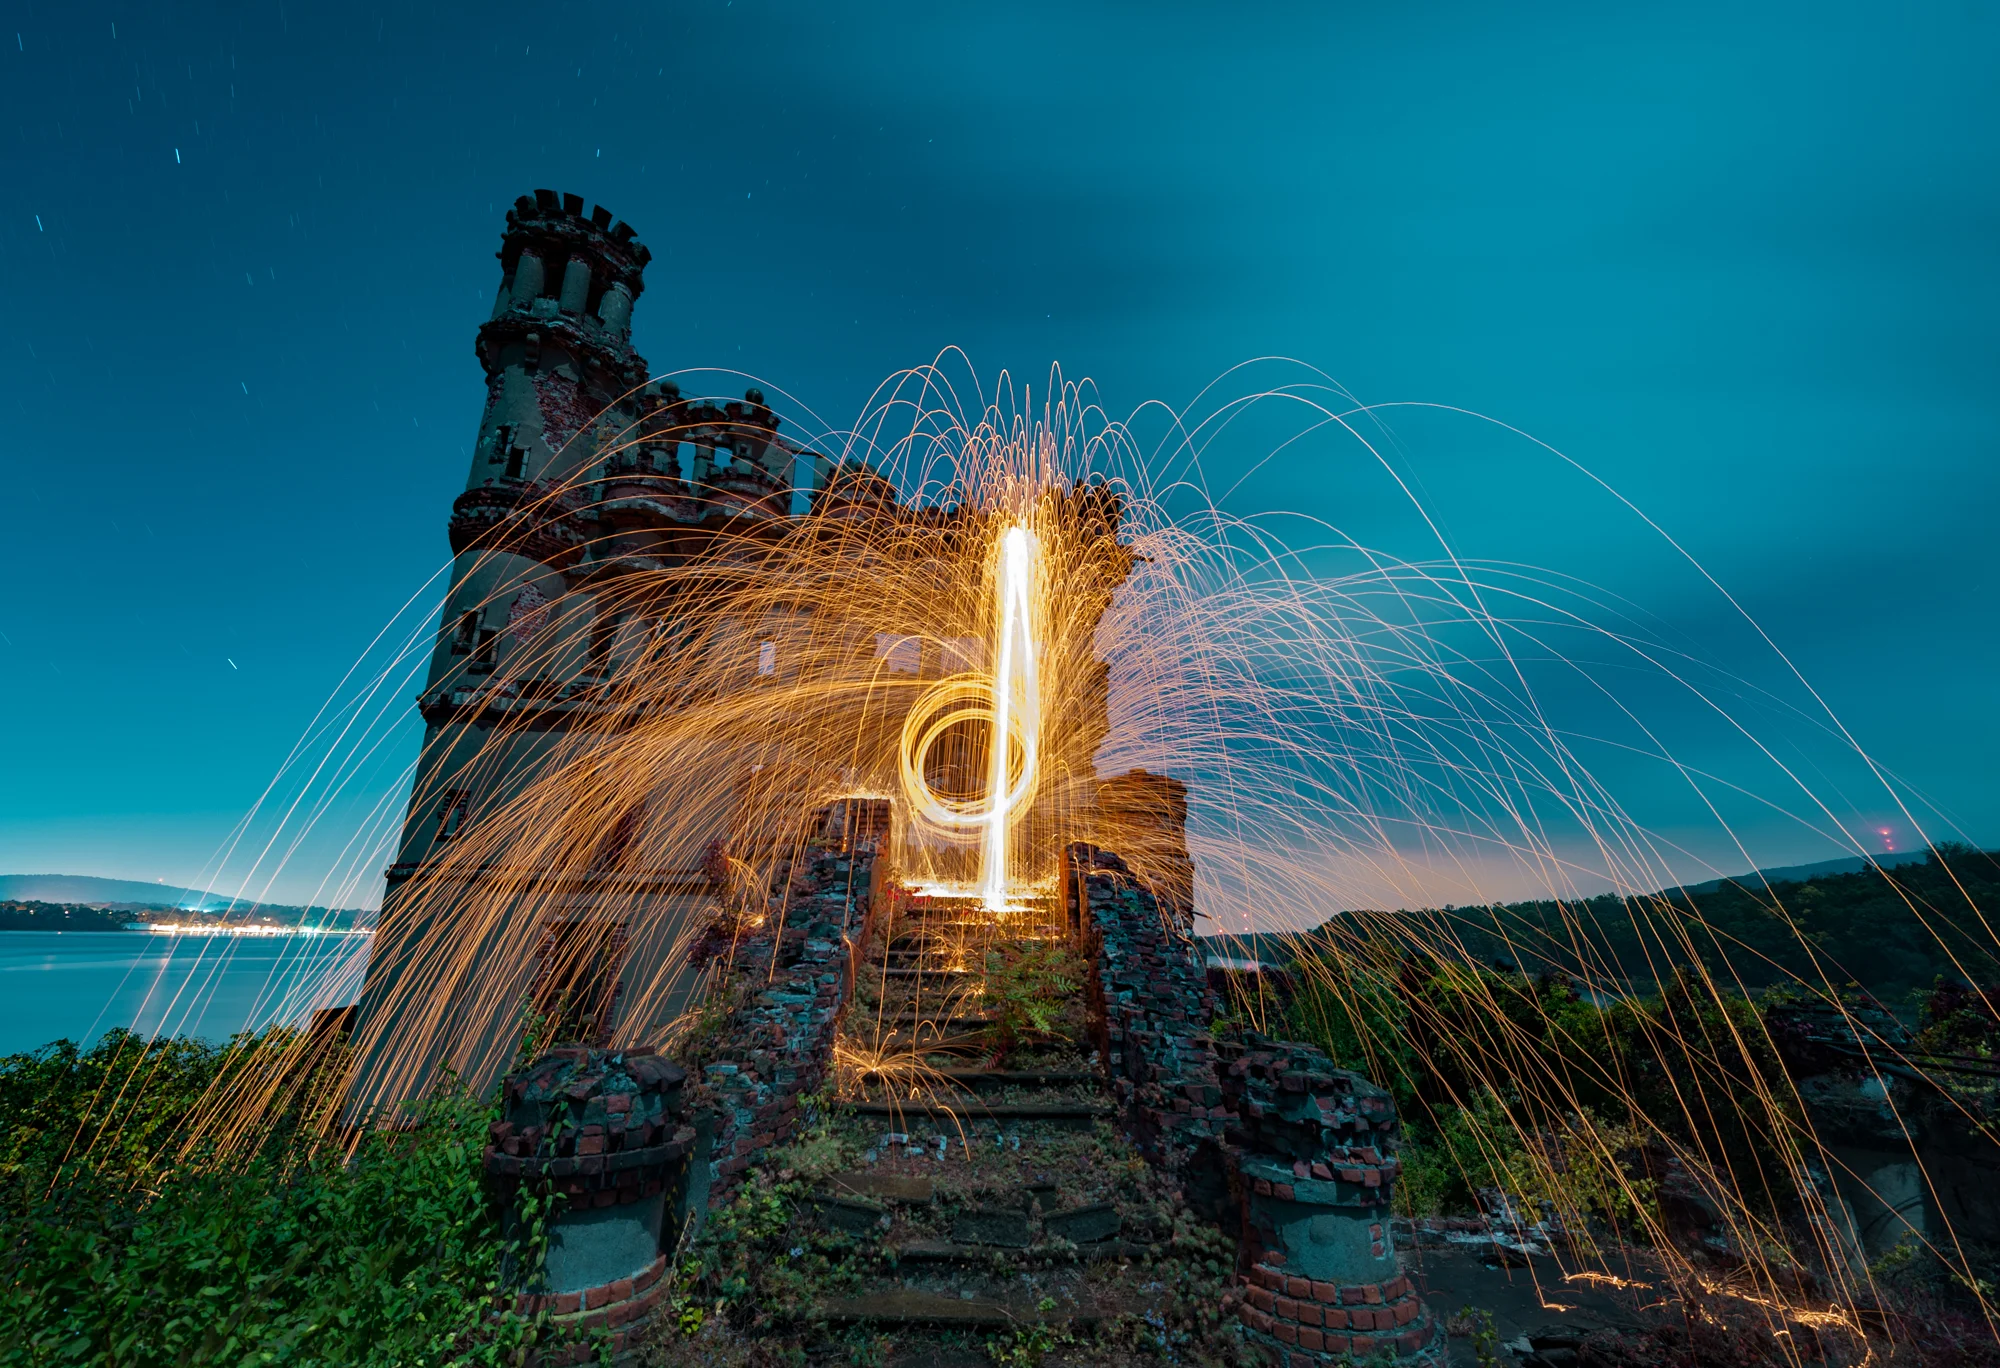
  • steel wool + whisk + metal cable (I wait for wet, rainy nights to do this or I stand in waterβ€”and again, fire, not in national parks!)
  • glow sticks
  • programmable LED strips
  • toys with lights in them
  • balloons with glow sticks in them
  • LED votive lights
  • DIY light painting tools and shapers of all kinds
  • professional light painting tools
  • lasers
  • car headlights and taillights

I use all of these indiscriminately. Why? Well, when you say no to something, your options are limited. So why not try everything and then some?

Now take a deep breath. You can't possibly carry all that with you. Though I have tried...

Below are some more images I've made while experimenting with light writing and painting.

Matt Hill is a partner and workshop leader with National Parks at Night. See more about his photography, art, workshops and writing at MattHillArt.com. Follow Matt on Twitter Instagram Facebook.

UPCOMING WORKSHOPS FROM NATIONAL PARKS AT NIGHT

Muses from the Pastβ€”Lighting and Night Photography of the Vargas Brothers

All images by Carlos and Miguel Vargas

All images by Carlos and Miguel Vargas

Back in October, I wrote about Harold Burdekin and John Morrison, two English photographers who published a beautiful book of night photographs of London in 1933 after seeing the Parisian night work of Brassai. By studying the innovations and inspirations of the night photographers of yesterday, we can better understand the roots of our art form, to learn and to progress in our own work.

This article is the second in a series on underappreciated photographers who have made a significant contribution to the genre. Perhaps no one better fits the bill than Carlos and Miguel Vargas of Arequipa, Peru.

Carlos and Miguel Vargas

Carlos and Miguel Vargas

The Vargas brothers opened their studio in 1912, after apprenticing for Max T. Vargas, an unrelated photographer who ran the busiest photo studio in Arequipa at the turn of the century.

The Estudio de Arte Vargas Hermanos was almost immediately successful. The 1910s and ’20s were a vibrant time in Arequipa. The flamboyant brothers were at the epicenter of a fashionable society created by the newfound wealth and exposure to European styles brought to the southern Andes. Artists, poets, writers and musicians passed through the brothers’' studio, which became a center for art and culture in the city. Their night photography adventures evolved into highbrow social events for their bohemian entourage.

The core of their business was portraits of the city’s elite, but their photographic legacy is much broader–– a remarkable photographic record of the last years of an elegant and formal society that would soon be lost to the restless hum of modernity and the cold economic reality of the Great Depression.

Their work is a testament to Peruvian society in the first half of the 20th century, but their contribution to night photography cannot be understated. The nocturnes of the Vargas brothers mark several firsts in the history of night photography.

the Crossing.jpg

First, the careful staging and choreography of their images had not been seen in nocturnal imagery before. Many of their night works included significant numbers of people, each one carefully placed and instructed to remain still for exposures that lasted up to an hour. The brothers were inspired by silent films, and acted like directors on a film set to produce narrative images that were reflective of their imaginations as much as of the time and place in which they were made.

It’s well-known that Bill Brandt staged night photographs to try to recreate some of Brassai’s images, even going so far as to pose his own wife Eva as a stand-in for the prostitute from one of Brassai’s images. Until the discovery of the Vargas nocturnes, it was assumed that Brandt was the first to stage night photos in the early 1930s. But Carlos and Miguel had him beat by about 15 years, and did so in extraordinary fashion!

In order to execute their complex photographs, the brothers needed to use added lighting. As far back as the 1860s, photographers such as Nadar in France and Charles Piazzi Smyth in Egypt had used artificial light to supplement their low-light photographs, but it was not until the work of the Vargas brothers that added light was used with aesthetic considerations.

The brothers understood that light could be used to create mood and atmosphere in a way that had never been done before–– at least outside of a studio. They placed lights in various places within the scene, often employing backlighting for dramatic effect.

Their cinematic vision combined long exposures taken in moonlight with strategically placed lights within the image. They used bonfires, car headlights, magnesium flashes and moonlight, in whatever combination served their needs. The combination of long exposures with flash powder was also new. Prior to the Vargas images, flash-lit photographs tended to be short exposures with the flash at or near the camera, resulting in the familiar on-camera strobe look that we are all familiar with. The brothers, however, used light flashes creatively.

The Vargas brothers used their technical mastery, ingenuity and creative vision to produce a dazzling portfolio of night photographs between about 1919 and 1930. Approximately 75 5x7-inch glass plate negatives, and just a few vintage prints, survive today.

Without the determined efforts of Houston-based photo historian Peter Yenne, it is likely that this remarkable body of work would have never been known. Yenne has worked for more than 20 years to discover and promote the work of early South American photographers. Beginning in 1999 he and Peruvian photographer Adelma Benavente inventoried, restored and scanned over 15,000 glass plate negatives from the archives of Estudios de Arte Hermanos Vargas that had been stored in cardboard boxes for decades.

The exhibition β€œCity of Night: The Vargas Brothers of Arequipa, Peru 1919-1930” was on view at Houston FotoFest from November 30, 2006, to January 20, 2007, and travelled to several other venues. Hopefully the brother’s photography will continue to draw interest, and they will be awarded their rightful place in the historical record.

For now, I hope that you enjoy the images shown here, courtesy of Peter Yenne.

Lance Keimig is a partner and workshop leader with National Parks at Night. He has been photographing at night for 30 years, and is the author of Night Photography and Light Painting: Finding Your Way in the Dark (Focal Press, 2015). Learn more about his images and workshops at www.thenightskye.com.

UPCOMING WORKSHOPS FROM NATIONAL PARKS AT NIGHT

Five Questions: Offering Answers on Gear, Techniques and Etiquette

As you might imagine, we get emails from time to time asking us questions about night photography. We’re always happy to respond personally to those questions. However, there’s also the (largely correct) theory that for every person who asks a question, there are a hundred others who want to know the same thing but didn’t ask.

Therefore, we have decided that from time to time we will collect five of the questions that have recently been asked of us, and share them, along with our answers, with all of our blog readers. We hereby commence this β€œFive Questions” series today.

Our first foray into shedding some light on night photography conundrums includes some excellent questions on gear, techniques and etiquette.

1. SharpStar2 and the Nikon 14-24mm

Q: I have the Nikon 14-24mm f/2.8 lens. I have just finished reading about the SharpStar2. In my very limited experience with photographing stars, I have yet to obtain anything close to a sharp focus on them. Thus I’m intrigued by the SharpStar2. Can this be used with the lens I’ve mentioned? I’m assuming I would have to purchase the appropriate square filter holder and the appropriate size SharpStar 2 filter. Could you tell me what size to order, and which filter holder you’d recommend? β€” Liela N.

A: Although the Nikon 14-24mm is one of the best lenses for night photography, it’s actually not one I can recommend for combining with the SharpStar2. In fact, I’m not sure there’s a way to get it to work at all. The issue is that lens has the bulbous front element, which means a flat filter can’t be used without retrofitting a holder. There’s a great article on Naturescapes titled β€œAdapting Filters to Fit the Nikon 14-24mm Lens” that explains why and offers a DIY solution, but it requires a 150mm filter, and the largest that SharpStar2 comes in is 100mm.

But I would definitely hold on to that lens for night photography! If you’d like to work on other techniques for focusing in darkness, I’ll offer three suggestions:

  1. Use Live View. It’s infinitely easier than trying to focus through your viewfinder.
  2. Try presetting your lens to infinity during daylight, then turn off autofocus and tape down the focus ring.
  3. Use hyperfocal distance.

Incidentally, if you’re interested in purchasing the SharpStar2 for other lenses, we have a discount code we can share with you. Use β€œNPAN10” to receive 10 percent off the SharpStar2 on LonelySpeck.com. β€” Chris

2. Stack-a-Matic

Q: I use Photoshop/Lightroom CS6. I am a new user to Photoshop so obviously still learning. I tried to download your recommended Stack-A-Matic but I get an error that says I need Photoshop 12 or higher. What is a good stacking program that goes with CS6? β€” Sue W.

A: Stack-a-Matic works with CS5 thru CC (latest). Did you download it from my website, and use the manual installation instructions? Sometimes it’s a little bit finicky, but it does work. You might have to do a restart, or possibly walk through the installation twice, but it’s worth it.

I’m sorry that I can’t offer more tech support than this for Stack-a-Matic; I’m just hosting it for Russell Brown. Alternatively, you can try StarStax for Mac, and Startrails.exe for PC. β€” Lance

3. Light painting in Arches National Park

Arches National Park. Β© 2016 Tim Cooper.

Arches National Park. Β© 2016 Tim Cooper.

Q: I heard/read that Arches National Park has closed the permits for night photography. Does this mean for workshops or personal? β€” Juan Aguilera

A: Yes, Arches (and Canyonlands National Park) did institute a rule change this year, but it applies only to instructor-led groups using an official CUA (Commercial Use Authorization) permit, and for the moment it applies only to light painting.

If you go on your own as a photographer, there are no restrictionsβ€”for now. But if photographers don’t collectively respect that environment (i.e., behave ourselves), who knows what might change? While we don’t agree with a blanket rule change in Arches, we do understand why it was implemented. We always talk about the etiquette of doing night photography in a way that doesn’t negatively affect others who are enjoying the same dark skies that we’re photographing. (See the early sections of the β€œNight Photography in National Parks” presentation Lance and Chris did at the B&H Event Space a few months ago.)

However, it’s also good to note that if you’re planning to shoot in Arches in 2017, the park will be closed at night every Sunday through Thursday due to road construction. So you can do night photography only on Fridays and Saturdays, until the expected November completion date. β€” Matt

4. Aurora in New England?

Q: Is there any chance of seeing aurora in New England? And is there a good app that you use for potential activity? β€” HersheyArtImages

A: The aurora can occasionally be seen in southern New England, but it is usually just a little bit of green near the horizon in the northern sky, when seen from a dark beach with a view to the north. In the northern parts of Vermont, New Hampshire and Maine, it is seen a little more frequently.

We use an app called Aurora Forecast, which is available for both iOS and Android. Once you download it, you can customize the settings to send you an alert for a kp (the unit of measurement of auroral activity) of 6 or higher in the middle latitudes. If the activity is much less than that, you are not likely to see anything.

You will never see aurora from a light-polluted area so far south. Really strong displays can sometimes be viewed right in the center of Reykjavik –– but that is a much smaller city, with much smaller suburbs. β€” Lance

5. Dealing with light pollution

In this photo from Everglades National Park, light pollution from distant Miami builds up in a 30-second exposure to provide depth to the scene. Β© 2013 Chris Nicholson.

In this photo from Everglades National Park, light pollution from distant Miami builds up in a 30-second exposure to provide depth to the scene. Β© 2013 Chris Nicholson.

Q: I am struggling with processing wide-field astrophotography images (starscapes, Milky Way, etc.). In particular, with how to remove light pollution, which is an unfortunate fact of life for those of us living in the eastern part of the country. For wide-field photographs, the light pollution is usually graduated over the image, being brightest at the horizon and diminishing at you go higher. I would very much appreciate any tips you might have in this area. β€” David T.

A: Honestly, I generally don’t do anything to try to rid light pollution from my night photos, but rather try to use that extraneous light creatively. Specifically, I use the distant light to create silhouettes of mountains, for example, or to light clouds in the sky. Both of those tactics can provide depth to otherwise pitch-dark scenes.

If you do want to negate the color effect of light pollution in the night sky, a tech option is to try one of the new filters for eliminating the color cast in the sky that can be caused by light pollution. Our friends at Lonely Speck recently released the PureNight filter, which is made from a special didymium glass that reduces the transmission of light from sodium vapor lamps. We have yet to try it, but they know their stuff, so it’s likely an excellent solution. We also just heard about the NiSi Natural Night Filter from Ikan, but again, we haven’t had the pleasure of trying it yet. β€” Chris

Chris Nicholson is a partner and workshop leader with National Parks at Night, and author of Photographing National Parks (Sidelight Books, 2015). Learn more about national parks as photography destinations, subscribe to Chris' free e-newsletter, and more at www.PhotographingNationalParks.com.

UPCOMING WORKSHOPS FROM NATIONAL PARKS AT NIGHT

How We Got the Shot: Teamwork at Desert Queen Ranch in Joshua Tree NP

Desert Queen Ranch panorama, as team-photographed by our workshop, April 25, 2017. Photograph by Deane Hall, Jeannine Henebry, Romit Maity, Kurt O’Hare, Priscilla Spencer, Lance Keimig and Chris Nicholson.

If you’ve read our blog in the past, you may have seen our series β€œHow I Got the Shot.” This time we’re doing something similar, but a little different: How We Got the Shot. It’s about how a group of workshop students came together to collaborate on a night image that took a lot of planning, communication and teamwork.

The Location

This week we completed our first workshop of 2017, at California’s Joshua Tree National Park. On the last night of the workshop, we were granted special access to Desert Queen Ranch (otherwise known as Keys Ranch), a spot that’s usually locked off from park visitors. The only way to see the site is to attend a group tour. Night access is rare, but we were able to bring our workshop photographers to the ranch through a partnership with Desert Institute, the educational outreach program at Joshua Tree.

β€œDesert Queen Ranch is a goldmine for photographers ...”

The ranch sits in a rocky canyon in the Mojave Desert. From 1910 to 1969 it was home to Bill Keys, who, along with his wife Frances, raised a family there and lived off the scarce resources of the environment.

Today the ranch is preserved as a National Historic Register Site. It’s a goldmine for photographers, offering subjects such as the small-frame clapboard buildings, old cars in disrepair, mining and ranching equipment, hand-hewn wood fencing, and more. There’s also the same subjects you find in the rest of the park, including rock formations, lizards and snakes, cacti, and Joshua trees and other yuccas.

To give you a sense of the photography opportunities at the ranch, here are some other images by our group from that evening:

The Photographers

Seven photographers at our Joshua Tree workshop (five attendees and two instructors) contributed to making the final image:

The Planning

We arrived at Keys Ranch with our Desert Institute guides shortly before sunset, which gave our photographers time to scout ideas for compositions. One of the more popular subjects was an old, rusting Jeep in the center of the site. As dusk began to darken into night, we noticed that by standing to the west of the Jeep, you get a nice side-to-side view of the ranch structures, including the house, old store, Jeep, windmill, water tank and workshop building.

We immediately knew the scene would make a great panorama, but would be quite a project that could be accomplished only by a good number of us pulling together to contribute. About two-thirds of the workshop was excited by the idea, so we regathered at 11 p.m. to see if we could pull it offβ€”hopefully with the Milky Way rising over the ridge that flanked the eastern edge of the ranch.

Because we didn’t have time for every photographer participating to shoot their own frames, we decided we would do one setup and execution, and we’d all share the RAW files to edit in our own ways. To provide the best image quality for everyone to start with, we chose to use a Nikon D5.

When the time came to start working on the photo, we carefully staked a spot for the tripod. We opted to use my Gitzo 3541LS, as it’s strong and steady, and we could rely on it to stay put during all the movements we’d be putting the ball head through. Using the bubble level on the tripod, followed by using the bubble level on the ball head, we were able to perfectly level the setup within a couple of minutes.

The scene stretched from left to right by about 160 degrees from the tripod mark. (In Figure 1, you can see how wide an area we needed to cover.) We couldn’t back up much because of a fence behind us, so we needed to use a wide angle lensβ€”specifically, the Nikon 14-24mm f/2.8, one of the sharpest tools in the night-photography shed.

Figure 1. Satellite image of our pano subjects at Desert Queen Ranch, showing how wide the scene is from camera position. Map data Β© Google.

Figure 1. Satellite image of our pano subjects at Desert Queen Ranch, showing how wide the scene is from camera position. Map data Β© Google.

Setting the zoom for 24mm framed the scene segments perfectly, but gave us an exposure problem: If we wanted to keep the stars as points, rather than having them begin to trail, then we would be limited to a shutter speed of 15 seconds.

We agreed that a 20-second exposure would be better because it would give us 33 percent more time to light-paint, and would give us one-third of a stop more light to help fill in foreground detail. Using the 400 Rule, we knew that maintaining star points during 20-second exposures would require a focal length of 20mm or wider.

So we set the zoom at 20mm and mounted the camera vertically (which is best for most pano-stitching applications). This setup offered approximately a 60-degree horizontal angle of view within each vertical frame.

The next step was figuring out how much to overlap the frames. The more you overlap, the more information you have for the pano-stitching software to do its job wellβ€”overlapping by at least one-third is recommended. We prudently decided to overlap by half, which gave us a 30-degree horizontal change between frames. By using the degree marks on the base of the ball head, we panned the camera in 30-degree increments and determined we would need to shoot five frames to cover the scene from left to right.

The Lighting

We could have photographed the ranch without lighting it, but what fun would that have been? Besides, the low light on the foreground would have obscured the detail of all the interesting objects in front of us. So we decided to light-paint what we believed were the most important and interesting elements: the store, the house, the tree behind the house, the Jeep, the windmill, the water tower and the workshop buildingβ€”all with 20-second exposures.

Teamwork was clearly required to pull this off.

Priscilla has a film-lighting background, and she shared that expertise to help place two panel lights on the largest subjects: the store and house (Figure 2), and the workshop (Figure 3). For the former we used Priscilla’s Vidpro LED Light Kit, and for the latter we used NPAN’s brand new Luxli Viola 5" Multi-Color LED light panel (which we used for different setups all week, and we loved it!).

Priscilla also stood by the panel on the far left of the image, because she needed to redirect its light mid-exposure. We used in-camera dodging by moving blackwrap in and out of the light to soften the shadow, thereby reducing the illumination on the ground during the exposure.

Figure 2. Vidpro LED Light Kit illuminating the house and store at the far left of our intended pano. This is the setup that Priscilla adeptly modified by moving blackwrap mid-exposure. We weren't concerned about hiding this light source (you can see it in Figures 5 and 8), because we knew it would be cropped out of the final stitched image.

Figure 3. The Luxli Viola LED panel light placed on the far right of the image is perched on a fence post. The only part of it visible to the camera is an LED on the back, which Lance covered with a piece of black gaffer tape so it wouldn't show in the final photograph. So even though the panel is technically in-frame, it disappears into the shadows.

Jeannine and Romit stood to camera-right, about 20 and 30 feet away, respectively. Jeannine light-painted the water tower, while Romit light-painted the Jeep.

Deane and Kurt worked in the background, in-frame, but behind objects so the camera couldn’t see their flashlights. Deane was positioned about center-frame, behind a bush, while light-painting the side of the house. Kurt was positioned toward frame-right, between some tall bushes, light-painting the windmill.

Everyone used incandescent flashlights to provide warm light to the warm-toned subjects. And because the final image would be composed of five stitched frames with overlapping elements, everyone had to repeat the light painting the same way multiple times.

As for the ambient illumination on the ridge, that was thoughtfully provided by clouds diffracting light pollution from Palm Springs. The clouds in the east weren’t as helpful, as they blocked our view of the Milky Way (though you can still discern it if you look closely at the final image). On the other hand, thin and broken clouds can add a good deal of visual interest to a starry sky, and they did exactly that for our composition.

The Shoot

When we were finally ready to execute, we all got into position for our roles. Lance observed the light painting from near the camera to watch for any mistakes that needed to be fixed. (There weren’t anyβ€”go team!) I operated the camera, using a Vello FreeWave wireless remote shutter release; I didn’t want to have to touch or even approach the tripod unnecessarily, to avoid the possibility of bumping it in the dark, which would have required us to re-set everything we’d done to that point.

We began by shooting from the right, primarily because that’s the direction the camera was pointing when we were ready to start. I fired the remote release, waited to hear the click of the shutter opening, then called out for the others to begin light-painting. When each 20-second exposure ended, I rotated the camera 30 degrees to the left (again using the markings on the ball head), then repeated the process four times. You can see the resulting images in Figure 5.

Figure 5. The five frames, before processing. All exposed at 20 seconds, f/3.2, ISO 6400. Nikon D5 with a Nikon 14-24mm f/2.8.

We reviewed the photos and everything looked exactly as we’d hoped. But we always say: Once you get the shot right, shoot another just in case. So we re-shot all five frames, and then wrapped the production.

Post-Processing

Back at the hotel at 2:30 a.m., we imported all the images into Lightroom. We made minor adjustments to one frame, then synced the edits to the other four frames so that each had the same adjustments applied.

Perhaps the most important edit we made in Lightroom is a necessity any time you’re stitching a pano: In the Lens Corrections panel, we selected β€œEnable Profile Corrections.” This removed lens vignetting and corrected barrel distortion (see Figure 6), both of which make it much easier for the software to stitch the images together, and also make for a better final image.

Figure 6. Before applying lens profile corrections (left) and after (right).

We then selected all five frames in Lightroom and clicked Photo–Photomerge–Panorama. Lightroom usually does an amazing job with stitching a pano, but in this case we thought the results looked a little too distorted.

Photoshop’s Photomerge feature has a few more options, so we decided to try that instead. Again with the five frames selected, we clicked Photo–Edit In–Merge to Panorama in Photoshop. We tried the Perspective, Cylindrical and Spherical options, but weren’t thrilled with those results either (particularly Perspectiveβ€”see Figure 7).

Figure 7. Not the result we were looking for. Sometimes pano-stitch settings fail, and we just have to start over, making new choices.

Figure 7. Not the result we were looking for. Sometimes pano-stitch settings fail, and we just have to start over, making new choices.

What did succeed was Photoshop’s Auto option for merging, which is what ultimately produced a result we could work with (Figure 8). This proves the theory that software is pretty smart these days, so always consider trying β€œauto” first.

Figure 8. The uncropped stitched pano, right out of Photoshop.

Back in Lightroom, we made a few more edits. We cropped out the waste (this is expectedβ€”it’s why you should always shoot a pano with extra room on all sides, knowing that you’ll need to crop off artifacts). We brought the Whites up a bit to fill out the histogram. Then we nudged down the Blacks and nudged up the Shadows, which is a nice trick to make an image pop. We increased Clarity a little, and Vibrance a tad.

Those were all the global adjustments we made, which resulted in the image in Figure 9. It was looking pretty good, but there was still more work to do.

Figure 9. Minor global adjustments improved the overall image.

To begin the local adjustments, we immediately cloned out the plane near the center. (No need for editorial integrityβ€”we just pretend that we shot the sequence two minutes earlier.)

To improve the sky, we added a Graduated Filter to the top of the frame, then used the Brush to mask around the ridge. We reduced the Exposure of the sky just a smidgen, and brought up Highlights and Clarity a touch to make the stars shine a little brighter (Figure 10).

Figure 10. The sky pops a little more after making some tweaks with the Graduated Filter tool.

We made some more local adjustments to even out the exposure, reducing the brightness and highlights of the workshop building at the right of the frame, reducing the brightness of the panel-lit ground on the left, and increasing the brightness and saturation (just a bit) of the Jeep (Figure 11).

Figure 11. Local adjustments to slightly darken the ground at left and the structure and ground at right, and to lighten the Jeep in center.

Finally, we pursued the curiosity of one workshop attendee who wondered what the photo would look like if we made adjustments to create more of a β€œnighttime feel.” To achieve that effect we dropped the White Balance temperature more toward blue, lowered Exposure by one-quarter of a stop, reduced Shadows, and dropped Saturation to -30. You can see the result in Figure 12.

Figure 12. A more night-feel approach to the editing.

The night approach looked great, but we decided that we liked our original take better. So we reverted to the first approach, which really shows the light painting that emphasizes the important elements of the composition. Figure 13 is the final version.

Figure 13. The final image.

Final Notes

Though we all made the photo together, the edited final version in this blog post is from my computer. There are many, many ways to edit digital images, dependent on different artistic preferences. I very much hope that Deane, Jeannine, Romit, Kurt and Priscilla will edit the RAW files as they like and post their final results in the Comments section.

Also, none of this would have been possible if the Desert Institute hadn’t partnered with our workshop and arranged for the special access to this very special space. With heartfelt thanks, we recognize Kevin Wong for his assistance at every stage of planning, and Julianne Koza and Lew Kingman for guiding us to and around Keys Ranch that magical evening.

Chris Nicholson, author of Photographing National Parks (Sidelight Books, 2015), is a partner and workshop leader with National Parks at Night. Learn more about national parks as photography destinations, subscribe to Chris' free e-newsletter, and more at www.PhotographingNationalParks.com.

UPCOMING WORKSHOPS FROM NATIONAL PARKS AT NIGHT

How I Got the Shot: Bryce Canyon National Park with Chris and Gabe

Light painting on the Navajo Loop Trail in Bryce Canyon National Park. 30 seconds, f/4, ISO 400. Nikon D750 with a Zeiss Distagon 15mm f/2.8 lens.

While shooting in Utah during National Parks Week in 2016, I made this image in cooperation with Gabe Biderman and Chris Nicholson. Wanna learn how? Read on.

The Location

First off, let’s establish that Bryce Canyon is beautiful. The hoodoos rock me. It’s also at a pretty high altitude. Consider that if you hike down into the canyonβ€”you must also hike back up!

Top that off with something unique to our visit: One small leg of the loop trail was not open, forcing us to go the long way around to get to the hoodoos. Of course that meant we had to go all the way back around to get back up. Talk about a workout carrying 35 pounds of photo gear on my back. I’m savage with myself that wayβ€”I never want to miss a shot because I left something in the car. (Hint: Do what I say and not what I do if you value your enjoyment.)

Anyway, on to how I β€œmade the sausage.”

Working the Scene

The final image, above, is a combination of ambient illumination by a full moon in a clear sky, complemented by light painting by Gabe and Chris within the lens frame, and light painting by me to camera-right.

I saw the photo as I was gasping my way up the canyon. (I am not as fit as I could be 😊). To compensate, I was playing a game with myself: Walk until completely out of breath, plant the tripod and take a photo on the spot, no matter the view. It kept my mind off my physical condition … for 30 to 120 seconds at a time, anyway.

Figure 1 is an example of one of those shots. Meh. So is Figure 2. Less meh.

Figure 1. 30 seconds, f/4, ISO 400. Nikon D750 with a Zeiss Distagon 15mm f/2.8 lens.

Figure 1. 30 seconds, f/4, ISO 400. Nikon D750 with a Zeiss Distagon 15mm f/2.8 lens.

Figure 2. 30 seconds, f/4, ISO 400. Nikon D750 with a Zeiss Distagon 15mm f/2.8 lens.

Figure 2. 30 seconds, f/4, ISO 400. Nikon D750 with a Zeiss Distagon 15mm f/2.8 lens.

But when I stopped to make a photo of Chris making a photo (how meta), I started to think about how I love making night portraits. This photo is Figure 3, in which you can also see Gabe’s flashlight in the distance. He was working on a masterpiece of light painting.

Figure 3. 30 seconds, f/4, ISO 400. Nikon D750 with a Zeiss Distagon 15mm f/2.8 lens.

Figure 3. 30 seconds, f/4, ISO 400. Nikon D750 with a Zeiss Distagon 15mm f/2.8 lens.

As it happened, I had a burst of energy and my next pit stop to breathe was above Gabe’s position. See Figure 4.

Figure 4. 30 seconds, f/4, ISO 400. Nikon D750 with a Zeiss Distagon 15mm f/2.8 lens.

Figure 4. 30 seconds, f/4, ISO 400. Nikon D750 with a Zeiss Distagon 15mm f/2.8 lens.

As I observed Gabe light-painting and working on his image, I was struck with the thought, β€œThis is the moment. People in a place I love doing the thing I love. Perfect moment for a portrait.”

I asked Gabe and Chris if they would indulge me, and somehow they seemed more than happy to stop climbing out of the canyon for a few minutes. We nailed it on the first shot, because Gabe had already been practicing for his photo, painting to the right. So I piggybacked on his hard work a bit. I asked Chris to paint the trees, and added my own twist by running to camera right and light-painting Gabe and Chris with short bursts of my flashlight (Figure 5). I took care not to sweep my flashlight, because I wanted a pool of light in the middle, with dark edges to the illumination.

Figure 5. Chris (left) is lighting the tree, and the arrows show where Gabe and I are light-painting.

Figure 5. Chris (left) is lighting the tree, and the arrows show where Gabe and I are light-painting.

Mission accomplished!

Figure 6, the final photo. 30 seconds, f/4, ISO 400. Nikon D750 with a Zeiss Distagon 15mm f/2.8 lens.

Figure 6, the final photo. 30 seconds, f/4, ISO 400. Nikon D750 with a Zeiss Distagon 15mm f/2.8 lens.

Details

Here are some more before/after details to spot how we added to the scene:

Figure 7. Painting distant hoodoo.

Figure 8. Light-painting trees takes more time since they are not reflective, but rather dark to begin with.

Figure 9. Gabe’s gentle painting of the canyon wall to his right.

Figure 10. Detail with and without Chris in frame.

Matt Hill is a partner and workshop leader with National Parks at Night. See more about his photography, art, workshops and writing at MattHillArt.com. Follow Matt on Twitter Instagram Facebook.

UPCOMING WORKSHOPS FROM NATIONAL PARKS AT NIGHT