How I Got the Shot

How I Got the Shot: Lunar Eclipse in a Sparkling Star Field

Portrait of a lunar eclipse. Nikon D5 with a Nikon 300mm f/2.8 lens. 32 frames shot at 1 second, f/2.8, ISO 51,200, noise-stacked in Sequator and blended in Photoshop with a moon exposure shot at 1/2 second, f/2.8, ISO 3200.

Note: We’re running this blog post today because tonight’s skies will feature the world’s last total lunar eclipse until the spring of 2025. See the end of the post for more information.

The Story

Since she was little, my daughter Maggie has been interested in astronomy. She could name the planets (in order) when she was 3. On summer nights she would lay a blanket on the grass outside, hone in on stars with my laser pointer, and ask me to look up their names in a sky-view app. In 2017 we road-tripped to see the solar eclipse, which she promptly labeled “the best thing I’ve ever done.” She was only 4, but I couldn’t disagree that the memory would remain on that list forever.

As Maggie has grown older (she’s 9 now) that interest has waned a little, somewhat supplanted by friends and music and drawing and painting and reading and swimming and making videos and any of the other hundred things that occupy her agile mind. Still, I’m never surprised when she wants to experience a celestial event—such as when she asked if we could go somewhere to see the total lunar eclipse last spring.

So we ventured to one of my favorite sections of the Blue Ridge Parkway, me toting my cameras, she toting the telescope that her grandmother and aunt had given her for Christmas.

Maggie watching the lunar eclipse through her telescope from the Blue Ridge Parkway last May.

The Location

The Blue Ridge Parkway stretches 469 miles between its northern and southern termini. That’s a long and varied destination for photography. For our experience I chose the area around Blowing Rock, North Carolina, because I know it has many valley-top overlooks, as well as the attractive landscapes of Price Lake, the Moses H. Cone estate, rolling fields, barns and so on.

Figure 1. PhotoPills’ Augmented Reality showed where the moon would be over Price Lake at the time of the eclipse.

I know the area well, as I’ve shot there many times (including with two National Parks at Night workshops). But PhotoPills scouting was still necessary because I needed to know where the moon would be during totality. Which of my favorite landscapes would be good for a moon photo at that particular time and date? I settled on Price Lake, as I could see that during totality the moon would be drifting over the tree line on the southeastern shore (Figure 1).

Alas, all good plans need a backup, especially when traveling with a kid. Maggie was bored waiting for the eclipse. We tried hunting for frogs, then hunting for spiders, then spotting fireflies. We watched the water flowing over the dam and listened for noises in the woods and guessed what made them. But these things didn’t hold her interest long enough. So, instead, we meandered up the parkway until the moon finally started to hide in Earth’s shadow, and then pulled into an overlook.

We set up her telescope, she promptly located the moon in the eyepiece, and the experience quickly became pretty freakin’ cool. She was enthralled—enough so that I knew I had time for a photo.

But from the overlook, I had no foreground worth shooting. By necessity, this would be a moon portrait, not a moonscape. I unpacked the longest lens I own, a Nikon 300mm f/2.8—a lens not quite long enough to fill the frame with the moon, but long enough so the moon would be more than just a red dot in the sky.

The Exposure

The trouble with telephoto lenses at night is that unless you’re using a hefty tracker, shooting star points is nearly impossible with one exposure. With a 300mm lens, a quick check of the Spot Stars calculator in PhotoPills revealed that I could use a shutter speed of only 1/2 to 1 second before my stars would begin to trail (Figure 2). That would require an ISO of 51,200, and that would produce way more noise than would be acceptable.

Figure 2. PhotoPills told me that to freeze the stars shooting with a Nikon D5 and a 300mm lens, I would need a shutter speed between about 1/2 second (in Accurate mode, right) and 1 second (in Default mode, left).

It also introduced a problem with the moon exposure: At 1/2 to 1 second at ISO 51,200, the moon would blow out.

So those were the two obstacles I needed to work around, and I chose two solutions:

  1. Because freezing the stars required such a high ISO, I would need to noise-stack multiple frames. This would make the final image appear as if I shot it at a lower, cleaner ISO.

  2. Because the first solution would result in the moon both blowing out and moving considerably during the exposures, I would need to shoot a separate frame of just the moon and then layer that on top of the noise-stacked frame in Photoshop.

It was time to calculate my moon exposure. The moon moves quickly—a distance roughly equal to its diameter about every 2.5 minutes. That’s why shooting even a 20-second astro-landscape exposure can result in the moon beginning to “stretch out” and look oblong. With a wide-angle lens, I rarely shoot more than 10 or 15 seconds when the moon is in the frame. Using a telephoto meant I needed to shoot even faster.

I also wanted a lower ISO for the moon so it wouldn’t look too noisy against the clean, noise-stacked stars. I shot a few tests and decided that 1/2 second at ISO 3200 resulted in a moon that would be sharp enough to look good.

The Shoot

Now all I needed to do (that night, anyway) was capture the raw materials.

One remaining concern I had was vibrations causing a soft image. Vibrations are a constant concern when working with a telephoto lens, as well as when working at night. To minimize vibration, I took the following steps:

  1. I mounted my setup on a sturdy tripod (the Gitzo 3541LS) with a sturdy, top-of-the line ball head (the Really Right Stuff BH55), and made sure everything was locked down tight. (My setup would have been even more solid if I’d used a gimbal head, but I don’t own one.)

  2. I connected a wireless shutter release (the Nikon ML-L3). This meant I wouldn’t have to touch the camera to open the shutter, and because no cable was connected, I also wouldn’t accidentally introduce vibration by touching the remote.

  3. I enabled Mirror Lockup on my Nikon D5. This feature separates the mechanics of raising the mirror from the mechanics of opening the shutter, so that the minor vibrations of the former have time to subside before the camera starts recording the image.

  4. I enabled a 2-second Shutter Delay in the camera. This feature creates a delay between when the shutter opens and when the image begins to record, again to mitigate vibration that could be caused by moving parts.

  5. I waited for any perceptible breeze to subside.

  6. I shot multiple frames, because when you do that, one frame will always be sharper than the rest.

Figure 3. The moon foreground. Nikon D5 with a Nikon 300mm f/2.8 lens. 1/2 second, f/2.8, ISO 3200.

Once I was satisfied that I had a good moon foreground to work with (Figure 3—yes, the moon is a foreground in this photo), I changed the exposure to record lots of star points. I pressed the button on the remote, locked it down, and let the camera fire off 32 frames.

(Why 32? I’ll get into this more in a future blog post that focuses on noise stacking. For now, just know that combining 32 frames in stacking software provides approximately a 5-stop improvement in apparent noise. Because I was shooting at ISO 51,200, my final result would therefore look like I shot it at about ISO 1600—i.e., 5 stops lower. I knew I would be happy with the quality of that result.)

One final note about the shoot: Because the process took a little while, the moon moved considerably. Therefore, I needed to constantly readjust the framing to keep the moon in the center. Otherwise it would have flown clear out of my composition in about 10 minutes.

The Post-Production

Once home the next day, I dumped all the images into Lightroom and got to work.

The foreground frame was easy—I just chose the one with the sharpest-looking moon. I applied some basic adjustments to get the moon to look its best (the stars weren’t important in this frame), and that was that. Done.

The next step was to noise-stack the stars. If you have a Mac, the tool for this is Starry Landscape Stacker; I have a PC, so the right tool is Sequator.

Figure 4.

I asked Lightroom to reveal the location of the first star file in Explorer (Figure 4). From that folder I selected all 32 star files, and then I dragged them into the Sequator interface. I walked through all the processing options (I’ll be writing a how-to for Sequator soon—keep an eye on this blog—but if you use a Mac, see our post on Starry Landscape Stacker), and then let the software do its thing. (I didn’t worry about masking the moon in the stack, because I knew I’d be layering over the moon for the final version of the photo anyway.)

The result was a TIFF saved into the same folder as my raw files. I needed to load that TIFF into Lightroom. I did this by navigating to the folder, right-clicking and selecting Synchronize Folder (Figure 5), then following the prompts.

Figure 5.

With the TIFF loaded into my Lightroom catalog, I applied some basic edits to make the sky look good. The result was exactly what I’d hope for—a noise-free field of sharp, bright, sparkling stars.

The only problem was that blown out moon, which I was now ready to layer over. In the Lightroom grid, I selected the moon raw file and the star TIFF by Control-clicking on both. Then from the menu I chose Photo > Edit > Open as Layers in Photoshop.

With both images layered in Photoshop, I needed to mask out the dull sky from the moon foreground to reveal the sparkling, noise-free sky behind it. I figured the Object Selection tool would pick out that moon beautifully, so I chose the tool from the toolbar, clicked and drew a square selection around the moon, and the algorithm did the rest. I had a perfectly selected moon (Figure 6).

Figure 6.

Figure 7.

At the bottom of the Layers panel, I clicked on the Add Layer Mask button. This created a mask from my moon selection (Figure 7), revealing the sharp, noise-free stars from the background layer. However, a little cleanup remained.

The first issue was that during the shoot I’d had to continually reframe to keep the moon centered, and because the moon kept moving during the series of exposures, it was in a slightly different spot from frame to frame. Therefore, the moon wasn’t lined up perfectly with itself in the layered image (Figure 8), so I had to adjust its placement. I activated the Move tool and then used the cursor keys to nudge the moon into the right place (Figure 9).

Figure 8.

Figure 9.

The second issue was that the masking process had left a dark halo around the moon. Easy fix—just needed to massage the edge of the mask to cover up that halo. I selected the mask, then from the menu chose Filter > Other > Minimum (Figure 10). Knowing what radius value is correct is just a matter of looking at the live effect (with the Preview option checked), but it’s usually a very low number. In this case, 2 looked perfect (Figure 11), so I clicked OK.

(Note that depending on what processing artifact had created the halo, using Minimum may have made the problem worse. If it had, then Filter > Other > Maximum would have worked instead.)

Figure 10.

Figure 11.

The final issue was that the sharp moon was just a little smaller than the moon in the background, due to both exposure blooming and the halo edit. No problem—I just had to make the foreground moon a little bigger to hide the edges of the background moon.

I pressed Control-T to activate the Free Transform tool, but because I was zoomed in, I couldn’t see the bounding box and its handles. So to make the adjustment, I used the options bar (Figure 12). I made sure that the Maintain Aspect Ratio button was selected, and then clicked to put my cursor in the Set Horizontal Scale field. Again, I was just eyeballing the effect, watching what happens to the image as I made microadjustments. Using the cursor keys, I pressed up once to increase the scale to 101 percent, then again to 102 percent. It looked perfect (Figure 13), so I stopped there.

Figure 12.

Figure 13.

I saved and closed the image, made a final crop in Lightroom, and bumped up the Texture slider a bit to make the stars pop.

Was it worth all that effort just to get some more stars? Heck yeah! Use the slider in Figure 14 to see a straight-out-of-camera shot versus the fully processed final image. See how “three-dimensional” and detailed the final image looks?

Figure 14.

Wrapping Up

Maggie thought it was pretty cool that I could take pictures of the moon (win for Daddy!), and she asked if she could try too. I let her fire off a few frames, and then we packed the gear into the car.

Figure 15. Lunar eclipse over Price Lake, Blue Ridge Parkway. Nikon D5 with a Nikon 300mm f/2.8 lens. 3 blended frames shot at 30 seconds (foreground), 15 seconds (stars) and 1/4 second (moon), f/2.8, ISO 6400.

The moon was still in shadow, so with Maggie’s permission we went back to Price Lake to create the astro-landscape photo of the eclipse that I had scouted earlier. That photo (Figure 15) was easier, as I didn’t need to shoot 32 frames to rid the image of high ISO noise. Just three exposures—one each for foreground, moon and sky—and we were done.

The timing of this post is intentional. Tonight the moon will fall into total eclipse again—for the second time this year, but for the last time until March 2025. If you’d like to create a photo like this, tonight is your last chance for 2.5 years.

Tonight’s lunar eclipse will begin at 3:02 a.m. EST, and totality will happen from 5:16 to 6:41 a.m. So it will take a commitment to photograph.

If you want to shoot this eclipse, of course other techniques are also options. For more ideas, see our blog posts:

For more information about tonight’s big event, see the Space.com article “How to watch the Blood Moon lunar eclipse on Nov. 8 online, the last until 2025.”

Tomorrow and in the days ahead, we’d love to see your lunar eclipse photos. Share in the comments below, or on our Facebook page, or on Instagram (tag us @nationalparksatnight #nationalparksatnight #seizethenight).

Chris Nicholson is a partner and workshop leader with National Parks at Night, and author of Photographing National Parks (Sidelight Books, 2015). Learn more about national parks as photography destinations, subscribe to Chris' free e-newsletter, and more at www.PhotographingNationalParks.com, and follow him on Instagram (@PhotographingNationalParks.com.

UPCOMING WORKSHOPS FROM NATIONAL PARKS AT NIGHT

How I Got the Shot: Puente Nuevo, Ronda at Night

Puente Nuevo, Ronda at Night. Nikon Z 6II with a Nikon Z 24-70mm f/2.8 S lens at 40mm. Foreground: shot with a 10-stop neutral-density filter at 20 seconds, f/11, ISO 100. Sky: 460 stacked frames shot at 3 seconds, f/8, ISO 800.

The Location

Dream location—conquered!

The rich history of Ronda, Spain, dates to the Neolithic Age. The Phoenicians, Romans, Muslims, Christians and the Spanish have claimed this remote outpost as their home. The Spanish Inquisition, Napoleon War and Spanish Civil War all had major impacts on the town. Ronda is proudly known as the birthplace of the modern style of bullfighting and has influenced and attracted such artists as Orson Wells and Ernest Hemingway to call it home.

Beyond this colorful past, what attracted me to Ronda were the images of this cliff-clinging town and the historic bridges that unite the old and new settlements over the 400-foot-deep gorge known as El Tajo. The most famous of the three bridges is the Puente Nuevo, or New Bridge, that was completed in 1793. (Imagine how old the older bridges are!) It could be one of the most dramatic bridges in the world and definitely one of the most photographed sites in Spain.

Figure 1. Puente Nuevo, or New Bridge, is in the mountaintop city of Ronda, Spain. (Satellite imagery courtesy of Google Earth.)

I had an image of this in my notes as a place to visit if I ever went to Spain again. Truth be told, that image has been in mind for a long, long time. I had been dreaming about Ronda and the New Bridge since I was a child.

One of my favorite children’s books growing up was Ferdinand the Bull, the story of a gentle bull who refused to fight. Ferdinand was from the Andalusia region of southern Spain, and there is a scene in the book where they send Ferdinand off to fight in Madrid. The illustration backdrop is Puente Nuevo!

Figure 2. The image I remember so well from Munro Leaf’s The Story of Ferdinand, illustrated by Robert Lawson.

The Shoot

In researching the town and looking at pictures of Puente Nuevo, I found very few pictures of the bridge at night, and none with stars. This is because the bridge is lit by sodium vapor floodlights that make it difficult to see anything in the pitch-black night sky.

The typical prime time to take photographs of Puente Nuevo is when the sun sets directly opposite the bridge, basking it with golden light, or during civil twilight when the sky is still a bright rich blue that perfectly complements the golden floodlights (Figure 3). But I’m always one for a challenge, so I set off to capture it at night.

Figure 3. Twilight at Puente Nuevo. Nikon Z 6II with a Nikon Z 24-70mm and a 10-stop neutral density filter. f/2.8 S lens at 40mm. 20 seconds, f/11, ISO 400.

My strategy was this: Combine a twilight blend with a star stack. This is a fairly common technique, but it would definitely prove to be difficult given the high contrast between the lit bridge and the surrounding darker rocks and sky.

So I hiked down the gorge to a vantage point I liked and shot the bridge during twilight. This foreground shot perfectly balanced the bridge and its lights (which had just come on) with the rocks and waterfall that were lit by the ambient light of twilight. I shot a few more frames and chatted with rock climbers and other folks coming down the path as I waited more than an hour for the stars to come out.

An additional challenge was the inky black sky of the moonless night. Having even a little moonlight would have helped the visual transition from a bright bridge to a more illuminated sky.

Yet another challenge was the lack of stars in the frame. With my naked eye I could see one star in my composition. I could have shot wider to include a bigger part of the sky that was unaffected by light pollution, but then the waterfall would have been too small and lost in the image. I chose a tighter 40mm focal length to get the viewer into the landscape, and I left one-fifth of the composition for the sky.

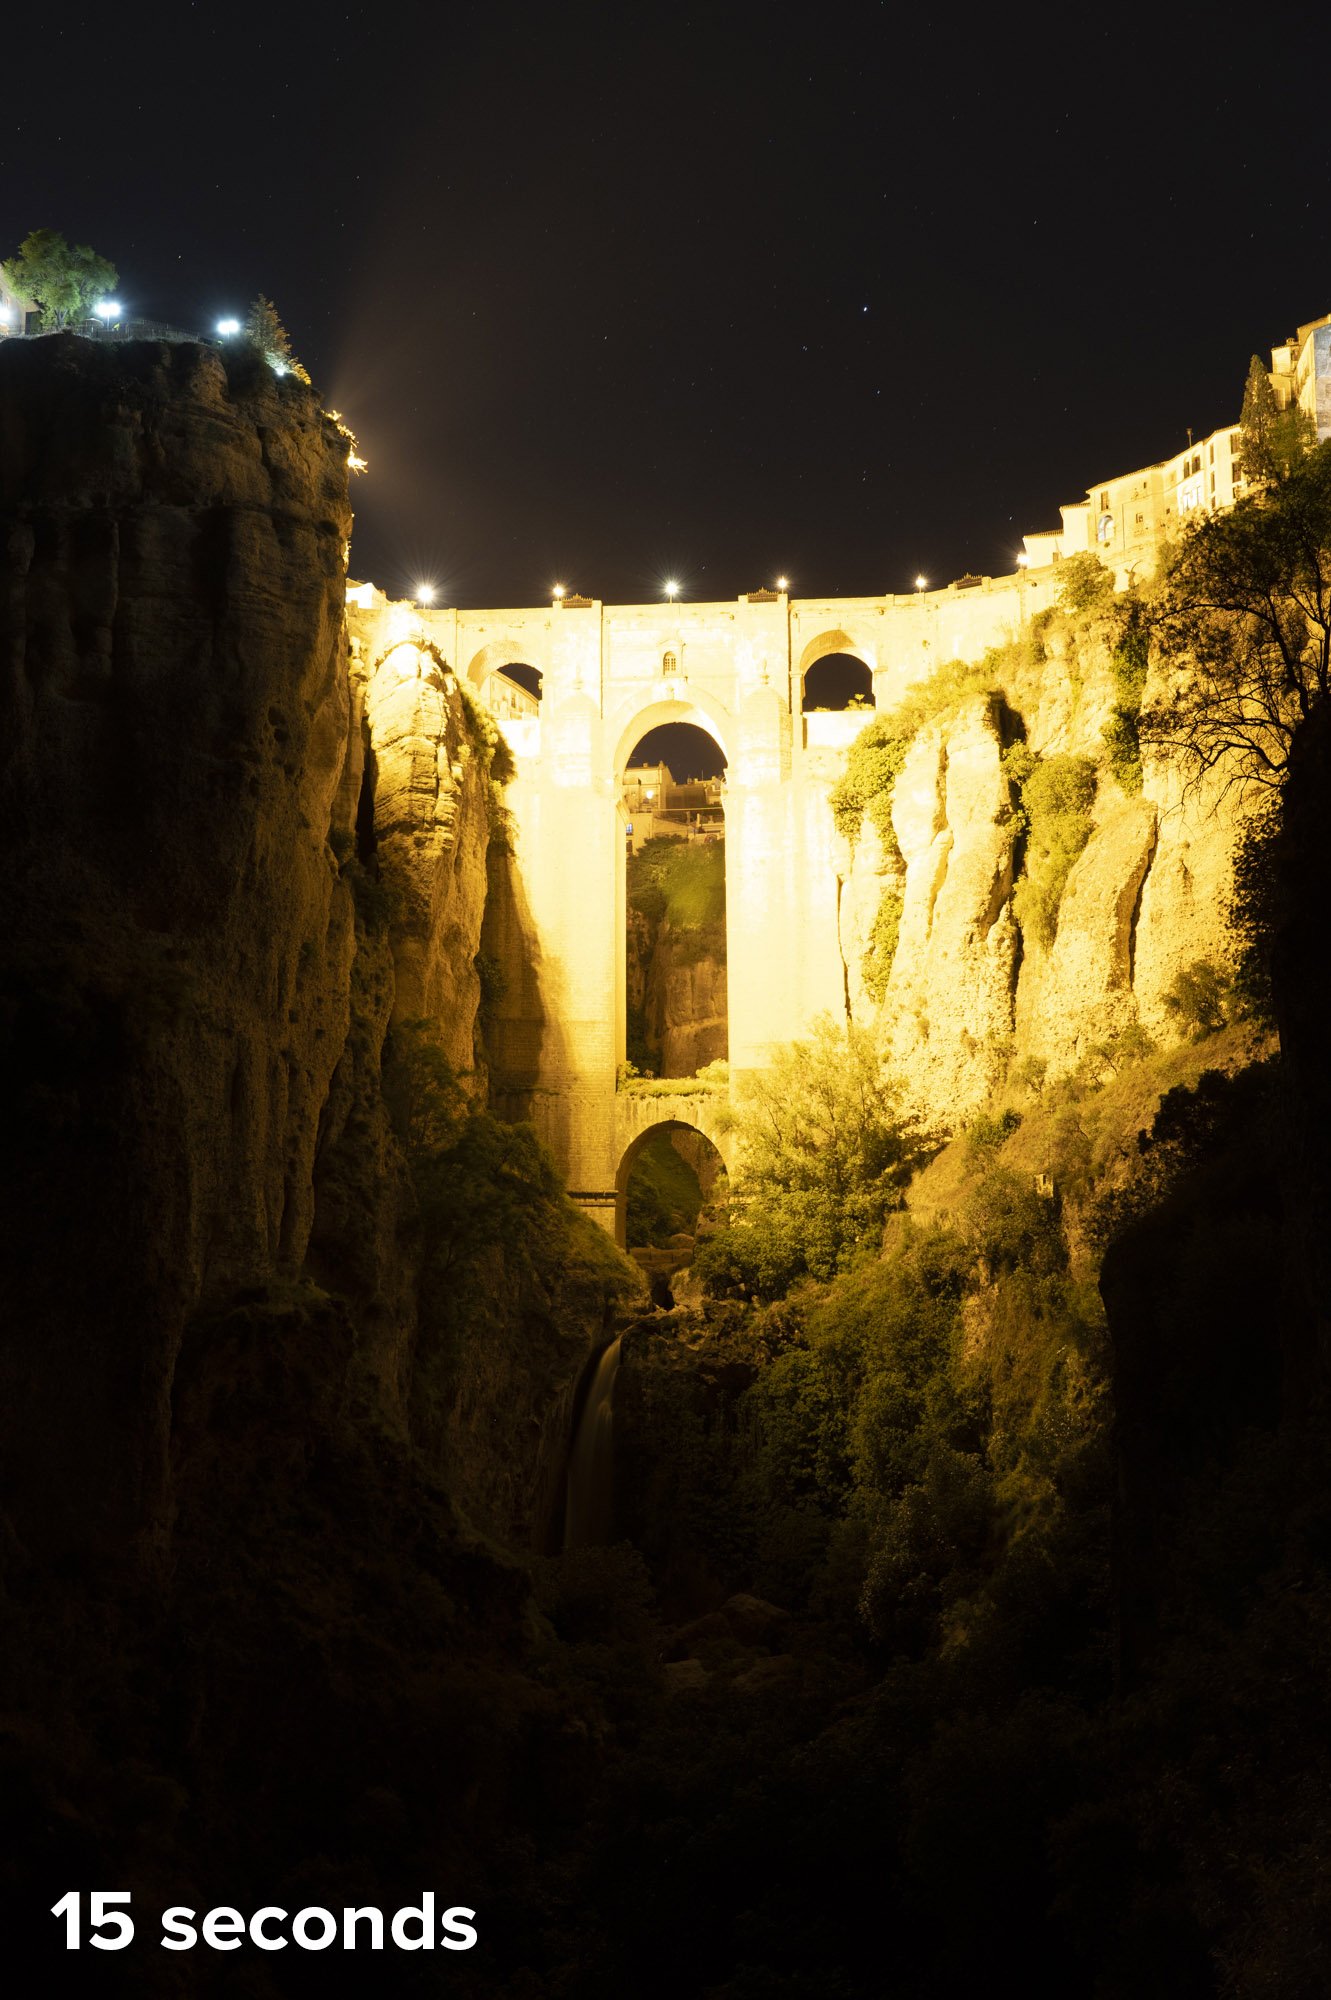
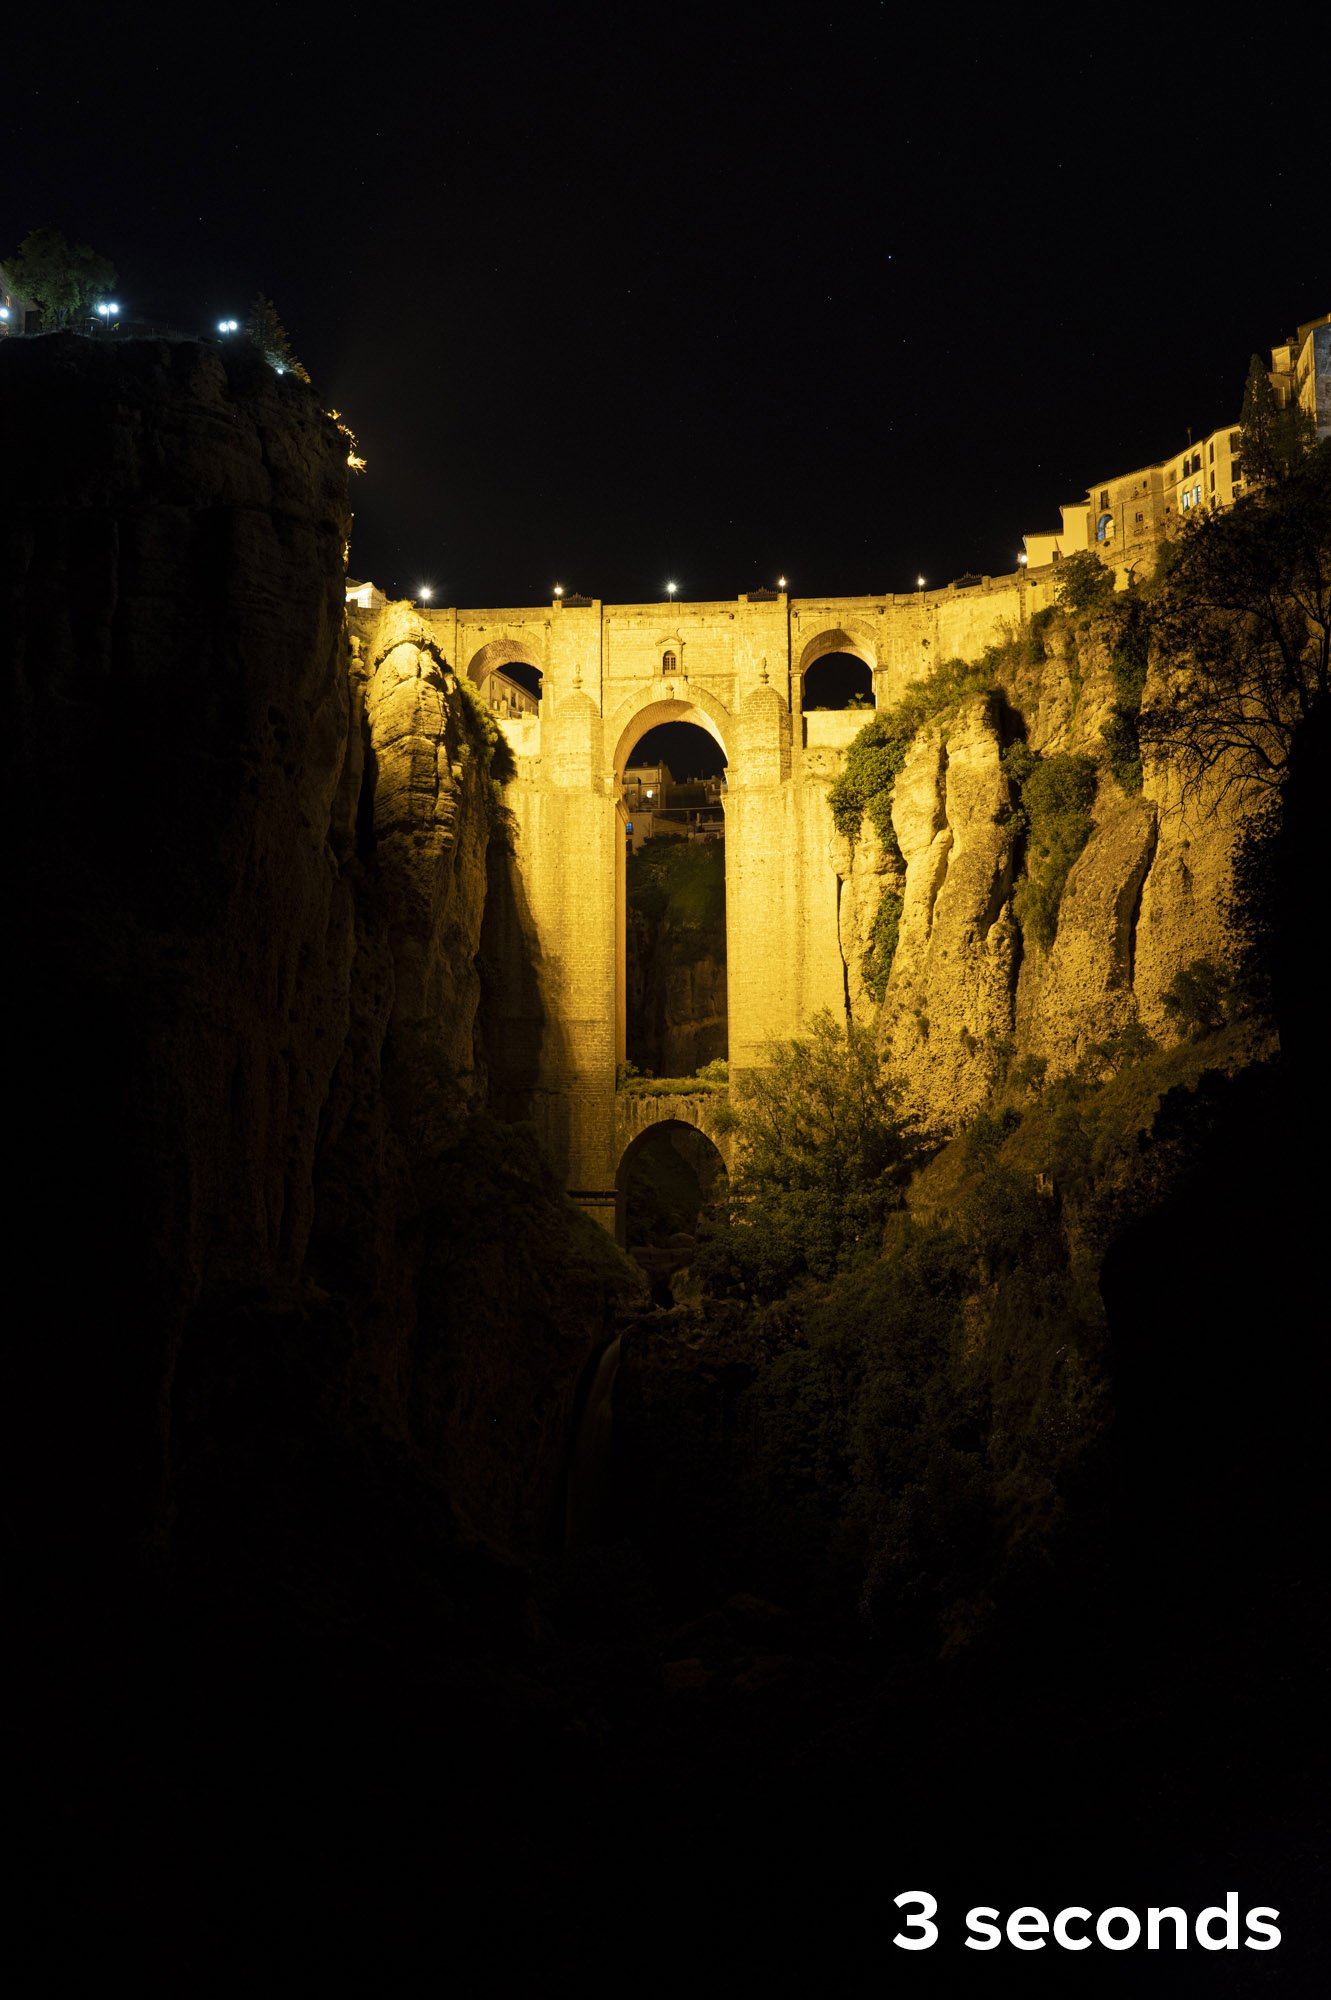
I could have opened my aperture to f/2.8 or gone to a high ISO to help my camera record more of the fainter stars, but that would have resulted in more of the streetlight spilling into the sky. Instead I chose an aperture of f/8 to control the direct light from the lamps and an ISO of 800 so the stars would retain some of their color and not blow out (Figure 4).

Figure 4. My first test shot was at 15 seconds, f/8, ISO 800. Note the spill of the streetlights into the night sky. I wanted to limit that so that blending in Photoshop would be easier. A 3-second shutter speed was the right balance, as it kept the bridge lights from not bleeding into the sky and still recorded more stars than my eyes could see.

It definitely felt weird to think of star-stacking a series of 3-second exposures. I would need a lot of frames to create a lengthy trail. But I felt this exposure gave me the best balance to blend everything together to create the final photograph that I was envisioning.

I was facing east, the only angle possible for this shot, so I knew the stars would trail downward toward the left. I planned for at least 1 hour of exposure, because I knew that would yield nice long star trails. I was shooting with my Nikon Z 6II, which is a 26-megapixel camera. With my shutter speed at 3 seconds, I used the built-in intervalometer to continually take successive shots.

As busy as this location is during the day, I bumped into only three people during my shoot. It is a bit of a hike down to the lookout, and people just don’t explore at night. So I dangled my feet over the fence and thought of Ferdinand the bull and all the historic places I had visited in Ronda that day.

After half an hour my eyes were adjusted enough and I could see that the brightest star had most likely moved out of the composition. That star had started in the middle of the frame, and because I was zoomed in with a 40mm focal length it had traveled a considerable distance to yield a long star trail. So even though I really didn’t see many other stars, I felt confident I had what I needed to put it all together in post.

The Post-Production

After loading the frames into Lightroom, I made only one adjustment: I turned off the automatic lens corrections. I always advise turning this off for stacking stars, otherwise you run the risk of creating moiré in the final stacked image. I was using 460 frames, which would result in about a 30-minute total exposure for the star trails.

Even though I have a fairly new souped up MacBook Pro M1, to stack 460 30-megabyte files would have definitely caused it to choke. So I stacked the images in sets of about 100 to create a series of five star trail images. Each stack followed this process:

  1. Select the frames in Lightroom.

  2. Choose Photo > Edit In > Open as Layers in Photoshop.

  3. In the resulting Photoshop file, select all the layers by clicking on the first, scrolling down, then shift-clicking on the last.

  4. Change the blend mode to Lighten.

  5. If desired, review the individual layers to edit out plane trails, stray light, etc.

  6. If desired to save hard drive space, flatten the layers.

  7. Save and return to Lightroom.

I then brought each of the five flattened stacks into Photoshop as layers, and used the Lighten mode on them to connect all the trails (Figure 5).

Figure 5. My five sequential star-stack images combined into one long stack.

Finally, I added the twilight shot as the top layer, and I and used a variety of masks and adjustment layers to match the exposures and blend them together as one cohesive image.

In the final photograph (Figure 6), look at the foreground areas outside what’s being illuminated by the streetlights. They are very dark, and that’s why I needed the twilight shot—just to bring out a little bit of detail in the rocks, waterfall and the rest of the foreground to make the overall image more pleasing, and to complete the visual story.

Figure 6. Nikon Z 6II with a Nikon Z 24-70mm f/2.8 S lens at 40mm. Foreground: shot with a 10-stop neutral-density filter at 20 seconds, f/11, ISO 100. Sky: 460 stacked frames shot at 3 seconds, f/8, ISO 800.

All in all this photograph took me about 1.5 hours of post-production work—the same amount of time I committed to shooting the image in the field!

Wrapping Up

Ferdinand didn’t want to fight, but I didn’t mind fighting all of those obstacles to get the shot that reminded me of one of my favorite stories from boyhood.

I’m pretty happy with it. I set out to create a complex photograph of a dream location under conditions I couldn’t control. I put my stamp on it, and hopefully inspired you to seize the night no matter what the scenario!

Gabriel Biderman is a partner and workshop leader with National Parks at Night. He is a Brooklyn-based fine art and travel photographer, and author of Night Photography: From Snapshots to Great Shots (Peachpit, 2014). During the daytime hours you'll often find Gabe at one of many photo events around the world working for B&H Photo’s road marketing team. See his portfolio and workshop lineup at www.ruinism.com.

UPCOMING WORKSHOPS FROM NATIONAL PARKS AT NIGHT

How I Got the Shot: Grosvenor Arch Milky Way Pano

Grosvenor Arch Milky Way Pano. Nikon Z 6II with an Irix 15mm f/2.4 Firefly lens and FTZ Adapter, mounted on a Novoflex VR-System Slim Panorama System, lit with two Luxli Fiddle LED panels. Eight frames shot at 15 seconds, f/3.2, ISO 12,800 and stitched in PTGUI Pro.

The Location

One standout feature among many in the nearly 2 million acres of Grand Staircase-Escalante National Monument is Grosvenor Arch.

This hulking double sandstone arch stands 150 feet above ground. Named in honor of Gilbert Hovey Grosvenor (1875-1966), the first full-time editor of National Geographic magazine and husband of Elise May Bell, daughter of Alexander Graham Bell. Gilbert is credited with transforming the much-too-scholarly National Geographic into the illustrated and superb publication many of us have enjoyed for decades.

Figure 1. Grosvenor Arch sits in the backcountry of Utah’s Grand Staircase-Escalante National Monument, which is gigantic. Click here to download a map of the area. Satellite imagery courtesy of Google Earth.

Photographers from the National Geographic Society named the arch after Grosvenor during a 1949 expedition, as they believed he “had done more than any other person to arouse public interest in geography.” So this was a fitting subject for Gabe Biderman and I to stop at during our 3-week tour of California, Utah and Arizona in 2021.

From our base in Kanab, Utah, Gabe and I made a day and night of driving north and past the entrance to Bryce Canyon (gasp!) and onward to Kodachrome Basin State Park for sunset (Figure 2).

Figure 2. Nikon Z 6 with a Venus Optics Laowa 15mm f/2 FE Zero-D lens, mounted on a Novoflex VR-System Slim Panorama System. Seventeen frames shot at 1/60, f/8, ISO 100 and stitched in PTGUI Pro.

A fun detour! But our real goal for the night lay farther down the primitive, hardpack Cottonwood-Canyon Road.

Upon arrival, we noted that 1) only one other car was present and the owner was either sleeping or hiking, and 2) there was a bathroom. Yay! The ample parking and paved walkway were welcoming after some of the back-trail adventures we’d had.

While scouting (Figure 3), I knew that my ultimate goal was the rise of the Milky Way core and the resulting arch connecting with the landform. Gabe and I studied the scene and planned the compositions. I was really into making panoramas during that trip (and still am!).

Figure 3. Scouting with PhotoPills.

The Pre-Shoot Shoot

As darkness drew upon us, we still had a long time to go before the galactic core appeared. Not ones to waste a good dark sky, we shot plenty while waiting.

We started with deploying some Low-level Landscape Lighting (LLL). Gabe hiked down the road a bit and then a little into the field to set up a Luxli Fiddle LED panel. Being over one-third of a mile from the arch, Gabe turned it on at 30 percent brightness. The result was a crisp, directional light source that defined the most important shapes and textures of the eroding rock formation.

We set up 1.5-hour star trail stack (Figure 4) and dove hungrily into our sandwiches.

Figure 4. Nikon Z 6II with a Nikon Z 24-70mm f/2.8 S lens at 34mm. Sky: 31 frames shot at 4 minutes, f/2.8, ISO 800 and stacked in Photoshop; foreground shot at 8 minutes, f/4, ISO 800.

After sitting back and enjoying the stars for a bit, we moved closer to the arch to shoot some star-point stacks, while the clock crept ever closer to the triumphant rise of the galactic center.

During that time I made this composite image with a 15-image star point sequence and a longer base image for the landscape (Figure 5).

Figure 5. Nikon Z 6II with a Venus Optics Laowa 15mm f/2 FE Zero-D lens. Sky: 15 frames shots at 10 seconds, f/2.8, ISO 12,800 and stacked in Starry Landscape Stacker. Foreground: 8 minutes, f/4, ISO 800. Blended in Photoshop.

Reviewing those images in the field, I noticed that the ground was dark in the composition. As natural as that was, Gabe and I agreed to draw out some more definition in the trees closest to us. We set up much closer to the foot of the arch to put even more of it above the horizon. Having that air around the formation really brought out the space between the eroded, airy portions, not to mention set the stage for a landing point when the Milky Way would appear.

The Shoot

It was dark. Really dark. Bortle Class 1 dark (Figure 6). So our short exposures were shot at ISO 12,800, and for star points we were using NPF settings (see below), which made the exposure even more challenging.

Figure 6. Bortle Class 1 info for the Grosvenor Arch area. Source: lightpollutionmap.info.

As we began setting up the panorama sweep, we set another Luxli Fiddle in the two trees in front of us. The concept was to cast shadows toward our lenses and radiating outward toward the arch. This gave the otherwise dull and dark trees shape and texture.

I placed and leveled my Novoflex TrioPod Pro75, then mounted my VR-System Slim Multi-Row Panorama System. This setup gives me reliable and repeatable rotations. Repeatability was necessary because I planned to execute the pano sweep three times with different settings. (Though I did end up getting it in one pass—lucky!)

I chose the Irix 15mm lens for this shot. NPF exposure duration for that lens on my Nikon Z 6 is 18.04 seconds for Default and 9.02 seconds for Accurate (Figure 7). (See the post “NPF: The New Rule for Shooting the Sharpest Stars in the Sky” for further information.) I was already at ISO 12,800 and didn’t want to push further. I opted for an educated guess of 15 seconds to drink in as much light as I could. I felt comfortable leaning toward letting in more light in the near-darkness versus a “correct” exposure with little information to post-process.

Figure 7.

After test shots, I waited for the Milky Way to be in the ideal position, and then I committed and shot the sequence. Job done! Well … almost.

The Processing

In Lightroom Classic, I first made basic local adjustments. Then I processed one of the image sets (Figure 8) by adding a mask for the sky using the new AI-assisted Masking tool. I also brushed in the negative space under the arch and cleaned up some of the land/sky mask using the Subtract tool. I adjusted to taste for an ideal sky.

Figure 8.

Then I created another mask using Select Sky (Figure 9), and I inverted that to mask the landscape instead. Again I cooked to taste, being extra careful not to over-boost the shadows and accentuate the noise in them.

I also got rid of sky junk, of which I found a surprising amount (Figure 10).

Figure 9.

Figure 10.

Once I got my adjustments down, I synchronized them across all the images. (Note: When you have one of the new AI-created masks and you sync it across images, you have to go in and recalculate each of them. Adobe, are you listening?)

After confirming that each of the eight pano images was processed correctly, I used the Export to PTGUI menu command and chose TIFFs with Lightroom Adjustments.

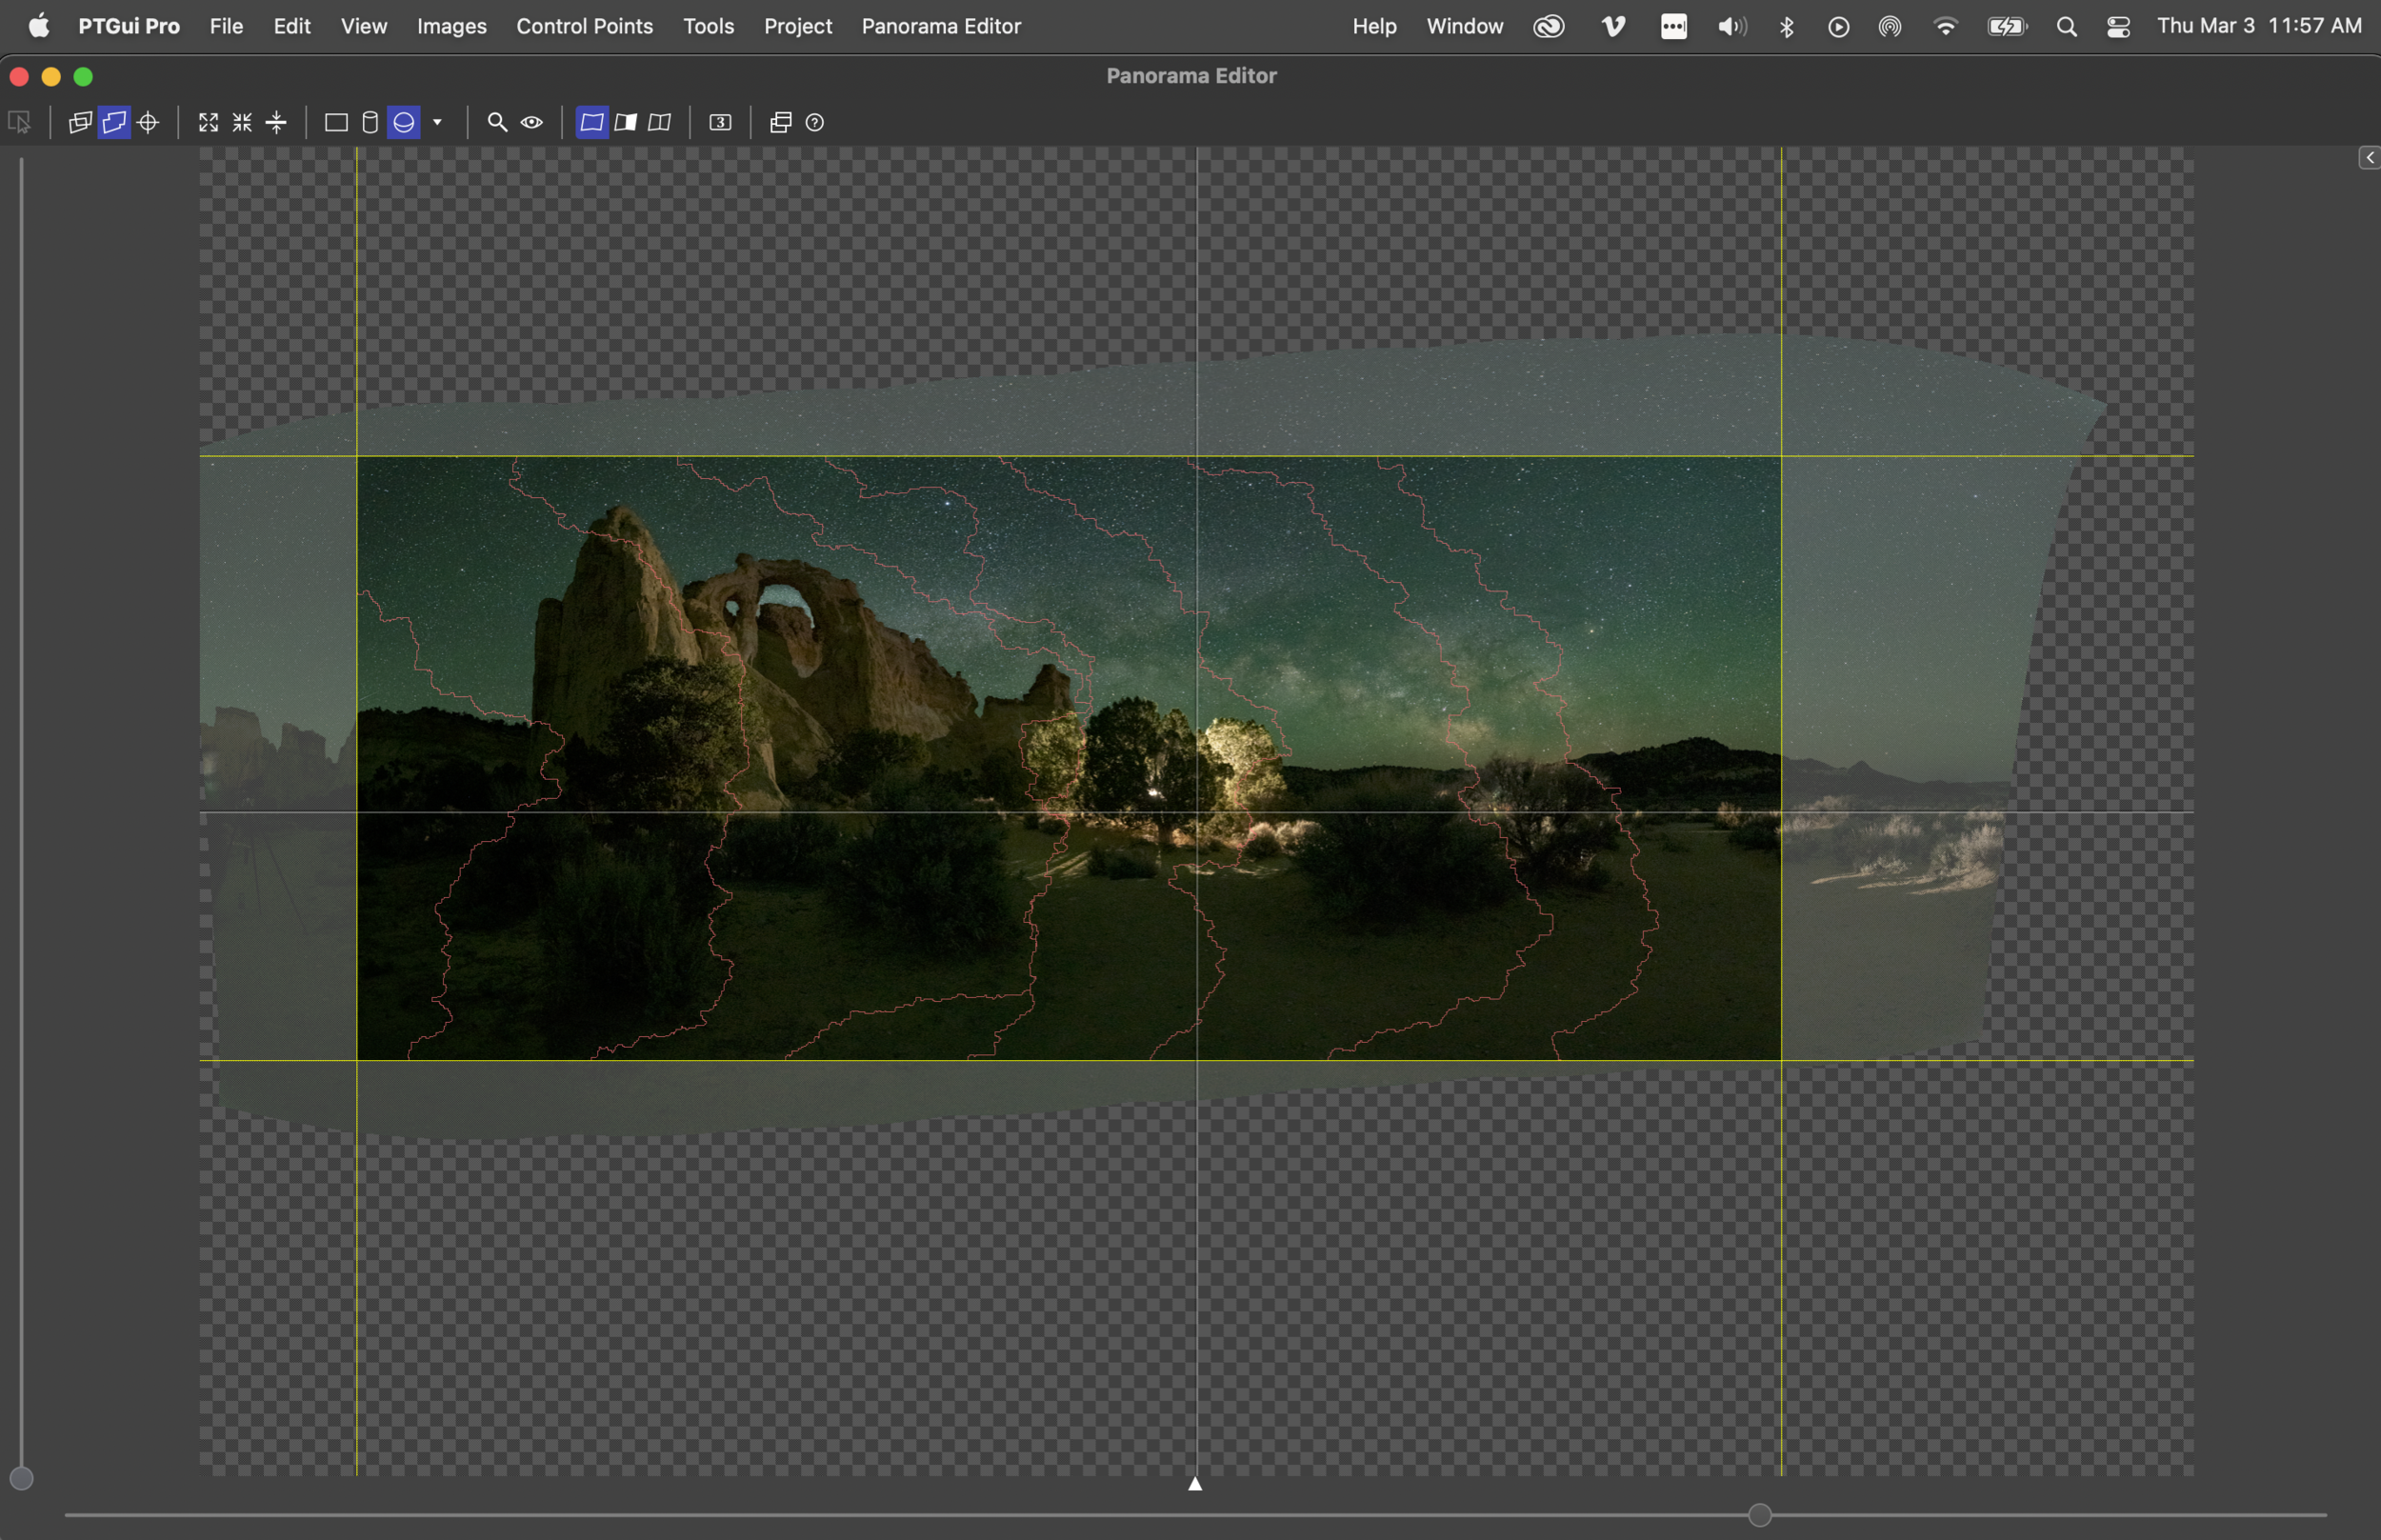
In PTGUI Pro, I moved through many of the different projections, looking for one that provided an ideal, natural perspective.

Figure 11.

Figure 12.

I ended up with Equirectangular (Figure 11) and reduced the field of view to 270 degrees (Figure 12). A final step in PTGUI was to drag in crop lines from each edge for a final composition (Figure 13).

Figure 13.

I exported from PTGUI to the same folder as the raw files, then synchronized the folder in Lightroom Classic to get that final image back into my catalog. Then I studied the image one last time. I noticed the trees in the foreground got bright again, despite careful processing before stitching, so I brushed in a local exposure reduction (Figure 14).

Figure 14.

Then it was time to make a final crop. I feel that the classic 3:1 ratio is perfect for this photo (Figure 15). It balances all the important elements in the scene.

Figure 15.

Wrapping Up

I find the final image (Figure 16) very true to the planning and preparation that went into this.

Figure 16. Nikon Z 6II with an Irix 15mm f/2.4 Firefly lens and FTZ Adapter, mounted on a Novoflex VR-System Slim Panorama System, lit with two Luxli Fiddle LED panels. Eight frames shot at 15 seconds, f/3.2, ISO 12,800 and stitched in PTGUI Pro.

It always pays to know when your celestial objects are going to be in the right place. PhotoPills was crucial in planning this from the hotel in Kanab.

What’s also essential is to look at a scene and have a bunch of other “tools in your toolbelt.” In this case, I was laser-focused on making a pano with the Milky Way arch, but it wasn’t the only photo I made that night. I made star trails, star point stacks and even a vertorama (not included here).

Making other photos while waiting on your dream image is the right way to warm up and to work out the kinks in any scene.

I hope you enjoyed coming along with me to one of the jewels in the crown of Grand Staircase-Escalante National Monument. Seize the night!

Further Learning

If you want to learn more about planning with PhotoPills, sign up for the waitlist for our PhotoPills Bootcamp: Bryce Canyon and be sure to get on our mailing list, as we’re sure to offer more PhotoPills workshops in the future.

If you want to shoot scenes like this under the amazing dark skies of the Kanab area, another outstanding opportunity to learn more about astro-landscape photography is by joining the outstanding group of instructors at the 2022 Nightscaper Conference April 26-29. Limited early bird tickets are available now.

Just for fun.

Matt Hill is a partner and workshop leader with National Parks at Night. See more about his photography, art, workshops and writing at MattHillArt.com. Follow Matt on Twitter Instagram Facebook.

UPCOMING WORKSHOPS FROM NATIONAL PARKS AT NIGHT

How I Got the Shot: Star Circles Over West Quoddy Head Lighthouse

West Quoddy Head Lighthouse. Nikon D780 with a Tamron 15-30mm f/2.8 lens at 18 mm. Five stacked frames shot at 10 minutes, f/3.2, ISO 800.

The Location

After our recently completed PhotoPills workshop in Acadia National Park, Chris and I took an extra day and night to visit Lubec, Maine, and the West Quoddy Head Lighthouse––the easternmost point in the continental United States and the light that warns ships of its rocky shores.

We both enjoy working out different strategies for photographing lighthouses with different types of beacons. Some beams are continuous, some pulse or flash, and some rotate. Each type requires a unique approach to get the best possible exposure (or exposures) for both the lighthouse and the surrounding landscape.

West Quoddy Head Light is among the most common in the category: those with a pulsing or flashing light. The beacon switches on and off every few seconds in a consistent, unique pattern (referred to as the lighthouse’s “characteristic”) that enables mariners to establish their location.

Seafaring folk just need to know what the colors and pattern are—they’re not concerned about anything else. But night photographers? We care. The longer that the light remains off (the “eclipse,” in lighthouse terminology), the easier it is to photograph, because the longer it’s on (the “flash”), the harder it is to control in a night exposure. West Quoddy Head’s characteristic is a white beam that flashes for 2 seconds, eclipses for 2 seconds, flashes for 2 seconds, eclipses for 9 seconds, then repeats (Figure 1).

Figure 1. This animation depicts what the 2-2-2-9-second flash sequence of the West Quoddy Head Lighthouse looks like in-person. This is the drastic change in exposure you need to compensate for when shooting a flashing-beam lighthouse. © 2021 Chris Nicholson.

Even for lighthouses with long eclipses, exposure is still a challenge, because the lantern is so bright. The usual technique to keep the flash from blowing out in an exposure is to cover the lens while the light is on and expose when the light is off over an extended period of time until an adequate ambient exposure is achieved. You still want to see the light, of course, so you allow the camera to see just a single flash.

Now let’s get back to Lubec and West Quoddy Head Lighthouse. We had arranged for after-hours access to the grounds, which is in a state park that is normally closed at sunset. We’d had a long day of travel and arrived after darkness had already fallen. There was no moon that night, and we set up without the benefit of daytime scouting. (Chris had been there before, but almost 20 years earlier!)

The lighthouse is situated on a peninsula (Figure 2) at the mouth of the Bay of Fundy, making it accessible from all sides with lots of photographic opportunities. The candy-striped paint and classic keeper’s house are easy to work with, but what really makes this lighthouse fun to photograph is its characteristic—that flash pattern of 2, 2, 2, 9.

Figure 2. Google Earth view of the West Quoddy Head Lighthouse.

The unusually long 9-second period of darkness makes it easier than most other lighthouses to get a good image without over-exposing the lantern. This was especially helpful on that moonless night, as there was almost no light source other than the stars to illuminate the overall scene. A few dim lights (an exit sign and a computer’s glow) inside the keeper’s house lit a couple of the windows, but did little to light the landscape.

The Composition

My initial inclination was to set up beneath the lighthouse on the north side to capture the vertical core of the late-season Milky Way behind it (Figure 3). This required using an ultrawide lens tilted significantly upward. The resulting composition was tight on the sides, had too much foreground and had too much perspective distortion for me to correct effectively in post-production.

Figure 3. West Quoddy Head Lighthouse test shot. I wanted to get the Milky Way in the frame, but didn’t like the compositional options. Nikon D780 with a Tamron 15-30mm f/2.8 lens at 15mm. 8 seconds, f/2.8, ISO 12,800.

I moved around to the south side of the lighthouse and set up a horizontal composition that included the keeper’s house, the ocean and a great alignment to make star circles. I wished that we had at least a little moonlight for the landscape, but that was not the case.

I established my composition with the intention to keep the camera level (in order to minimize distortion) and to crop out some of the resulting dark grassy foreground.

Then I focused on an illuminated window in the keeper’s house. I was about 50 feet from the house, so I knew that with an 18mm lens I could safely focus on the foreground and still have the stars in focus. (See “Use Hyperfocal Distance to Maximize Depth of Field at Night.”) Since we had just finished the PhotoPills bootcamp and those skills were fresh in my mind, I confirmed my focus choice with the Advanced DoF pill and found that if I focused at 50 feet then my depth of field would be from 18 feet to infinity. That was plenty!

The Exposure

While we generally use a baseline of 20 seconds, f/2.8, ISO 6400 for starlit scenes, that’s really a compromise exposure that underexposes to keep the stars as points of light. I prefer to add at least a stop of extra exposure for my star trail images; my go-to baseline for star trails is 10 minutes, f/3.2, ISO 800.

I could have used the Six Stop Rule to extrapolate, but since I was changing all three exposure variables from my test shot, it was easier to use the Exposure pill in PhotoPills to translate from the test exposure to the final exposure. In this case, a successful test of 1 minute, f/2.8, ISO 6400 yielded a final exposure of 10 minutes, f/3.2, ISO 800 (Figure 4). Boom! My go-to baseline was almost exactly the same as that night’s perfect exposure.

Now that I had fixed the composition, focus and exposure, it was time to get down to the real task at hand. In order to get a good semblance of a star circle with a wide lens, I knew that I would have to do at least 30 minutes of exposures, and preferably more.

Figure 4. Unadjusted frame from the series, showing the single-shot exposure. Nikon D780 with a Tamron 15-30mm f/2.8 lens at 18 mm. 10 minutes, f/3.2, ISO 800.

If you’ve been paying attention, you might be wondering at this point how I’d go about exposing long enough for a star circle while covering the lens whenever the light was flashing. The short answer can be summed up with two words: patience and determination.

That meant that I would have to stand behind the camera covering and uncovering the lens according to the flash sequence of the lighthouse for the entire series of exposures. I probably could have used the cover-the-lens technique for just one exposure and then masked out the lighthouse from the rest of the images in post, but that’s not how I roll. I wanted to do as much in-camera and as little in post as possible.

I practiced for a couple of minutes to get the rhythm of the flash sequence down, and then started my first exposure, not knowing how long I’d be able to keep it up without accidentally uncovering the lens at the wrong time. To keep my count, when I wasn’t covering the lens, I was waving the black card in time with my counting. As luck would have it, I managed to pull off five 10-minute exposures, each with good highlight detail, even keeping it together when Chris came over to see what I was up to and started chatting.

Counting, covering and uncovering while trying to hold a conversation is not an easy task. It was on the sixth exposure that I whacked the lens with my black card and moved the camera ever so slightly. So that was it. Fifty minutes of star trails behind a lighthouse with a well-exposed lantern. That was a record for me, but now I can’t wait to go back and do it under a full moon!

The Processing

Stacking the images in Photoshop was relatively easy because of the way I’d gone about capturing the raw materials. The light wasn’t blowing out in any of the exposures, so it was a simple matter of:

  1. selecting the five frames in Lightroom

  2. choosing Photo > Edit In > Open as Layers in Photoshop

  3. selecting all five layers

  4. changing the blend mode of the five layers to Lighten (Figure 5)

Figure 5.

I made a few minor touch-ups, then saved and returned the image to Lightroom.

Wrapping Up

Lighthouses are a challenging and fun subject for night photography. Sometimes the approach is dictated by geography––like the charming Bass Harbor Head Lighthouse in Acadia National Park and how it demands certain compositional compromises—while others offer 360 degrees of access.

The technique to get the best images varies from one lighthouse to the next, but the biggest challenge is usually trying to manage overexposure in the lantern while getting enough exposure for the landscape. The solution to that challenge varies depending on the lighthouse, and in this case the particular set of challenges pushed me toward a final photograph (Figure 6) I was quite happy with.

Figure 6. The final image of West Quoddy Head Lighthouse. Nikon D780 with a Tamron 15-30mm f/2.8 lens at 18 mm. Five stacked frames shot at 10 minutes, f/3.2, ISO 800. That was fun.

If you’d like to have a go at some of the best lighthouses in North America, sign up for the waitlist for our Lighthouses of the Outer Banks, Acadia National Park or Monhegan Island workshops, and keep an eye out for more lighthouse workshops in the future.

What lighthouses have you photographed at night? We’d love to see! Feel free to post your take on this towering genre in the comments, on our Facebook page or on Instagram (tag us @nationalparksatnight and/or hashtag us #nationalparksatnight).

Lance Keimig is a partner and workshop leader with National Parks at Night. He has been photographing at night for 30 years, and is the author of Night Photography and Light Painting: Finding Your Way in the Dark (Focal Press, 2015). Learn more about his images and workshops at www.thenightskye.com.

UPCOMING WORKSHOPS FROM NATIONAL PARKS AT NIGHT

How I Got the Shot: Milky Way and White Dome Geyser, Yellowstone

Milky Way and White Dome Geyser, Yellowstone. Nikon D5 with an Irix 15mm f/2.4 lens, light painted with a Luxli Viola. 25 seconds, f/2.8, ISO 6400.

The Location

I love Yellowstone National Park’s White Dome Geyser. I’ve been photographing it since 2010.

I first targeted it as the solution to a self-challenge. While preparing for a 10-day shoot in Yellowstone, I’d had a sudden inspiration that I wanted to silhouette a geyser eruption in front of a sunrise or sunset. I started researching which of the park’s 500 geysers would give me good chances for a good photo. In my mind, three criteria were important:

  1. The geyser had to erupt frequently. I didn’t want an hours-long window between eruptions, because I needed to be able to time it with a sunrise or sunset.

  2. The geyser had to erupt predictably. That solves the same problem as above—if the estimated time of the predicted eruption was wrong by two hours, I wouldn’t be able to time the eruption with a sunrise or sunset.

  3. The geyser had to have an aesthetic quality that could be silhouetted. A hole in the ground wouldn’t work—physical structure was important.

After a fair amount of pre-trip research, I settled on White Dome Geyser. Its eruption times can vary, but not nearly as widely as most other geysers (the average interval is about half an hour for White Dome, as opposed to hours, days, weeks, months or years for others); it’s relatively predictable, rarely varying by more than 30 minutes or so; its presence is visually notable, as it features a sinter cone that rises 12 feet from the ground.

The geyser didn’t disappoint. Once I arrived on location, it took me three tries (because of weather), but eventually I got my shot (Figure 1). Then over the years I fondly visited and photographed White Dome a few more times, during daylight and moonlight. I’ve come to know the spot well.

Figure 1. White Dome Geyser erupting at sunset in 2010. Nikon D3 with a Nikon 80-200mm f/2.8 lens. 1/800, f/5.6, ISO 200.

So this past September, when Tim Cooper and I were leading a night photography workshop in Yellowstone and we had the idea of light painting an eruption with the Milky Way in the background, I had an inkling for a geyser that might work. White Dome would be a good target once again, for all the reasons mentioned above. We did a daytime scout with PhotoPills (Figure 2), which showed that the galactic core would be behind the geyser by about 10 p.m. Perfect!

Figure 2. PhotoPills proved our hunch that we could photograph the Milky Way behind White Dome geyser that week, and told us what time we could expect that to happen.

The Shoot

We never have just one idea for a location—we come loaded with a few (including, in this case, star circles over a nearby hot spring), and of course we let workshop participants run with their own ideas as well. On the night we visited that location, most of the group shot by the hot spring, because that photo opportunity was immediate, while the White Dome idea wouldn’t work until a few hours into the evening, after the moon set.

With that being the case, the idea for the Milky Way behind the geyser was nearly forgotten. Folks did some twilight light painting, followed by Tim and I running a long demo to help participants set up for shooting star circles under moonlight, followed by an hour-plus of everyone chatting under the night sky while their cameras ripped a series of 2-minute exposures.

Except for James and me.

Earlier in the evening I’d set up a series of star-circle exposures over White Dome Geyser. I wanted to go back to stop the camera, and James, one of the workshop participants, decided he’d join me.

After breaking down that north-facing setup, I remembered the Milky Way idea and we circled the geyser to see how things were lining up. The answer? Perfectly! We decided we’d do a quick setup—not to wait for the geyser to erupt, but to just light paint the steam with the Milky Way in the background.

We set up our tripods, and worked out our compositions, focus and exposure. Then we added some light with a Luxli Viola. The approach was straight-forward. We didn’t have much choice for an angle to light from, because we could walk on only one side of the geyser (the side with the paved road)—so we just walked far enough to get a 90-degree angle at the steam. The only real question was how much light to add, and we figured that out with just three test shots (Figure 3).

Figure 3. Testing the light painting. From left: a little too much, a little too little, almost perfect.

We were very happy with that third shot, enough to pack up and move back to the rest of the group. We came within seconds of breaking down our setups, when—swoosh! Water started gushing skyward!

We couldn’t have timed it better if we’d tried. We were already set up, composed, focused and dialed in with our exposure, and we knew exactly how much light to add and from where to add it. All we needed to do was execute everything again. So we did. And we got the two shots in Figure 4.

Figure 4. The two photos that include the eruption.

The Reshoot

James and I were ecstatic about our … well, let’s not say at “luck,” but rather at the meeting of luck and preparation. On the way back to the group, we were pretty charged about the image we’d just made. We showed the rest of the participants, and they were excited too, enough so that four of them wanted to stay late to shoot a similar photo.

By the time we made it back to White Dome, an hour had passed. It was almost midnight, and the Milky Way had moved. Seven of us set up along the side of the road, and Tim and I set two Violas on the ground, pointed toward the geyser. We tested our exposures, and waited.

But this time, we weren’t as fortunate. We encountered a few problems.

First Reshoot

We didn’t have to wait terribly long for the next eruption. White Dome blew again at about 12:30. We were all excited and started shooting. But …

Unfortunately, someone had the Luxli Composer app open on their phone and accidentally touched a control. Instantly the light color changed from the nice warm temperature of 3200 K to bright blue (Figure 5). White Dome’s eruptions last about two minutes, but the maximum flow occurs for less than half of that. When you’re dealing with a 15- to 25-second exposure, that means you usually get one good shot—maybe two—per eruption. The color change happened during that narrow window, so … well, we missed the shot.

Figure 5. First reshoot. Oops.

Still, we were enjoying the now-dark sky (the moon had set two hours earlier by that point) and the quiet surrounds of a beautiful national park—not to mention each other’s company. So we got over our disappointment and settled in for another try.

Second Reshoot

That opportunity came 50 minutes later—at 1:23 a.m. But …

At exactly 1:20 a.m—just three minutes before the next eruption, for the first time all night, the breeze shifted. All of us had set up compositions with the galactic core to the left of the geyser, and now the steam was blowing across—and obscuring—the Milky Way. Then, swoosh!, White Dome blew. Once again, we didn’t get the shot.

Figure 6. Second reshoot. Dang wind!

We were deflated. We were disappointed. And we were exhausted. We were done. We decided we couldn’t and wouldn’t wait for another eruption.

Then a funny thing happened: We waited anyway. We didn’t break down. We didn’t pack up our gear. We didn’t leave. Instead, we stood there talking and laughing and, for some reason, not getting any more tired. I can attribute that only to something about the magic of nature at night.

Third Reshoot

Thus, when the geyser blew again at 2 a.m., we were ready. The Milky Way was tilting perfectly. The light was right. The breeze was blowing gently to the right. Everything was perfectly in place, and we all got the shot (Figure 7).

We felt good. In fact, we felt great! We hooted, we hollered, we high-fived. Then we packed the cars to head back to the hotel, hitting the road about 2:30 a.m. and the beds well after 3:00.

Figure 7. Third reshoot. Yay!

Wrapping Up

All the takes on that night’s scene were straight-forward: just the right exposure with the right amount of added light. As such, the post-production didn’t require anything fancy or complex—just basic adjustments to tune the white balance and exposure, then to boost local contrast with Dehaze and Texture.

The biggest matter in post was choosing which frame I like the most. By the end of the night I’d had two cameras running—one vertical and one horizontal—and thus I had about 20 exposures with the geyser actually erupting (plus about 120 with just steam). Many of the images had merits, but I decided that my first take with James was my favorite. I just liked the way the water and steam were moving in the composition, mimicking the shape of the galactic core.

Milky Way and White Dome Geyser, Yellowstone. Nikon D5 with an Irix 15mm f/2.4 lens, light painted with a Luxli Viola. 25 seconds, f/2.8, ISO 6400.

Chris Nicholson is a partner and workshop leader with National Parks at Night, and author of Photographing National Parks (Sidelight Books, 2015). Learn more about national parks as photography destinations, subscribe to Chris' free e-newsletter, and more at www.PhotographingNationalParks.com.

UPCOMING WORKSHOPS FROM NATIONAL PARKS AT NIGHT