lunar eclipse

From Plane to Rain to Desert Moon: The Great Lunar Eclipse Chase of 2025

It had been a while since we were last able to photograph a total lunar eclipse in the Americas—November 2022, to be exact. I missed shooting them, because I love shooting them.

I started chasing lunar eclipses in 2014 when I took a Dusk to Dawn workshop group to Las Vegas for the second in the tetrad of lunar eclipses that were happening over a one-year period. The next time was 2019, when I was in Atlanta and found a view of downtown with car trails and a big super blood moon.

High Roller & Lunar Moon Trail, 2014. 55mm focal length, 15 minutes f/8, ISO 400.

The 2019 super blood wolf moon (aka the lunar eclipse) over Atlanta. Foreground: 35mm lens, 25 seconds, f/16, ISO 200; background (moon): 600mm lens, 1/2 second, f/5.6, ISO 3200.

Lunar eclipses are relatively easy to shoot, compared to solar eclipses—you don’t need special filters and you typically have an hour of totality instead of mere minutes. Looking back recently, a common theme I noticed was that I had shot all my lunar eclipses in urban locations. So for the March 2025 eclipse last week, I wanted to travel someplace dark. Given that I would be in Vegas again right before this eclipse, I set my eyes on experiencing the event in the gold-tier dark skies of nearby Death Valley National Park.

The Players

As always is the case with night photography, I wanted to enjoy this experience with others. I was heading to Vegas for the WPPI conference, so it wasn’t hard to find friends who were willing to adventure together. The team comprised:

  • Susan Magnano, night photographer, luminescent portrait expert, Night Photo Summit speaker and birthday girl!

  • Clifford Pickett, post-processing wizard and educator in all things photography

  • JC Carey, master of bringing light and drama to any scene with his Westcott strobes always at the ready

The Plan

Death Valley is a vast national park with lots of scenery options. The idea I proposed was to photograph the hexagonal patterns of salt flats with mountains in the distance (like in the photo below) and the moon high in the sky.

Salt flat formations, Death Valley National Park. © Chris Nicholson. Nikon D5 with a Nikon 14-24mm f/2.8 lens. 1/320, f/8, ISO 100.

JC and I planned to fly in early on the 13th and head right to Death Valley. Susan and Cliff were already there and were able to do some key scouting for locations.

When JC and I landed, the weather was horrible. It was raining, totally overcast, windy and cold. But the forecast for Death Valley was that things would clear up about an hour before totality. That being said, Death Valley has different weather all over the massive park, so we kept our fingers crossed.

Another not-so-fun fact about Death Valley (depending on your priorities) is that it has very limited cell reception. Fortunately we got just enough of a sliver of service to learn that when Susan and Cliff scouted Badwater Basin—the usual spot for shooting salt patterns—they found nothing. Hurricane Hillary in 2023 and heavy rains in 2024 wiped out the formations (which is part of the normal cycle of nature there), and new ones had not completely reformed yet. So Susan and Cliff found another location with more defined patterns, and they sent us a pin.

The Shoot

Dropped pins work OK in Death Valley, as long as you have downloaded an offline map in Google Maps—which fortunately I had. We found Susan and Cliff after only one turnaround, when we spotted a lone car parked on the side of the road and a few tripods out in the darkness. We pulled over and called out “Susan, is that you?” A familiar voice called back, “You made it!” Finding your friends in the dark can be a very comforting feeling.

The sky was looking pretty good. There were still some big patchy clouds, but to the west were lots of stars. The air was a little chilly with winds approximately 10 mph, which was down significantly from the 50 mph winds earlier.

We started looking for primo honeycomb patterns that we could frame in front of the moon. By the time the clouds cleared, the eclipse was halfway toward totality. It looked very cool.

I had two setups going, but the main one was my Nikon Z 8 with a 14-24mm f/2.8 lens low to the ground to emphasize the raised lines of salt. I focused on the hyperfocal distance and was able to achieve sharp focus from 3 feet away to the stars at infinity.

Once totality kicked in and the moon turned dark red, I needed to home in on the proper exposure for the moon with detail. The correct foreground shot (Figure 1) was 8 seconds, f/2.8, ISO 6400. The properly exposed wide moon shot (Figure 2) was 1/2, f/4, ISO 1250. That is a five-plus-stop difference in exposure.

Figure 1. The foreground exposure. Nikon Z 8 with a Nikon Z 14-24mm f/2.8 lens. 8 seconds, f/2.8, ISO 6400.

Figure 2. The moon exposure. 1/2, f/4, ISO 1250.

I shot both frames at 18mm and later blended the properly exposed lunar eclipse with the foreground in Photoshop (Figure 3).

I shot a few different takes of this with different salt patterns, and I also used a Luxli Fiddle at .1 percent power to sidelight the scene and bring out the texture of the ground. However, for this foreground shot a car was driving down the road and the sidelight from the headlights provided the perfect visual punch to the salt flats.

Figure 3. The final blended image.

I also had my Nikon ZF camera mounted with a 100-400mm lens to get some close-up views of the eclipse during totality. I was inspired by Chris Nicholson’s bright star field capture of the lunar eclipse in 2022 and wanted to create something similar that as well.

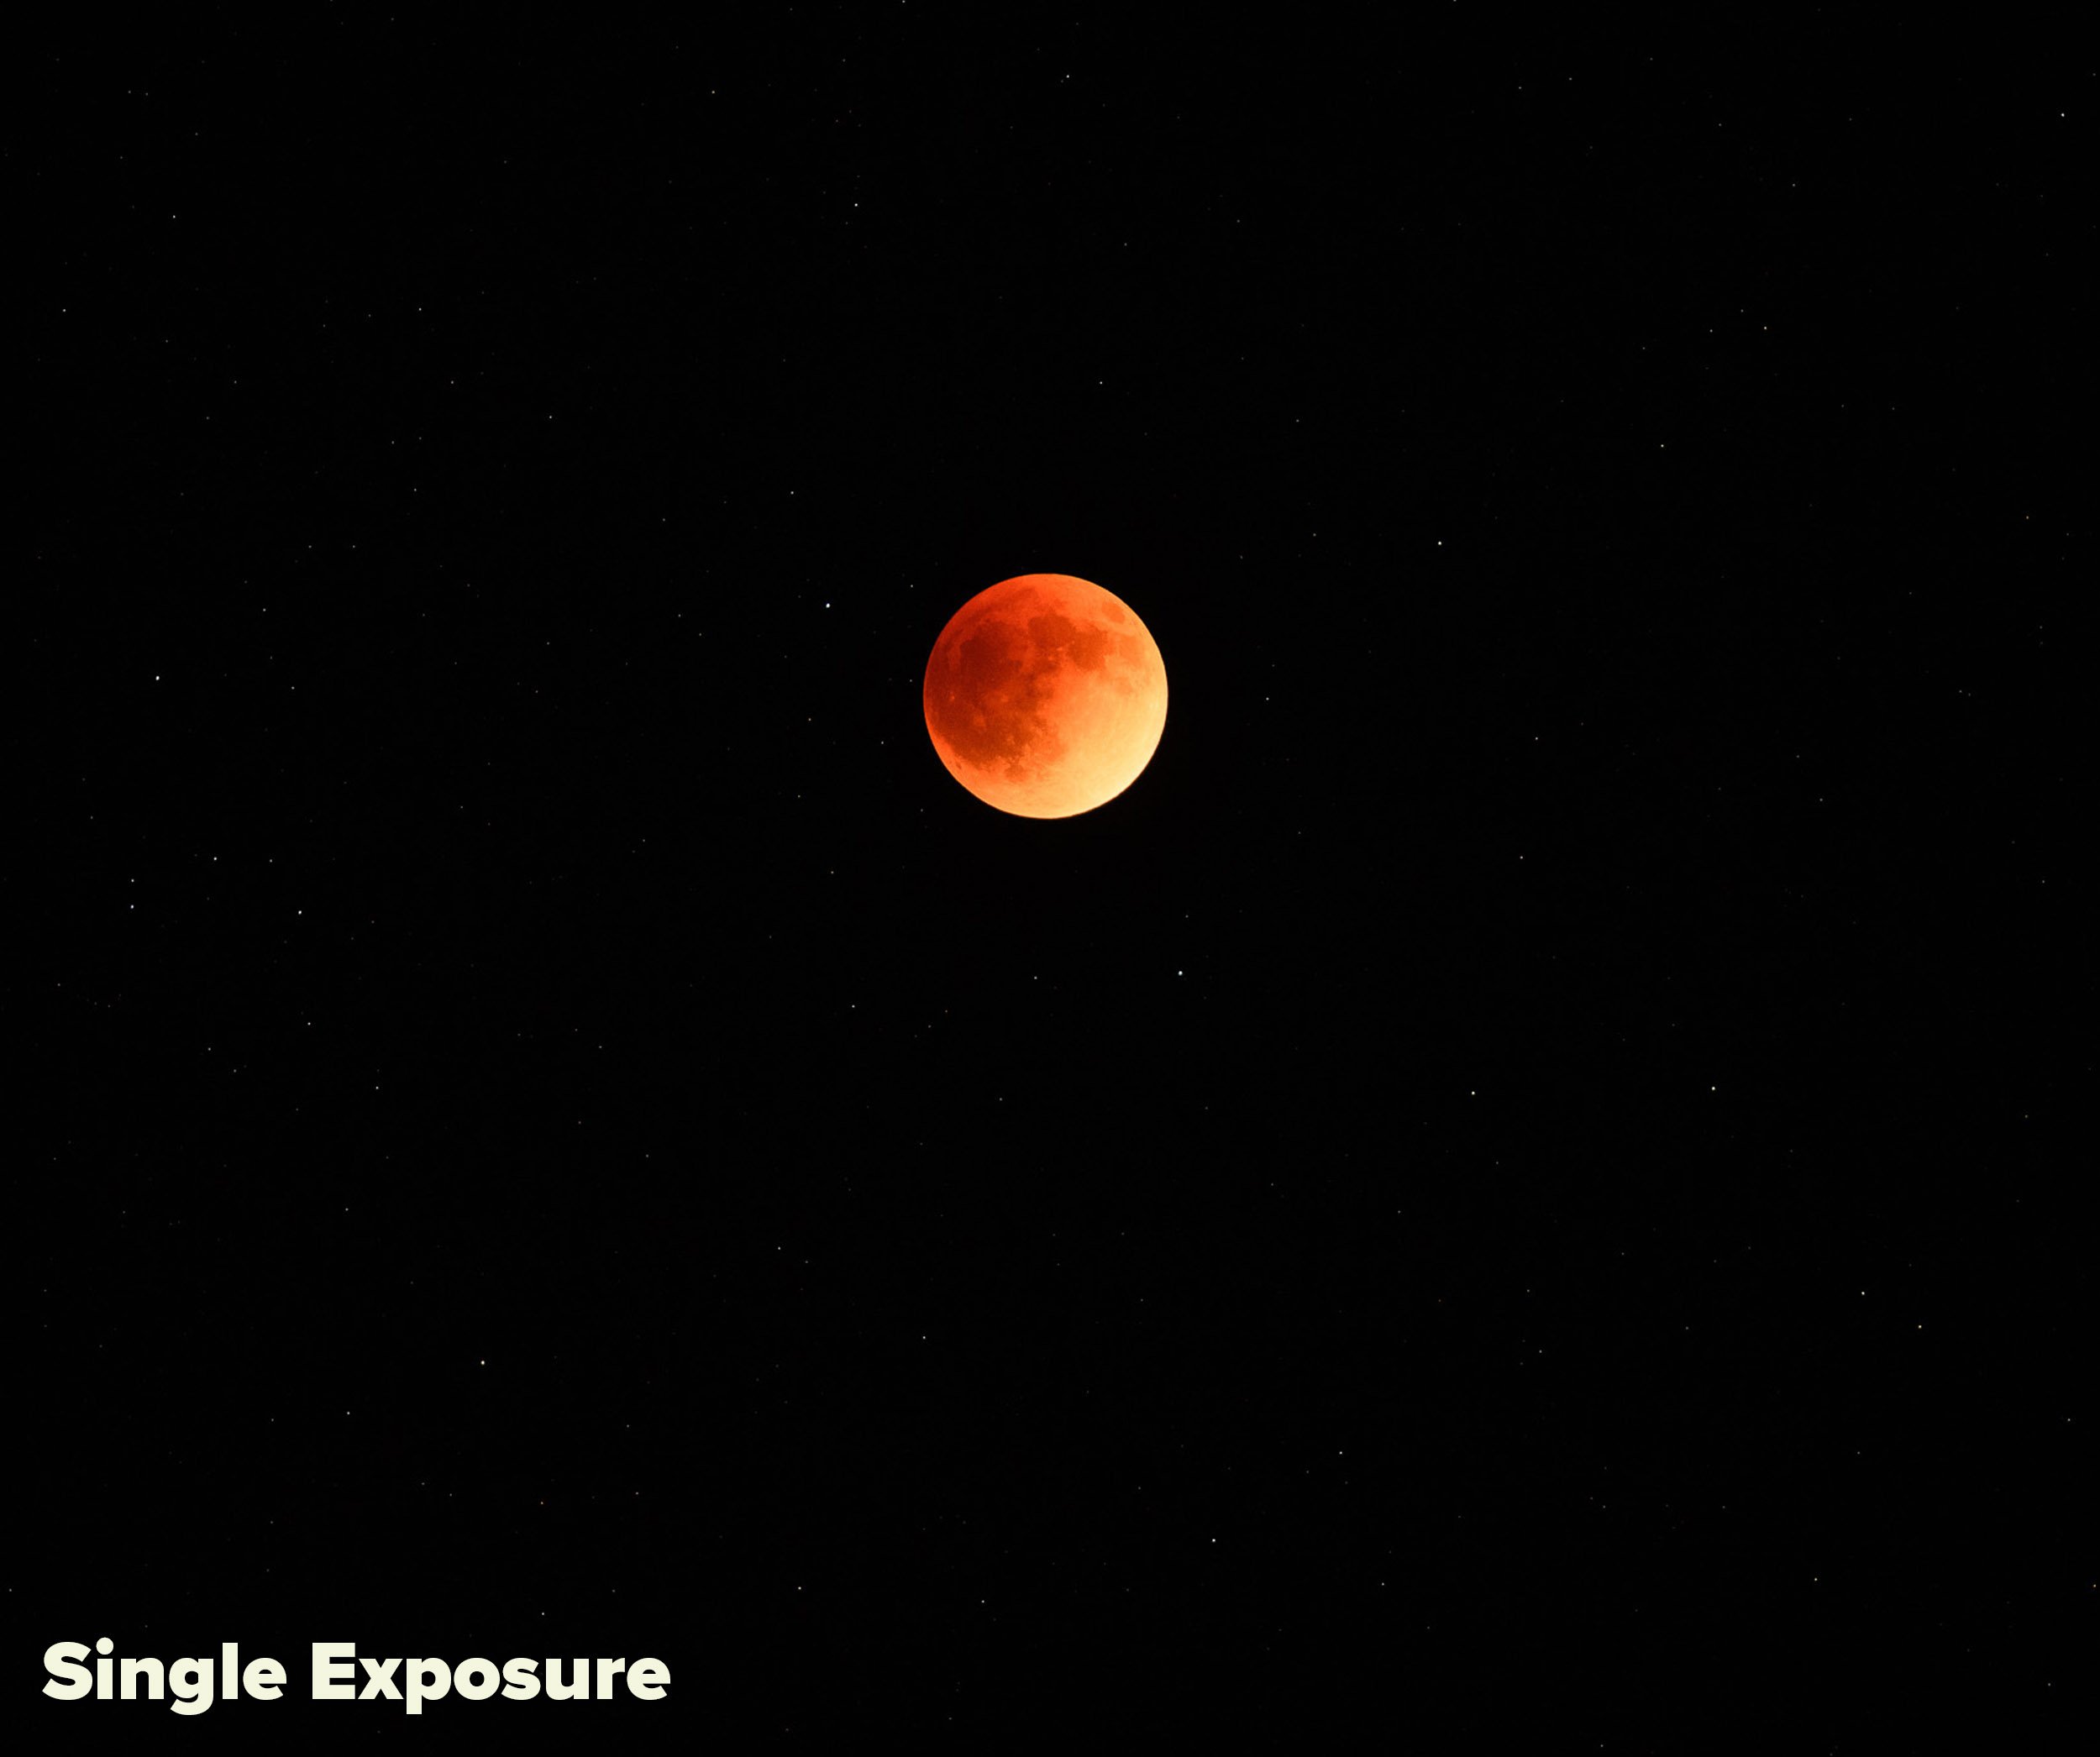
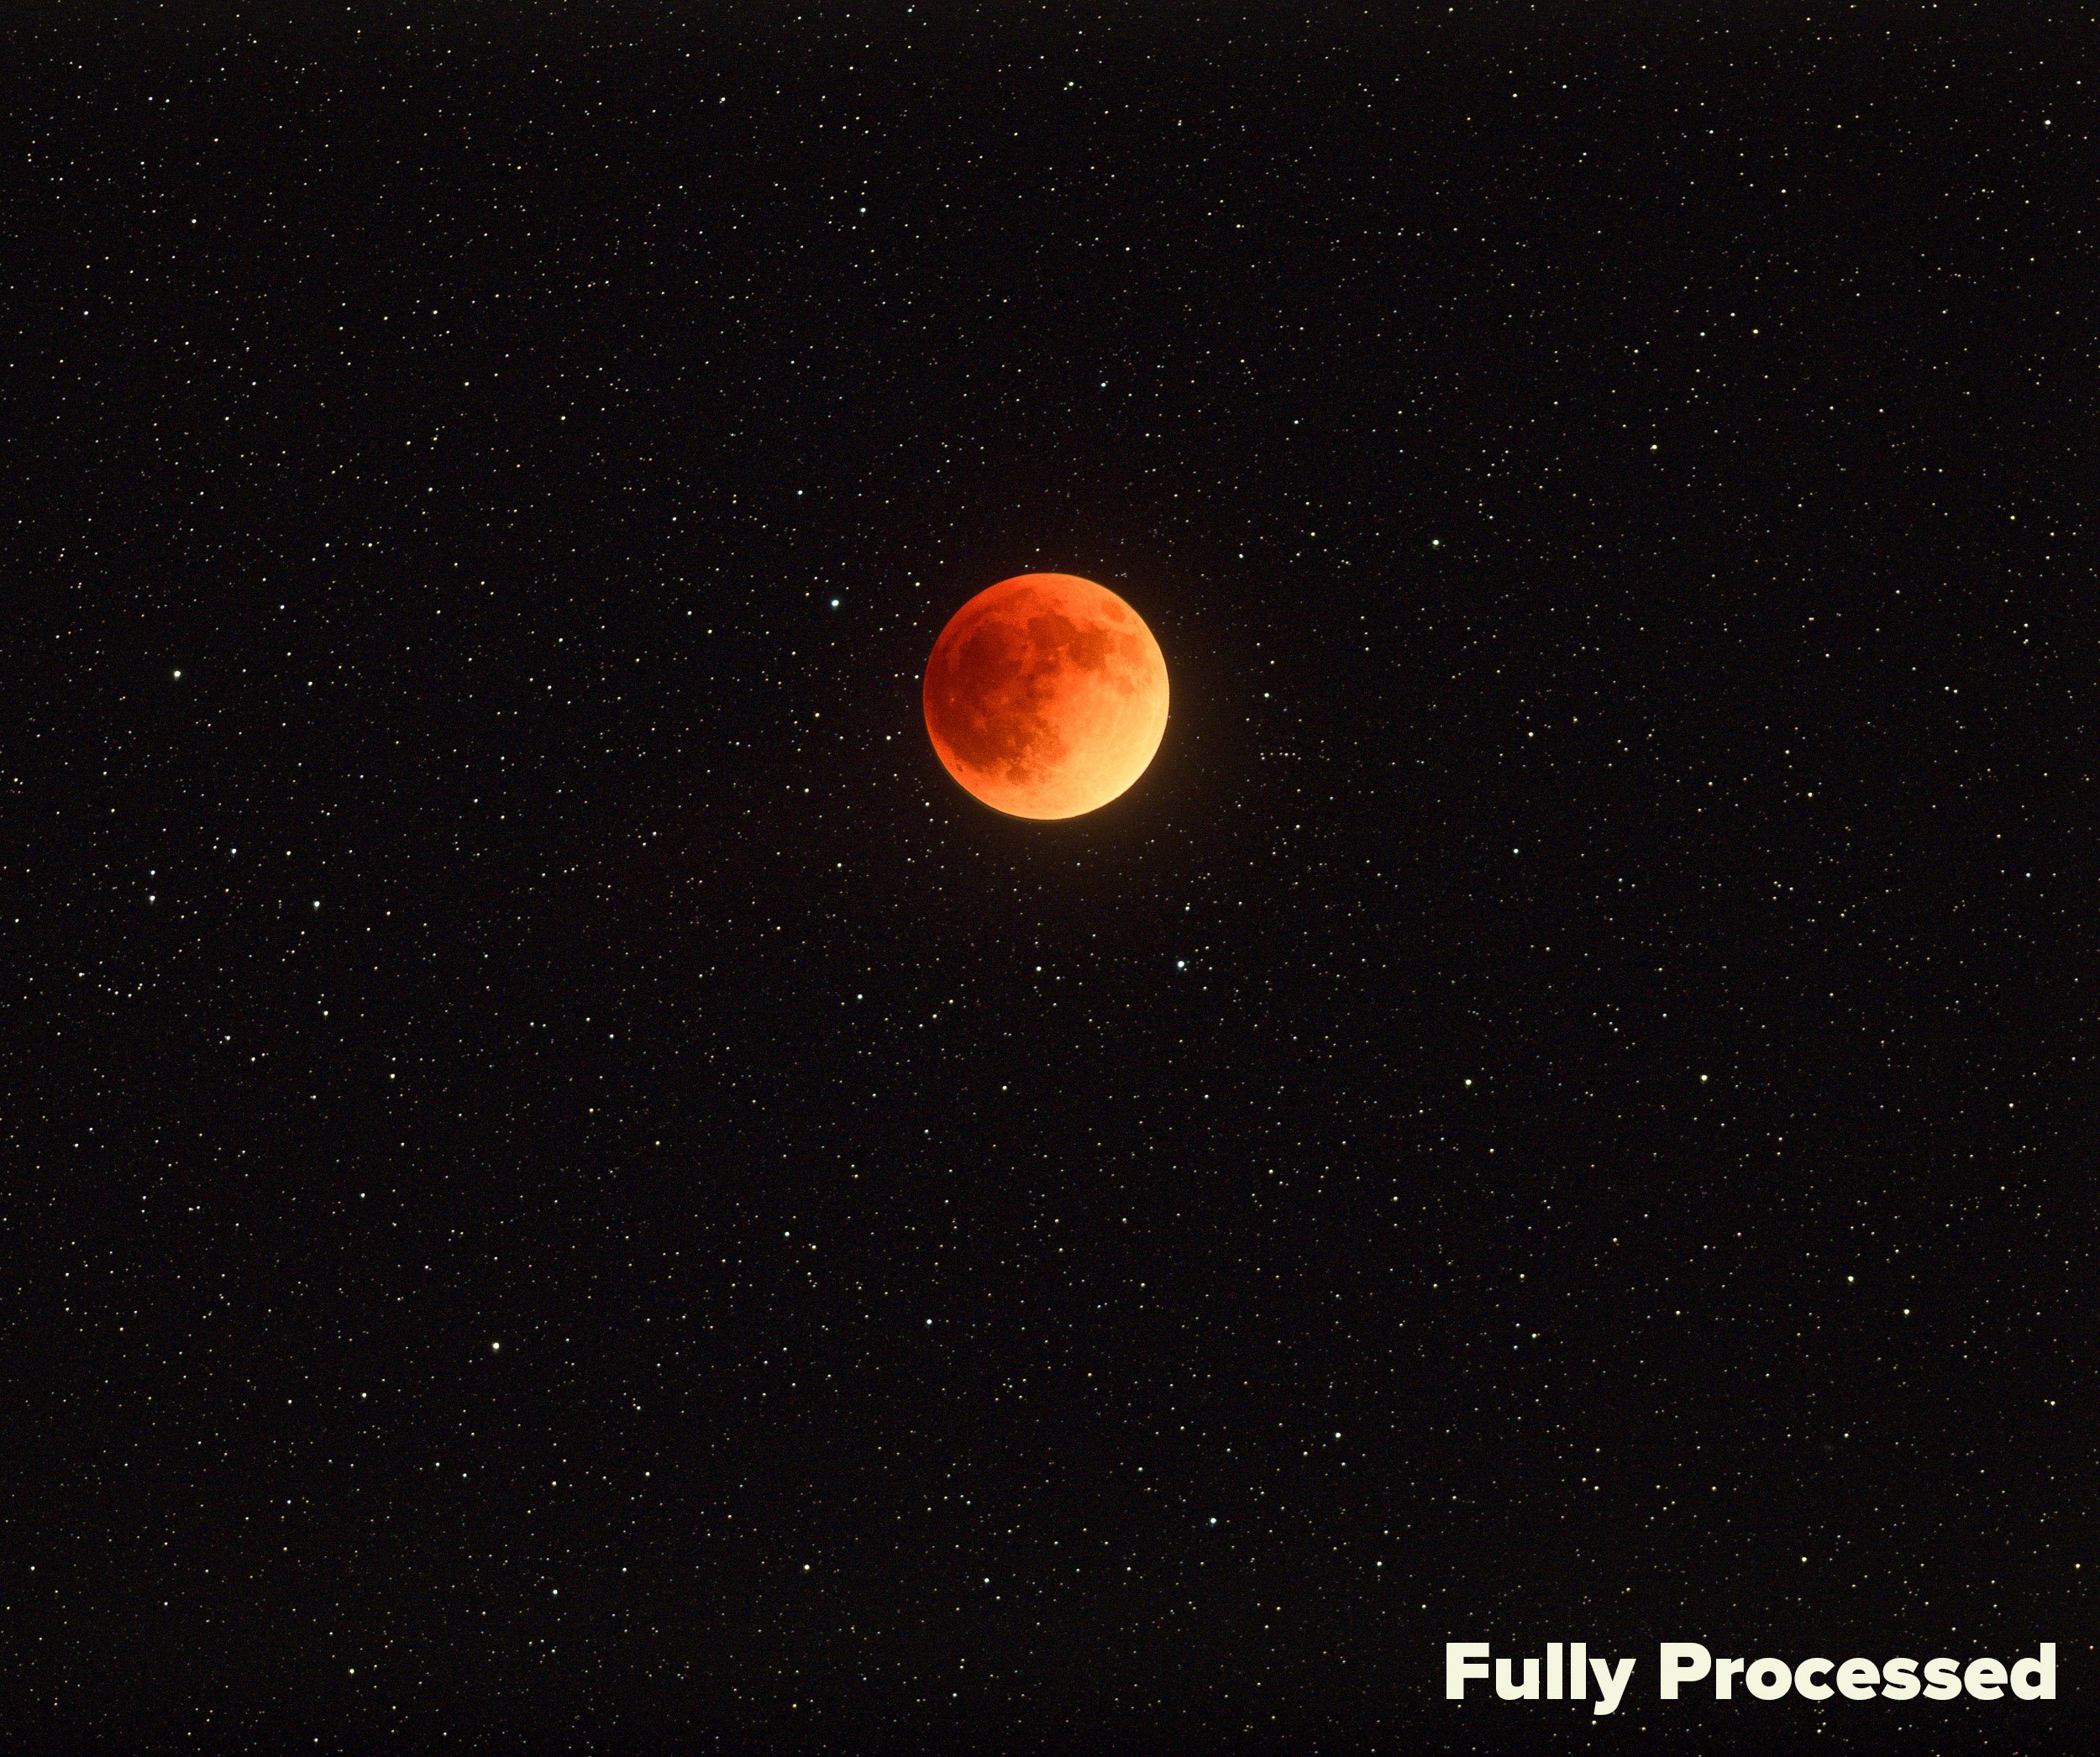
The stars were really sparkling during totality and my proper lunar eclipse exposure (Figure 4) was 1/15, f/5.6, ISO 6400 shooting with the lens at 185mm. The sharp star field shot (Figure 5) was 1/2, f/5.6, ISO 25,600 also at 185mm.

Figure 4. Nikon ZF with a Nikon 100-400mm f/4.5-5.6 lens at 185mm. 1/15, f/5.6, ISO 6400.

Figure 5. 1/2, f/5.6, ISO 25,600.

What made blending these images together (Figure 6) easier than typical moon-swapping blends is that the glow around the moon was minimal because the moon was so dim.

Figure 6. The final blended image.

The Group Experience

It was very cool to experience the lunar eclipse in a dark location such as Death Valley. We were able to experience a variety of night photography opportunities due to the full-moon transition from a bright sky and landscape to an incredibly dark sky with stars aplenty, then back again, all within a few hours.

What I also found to be fun was that each of us were trying different interpretations of the lunar eclipse. JC’s favorite was a timelapse he set up that really shows the transition of the eclipse into totality.

© 2025 JC Carey.

Of course it wouldn’t be a night shoot with Susan if she didn’t bring out her light tubes and start taking luminescent portraits! That was super fun and a wonderful way to forever commemorate the Great Lunar Eclipse Chase of 2025.

© 2025 Susan Magnano.

© 2025 Susan Magnano.

Your Turn

We’d love to see your eclipse images and hear your eclipse stories! Share in the comments below, or on our Facebook page, or on Instagram (tag us @nationalparksatnight #nationalparksatnight #seizethenight).

If you didn’t get to shoot this lunar eclipse, another will hit the Americas on March 3, 2026. You’ll need to go west to see totality—in Alaska, Washington, Oregon, California and Canada. Bring friends. It’s the best way to enjoy and remember the experience!

Gabriel Biderman is a partner and workshop leader with National Parks at Night. He is a Brooklyn-based fine art and travel photographer, and author of Night Photography: From Snapshots to Great Shots (Peachpit, 2014). During the daytime hours you'll often find Gabe at one of many photo events around the world working for B&H Photo’s road marketing team. See his portfolio and workshop lineup at www.ruinism.com.

UPCOMING WORKSHOPS FROM NATIONAL PARKS AT NIGHT

Are You Ready for the Total Lunar Eclipse of 2025?

If total lunar eclipses seem like a thing of the past, there’s a good reason for that: The world hasn’t seen one since 2022. But have no fear—the disappearing act is back!

This week the moon will cross completely into Earth’s shadow, providing an opportunity for most of the photographers in the Western Hemisphere to get out and shoot this uncommon celestial event.

This eclipse will happen on the overnight of March 13 to 14, 2025—in other words, you want to be out tomorrow night. We’re offering this blog post to help you get prepared.

Info About the Eclipse

To learn more about this eclipse, we recommend checking out these excellent resources:

Where to See the Eclipse

A good portion of the Western Hemisphere will witness the total eclipse, including all of the contiguous United States and the eastern half of Alaska, plus all of Canada, all of Central America and half of South America.

Courtesy of NASA.

How to Shoot the Eclipse

Gear

You don’t need any special equipment beyond what you’d use to photograph any moon at night: camera, lens, tripod. You can add a cable remote, an intervalometer, a star tracker, etc., but you won’t need any special light filters or anything of that nature.

Consider using both long and wide lenses to create different types of compositions. The former will give you great moon portraits, while the latter will allow you to portray the moon as an element of a wider night scene (see below). The visible eclipse will last 3.5 hours from beginning to end, and totality will last about an hour. You can work through a lot of scenarios and ideas in that much time, and you can even wait out clouds that might be blocking the moon for a bit.

Lunar eclipse over Price Lake, Blue Ridge Parkway. Nikon D5 with a Nikon 24-70mm f/2.8 lens. Three blended frames shot at 30 seconds (foreground), 15 seconds (stars) and 1/4 second (moon), f/2.8, ISO 6400.

Scouting

Use PhotoPills to see ahead of time where the moon will be in the sky during the eclipse. You can do this with the Eclipse panel in the Planner, or if you’re already on location just use Night AR in the Moon pill to visualize where the moon will move during the times mentioned above.

Exposure

Pay attention to shutter speed. The moon moves faster than it appears—a little less than 2,300 miles per hour. The moon moves the length of its diameter every 2 minutes.

This means that if your shutter speed is too long, the moon will blur. The wider your lens, the longer shutter speed you can get away with—even as long as 10 seconds or so. But with longer lenses, you’ll be limited to much shorter speeds.

Be ready to change exposure. The moon will get darker closer to the middle of the eclipse, so an exposure that looks good at 1:30 a.m. EDT will appear dark at 3 a.m., and your good 3 a.m. exposure will blow out the moon at 5:00 a.m. But you have to be careful about compensating for that loss of illumination by changing your shutter speed too much, lest your moon go soft from motion (see above). Therefore, during totality you’ll probably want to increase your ISO instead.

More Info

In the past we’ve written a few blog posts about lunar eclipse photography. Reading through them will offer a little more context about how to work this week.

When to Shoot the Eclipse

All phases of the eclipse will happen simultaneously for viewers across time zones. However, because your watches will be different, the times will be different. To that end, we offer the following guides for when to be out shooting, and for when to expect what. (Click to open, right-click to download.)

Atlantic Daylight Time (GMT -3)

Eastern Daylight Time (GMT -4)

Central Daylight Time (GMT -5)

Mountain Daylight Time (GMT -6)

Pacific Daylight Time (GMT -7)

Alaska Daylight Time (GMT -8)

Wrapping Up

We wish all of you great success in shooting for the moon this week! Please come back and share your photos with us. Share in the comments below, or on our Facebook page, or on Instagram (tag us @nationalparksatnight #nationalparksatnight #seizethenight). Be sure to tell a story too—the technical aspects, the challenge overcome, or a tale of the experience.

Chris Nicholson is a partner and director of content with National Parks at Night, and author of Photographing National Parks (Sidelight Books, 2015) and Photographing Lighthouses (Sidelight Books, 2025). Learn more about national parks as photography destinations, subscribe to Chris' free e-newsletter, and more at www.PhotographingNationalParks.com.

UPCOMING WORKSHOPS FROM NATIONAL PARKS AT NIGHT

How I Got the Shot: Lunar Eclipse in a Sparkling Star Field

Portrait of a lunar eclipse. Nikon D5 with a Nikon 300mm f/2.8 lens. 32 frames shot at 1 second, f/2.8, ISO 51,200, noise-stacked in Sequator and blended in Photoshop with a moon exposure shot at 1/2 second, f/2.8, ISO 3200.

Note: We’re running this blog post today because tonight’s skies will feature the world’s last total lunar eclipse until the spring of 2025. See the end of the post for more information.

The Story

Since she was little, my daughter Maggie has been interested in astronomy. She could name the planets (in order) when she was 3. On summer nights she would lay a blanket on the grass outside, hone in on stars with my laser pointer, and ask me to look up their names in a sky-view app. In 2017 we road-tripped to see the solar eclipse, which she promptly labeled “the best thing I’ve ever done.” She was only 4, but I couldn’t disagree that the memory would remain on that list forever.

As Maggie has grown older (she’s 9 now) that interest has waned a little, somewhat supplanted by friends and music and drawing and painting and reading and swimming and making videos and any of the other hundred things that occupy her agile mind. Still, I’m never surprised when she wants to experience a celestial event—such as when she asked if we could go somewhere to see the total lunar eclipse last spring.

So we ventured to one of my favorite sections of the Blue Ridge Parkway, me toting my cameras, she toting the telescope that her grandmother and aunt had given her for Christmas.

Maggie watching the lunar eclipse through her telescope from the Blue Ridge Parkway last May.

The Location

The Blue Ridge Parkway stretches 469 miles between its northern and southern termini. That’s a long and varied destination for photography. For our experience I chose the area around Blowing Rock, North Carolina, because I know it has many valley-top overlooks, as well as the attractive landscapes of Price Lake, the Moses H. Cone estate, rolling fields, barns and so on.

Figure 1. PhotoPills’ Augmented Reality showed where the moon would be over Price Lake at the time of the eclipse.

I know the area well, as I’ve shot there many times (including with two National Parks at Night workshops). But PhotoPills scouting was still necessary because I needed to know where the moon would be during totality. Which of my favorite landscapes would be good for a moon photo at that particular time and date? I settled on Price Lake, as I could see that during totality the moon would be drifting over the tree line on the southeastern shore (Figure 1).

Alas, all good plans need a backup, especially when traveling with a kid. Maggie was bored waiting for the eclipse. We tried hunting for frogs, then hunting for spiders, then spotting fireflies. We watched the water flowing over the dam and listened for noises in the woods and guessed what made them. But these things didn’t hold her interest long enough. So, instead, we meandered up the parkway until the moon finally started to hide in Earth’s shadow, and then pulled into an overlook.

We set up her telescope, she promptly located the moon in the eyepiece, and the experience quickly became pretty freakin’ cool. She was enthralled—enough so that I knew I had time for a photo.

But from the overlook, I had no foreground worth shooting. By necessity, this would be a moon portrait, not a moonscape. I unpacked the longest lens I own, a Nikon 300mm f/2.8—a lens not quite long enough to fill the frame with the moon, but long enough so the moon would be more than just a red dot in the sky.

The Exposure

The trouble with telephoto lenses at night is that unless you’re using a hefty tracker, shooting star points is nearly impossible with one exposure. With a 300mm lens, a quick check of the Spot Stars calculator in PhotoPills revealed that I could use a shutter speed of only 1/2 to 1 second before my stars would begin to trail (Figure 2). That would require an ISO of 51,200, and that would produce way more noise than would be acceptable.

Figure 2. PhotoPills told me that to freeze the stars shooting with a Nikon D5 and a 300mm lens, I would need a shutter speed between about 1/2 second (in Accurate mode, right) and 1 second (in Default mode, left).

It also introduced a problem with the moon exposure: At 1/2 to 1 second at ISO 51,200, the moon would blow out.

So those were the two obstacles I needed to work around, and I chose two solutions:

  1. Because freezing the stars required such a high ISO, I would need to noise-stack multiple frames. This would make the final image appear as if I shot it at a lower, cleaner ISO.

  2. Because the first solution would result in the moon both blowing out and moving considerably during the exposures, I would need to shoot a separate frame of just the moon and then layer that on top of the noise-stacked frame in Photoshop.

It was time to calculate my moon exposure. The moon moves quickly—a distance roughly equal to its diameter about every 2.5 minutes. That’s why shooting even a 20-second astro-landscape exposure can result in the moon beginning to “stretch out” and look oblong. With a wide-angle lens, I rarely shoot more than 10 or 15 seconds when the moon is in the frame. Using a telephoto meant I needed to shoot even faster.

I also wanted a lower ISO for the moon so it wouldn’t look too noisy against the clean, noise-stacked stars. I shot a few tests and decided that 1/2 second at ISO 3200 resulted in a moon that would be sharp enough to look good.

The Shoot

Now all I needed to do (that night, anyway) was capture the raw materials.

One remaining concern I had was vibrations causing a soft image. Vibrations are a constant concern when working with a telephoto lens, as well as when working at night. To minimize vibration, I took the following steps:

  1. I mounted my setup on a sturdy tripod (the Gitzo 3541LS) with a sturdy, top-of-the line ball head (the Really Right Stuff BH55), and made sure everything was locked down tight. (My setup would have been even more solid if I’d used a gimbal head, but I don’t own one.)

  2. I connected a wireless shutter release (the Nikon ML-L3). This meant I wouldn’t have to touch the camera to open the shutter, and because no cable was connected, I also wouldn’t accidentally introduce vibration by touching the remote.

  3. I enabled Mirror Lockup on my Nikon D5. This feature separates the mechanics of raising the mirror from the mechanics of opening the shutter, so that the minor vibrations of the former have time to subside before the camera starts recording the image.

  4. I enabled a 2-second Shutter Delay in the camera. This feature creates a delay between when the shutter opens and when the image begins to record, again to mitigate vibration that could be caused by moving parts.

  5. I waited for any perceptible breeze to subside.

  6. I shot multiple frames, because when you do that, one frame will always be sharper than the rest.

Figure 3. The moon foreground. Nikon D5 with a Nikon 300mm f/2.8 lens. 1/2 second, f/2.8, ISO 3200.

Once I was satisfied that I had a good moon foreground to work with (Figure 3—yes, the moon is a foreground in this photo), I changed the exposure to record lots of star points. I pressed the button on the remote, locked it down, and let the camera fire off 32 frames.

(Why 32? I’ll get into this more in a future blog post that focuses on noise stacking. For now, just know that combining 32 frames in stacking software provides approximately a 5-stop improvement in apparent noise. Because I was shooting at ISO 51,200, my final result would therefore look like I shot it at about ISO 1600—i.e., 5 stops lower. I knew I would be happy with the quality of that result.)

One final note about the shoot: Because the process took a little while, the moon moved considerably. Therefore, I needed to constantly readjust the framing to keep the moon in the center. Otherwise it would have flown clear out of my composition in about 10 minutes.

The Post-Production

Once home the next day, I dumped all the images into Lightroom and got to work.

The foreground frame was easy—I just chose the one with the sharpest-looking moon. I applied some basic adjustments to get the moon to look its best (the stars weren’t important in this frame), and that was that. Done.

The next step was to noise-stack the stars. If you have a Mac, the tool for this is Starry Landscape Stacker; I have a PC, so the right tool is Sequator.

Figure 4.

I asked Lightroom to reveal the location of the first star file in Explorer (Figure 4). From that folder I selected all 32 star files, and then I dragged them into the Sequator interface. I walked through all the processing options (I’ll be writing a how-to for Sequator soon—keep an eye on this blog—but if you use a Mac, see our post on Starry Landscape Stacker), and then let the software do its thing. (I didn’t worry about masking the moon in the stack, because I knew I’d be layering over the moon for the final version of the photo anyway.)

The result was a TIFF saved into the same folder as my raw files. I needed to load that TIFF into Lightroom. I did this by navigating to the folder, right-clicking and selecting Synchronize Folder (Figure 5), then following the prompts.

Figure 5.

With the TIFF loaded into my Lightroom catalog, I applied some basic edits to make the sky look good. The result was exactly what I’d hope for—a noise-free field of sharp, bright, sparkling stars.

The only problem was that blown out moon, which I was now ready to layer over. In the Lightroom grid, I selected the moon raw file and the star TIFF by Control-clicking on both. Then from the menu I chose Photo > Edit > Open as Layers in Photoshop.

With both images layered in Photoshop, I needed to mask out the dull sky from the moon foreground to reveal the sparkling, noise-free sky behind it. I figured the Object Selection tool would pick out that moon beautifully, so I chose the tool from the toolbar, clicked and drew a square selection around the moon, and the algorithm did the rest. I had a perfectly selected moon (Figure 6).

Figure 6.

Figure 7.

At the bottom of the Layers panel, I clicked on the Add Layer Mask button. This created a mask from my moon selection (Figure 7), revealing the sharp, noise-free stars from the background layer. However, a little cleanup remained.

The first issue was that during the shoot I’d had to continually reframe to keep the moon centered, and because the moon kept moving during the series of exposures, it was in a slightly different spot from frame to frame. Therefore, the moon wasn’t lined up perfectly with itself in the layered image (Figure 8), so I had to adjust its placement. I activated the Move tool and then used the cursor keys to nudge the moon into the right place (Figure 9).

Figure 8.

Figure 9.

The second issue was that the masking process had left a dark halo around the moon. Easy fix—just needed to massage the edge of the mask to cover up that halo. I selected the mask, then from the menu chose Filter > Other > Minimum (Figure 10). Knowing what radius value is correct is just a matter of looking at the live effect (with the Preview option checked), but it’s usually a very low number. In this case, 2 looked perfect (Figure 11), so I clicked OK.

(Note that depending on what processing artifact had created the halo, using Minimum may have made the problem worse. If it had, then Filter > Other > Maximum would have worked instead.)

Figure 10.

Figure 11.

The final issue was that the sharp moon was just a little smaller than the moon in the background, due to both exposure blooming and the halo edit. No problem—I just had to make the foreground moon a little bigger to hide the edges of the background moon.

I pressed Control-T to activate the Free Transform tool, but because I was zoomed in, I couldn’t see the bounding box and its handles. So to make the adjustment, I used the options bar (Figure 12). I made sure that the Maintain Aspect Ratio button was selected, and then clicked to put my cursor in the Set Horizontal Scale field. Again, I was just eyeballing the effect, watching what happens to the image as I made microadjustments. Using the cursor keys, I pressed up once to increase the scale to 101 percent, then again to 102 percent. It looked perfect (Figure 13), so I stopped there.

Figure 12.

Figure 13.

I saved and closed the image, made a final crop in Lightroom, and bumped up the Texture slider a bit to make the stars pop.

Was it worth all that effort just to get some more stars? Heck yeah! Use the slider in Figure 14 to see a straight-out-of-camera shot versus the fully processed final image. See how “three-dimensional” and detailed the final image looks?

Figure 14.

Wrapping Up

Maggie thought it was pretty cool that I could take pictures of the moon (win for Daddy!), and she asked if she could try too. I let her fire off a few frames, and then we packed the gear into the car.

Figure 15. Lunar eclipse over Price Lake, Blue Ridge Parkway. Nikon D5 with a Nikon 300mm f/2.8 lens. 3 blended frames shot at 30 seconds (foreground), 15 seconds (stars) and 1/4 second (moon), f/2.8, ISO 6400.

The moon was still in shadow, so with Maggie’s permission we went back to Price Lake to create the astro-landscape photo of the eclipse that I had scouted earlier. That photo (Figure 15) was easier, as I didn’t need to shoot 32 frames to rid the image of high ISO noise. Just three exposures—one each for foreground, moon and sky—and we were done.

The timing of this post is intentional. Tonight the moon will fall into total eclipse again—for the second time this year, but for the last time until March 2025. If you’d like to create a photo like this, tonight is your last chance for 2.5 years.

Tonight’s lunar eclipse will begin at 3:02 a.m. EST, and totality will happen from 5:16 to 6:41 a.m. So it will take a commitment to photograph.

If you want to shoot this eclipse, of course other techniques are also options. For more ideas, see our blog posts:

For more information about tonight’s big event, see the Space.com article “How to watch the Blood Moon lunar eclipse on Nov. 8 online, the last until 2025.”

Tomorrow and in the days ahead, we’d love to see your lunar eclipse photos. Share in the comments below, or on our Facebook page, or on Instagram (tag us @nationalparksatnight #nationalparksatnight #seizethenight).

Chris Nicholson is a partner and workshop leader with National Parks at Night, and author of Photographing National Parks (Sidelight Books, 2015). Learn more about national parks as photography destinations, subscribe to Chris' free e-newsletter, and more at www.PhotographingNationalParks.com, and follow him on Instagram (@PhotographingNationalParks.com.

UPCOMING WORKSHOPS FROM NATIONAL PARKS AT NIGHT

Once in a Red Moon: Photographing the Lunar Eclipse

Cameras ready! This evening’s night skies will feature a total lunar eclipse.

The show will last about 3.5 hours, beginning at about 10:30 p.m. Eastern time, and ending at about 2 a.m., with totality falling between about 11:30 and 1. Moreover, the eclipse will be visible to about one-third of humans around the world—in most of Europe, Africa, and North and South America (including all of the United States)—providing extraordinary photo opportunities to countless photographers.

A lunar eclipse differs from its solar cousin in that we don’t get a total blackout, or a ring of fire, or any of that kind of end-of-days drama. But the moon, should weather allow you to see it, will become completely dim and red.

Why? Because a solar eclipse is a phenomenon of the light source (the sun) being blocked from view, while a lunar eclipse is a phenomenon of the moon moving into a shadow. When something is in a shadow, you can usually still see it—just dimmer, and perhaps with altered color. That’s exactly what’s happening during a total lunar eclipse. The moon appears dimmer in the Earth’s shadow, and takes on first a yellowish and then a reddish hue because the only light hitting it is being bent and filtered through our atmosphere.

A Quick Rundown

Here are a few notes on photographing a lunar eclipse:

No special gear is needed beyond what you’d use to photograph any moon at night: camera, lens, tripod. You can add a cable remote, an intervalometer, a star tracker, etc., but you won’t need any special light filters or anything of that nature.

Use PhotoPills to see ahead of time where the moon will be in the sky during the eclipse. You can do this with the Eclipse panel in the Planner, or if you’re already on location just use Night AR in the Moon pill to visualize where the moon will move during the times mentioned above.

PhotoPills.com showing the location of the moon at the time of peak totality, as it can be seen from the North Rim of Grand Canyon National Park.

Consider using both long and wide lenses to create different types of compositions. The former will give you great moon portraits, while the latter will allow you to portray the moon as an element of a wider night scene.

Slow down. The eclipse will last 3.5 hours from beginning to end, and totality will last about 90 minutes. You can work through a lot of scenarios and ideas in that much time, and you can even wait out clouds that might be blocking the moon for a bit.

Pay attention to shutter speed. The moon moves faster than it appears—a little less than 2,300 miles per hour. According to Lance Keimig’s book Night Photography and Light Painting, that means the moon moves the length of its diameter every 2 minutes. If your shutter speed is too long, it will blur. The wider your lens, the longer shutter speed you can get away with—even as long as 10 seconds or so. But with longer lenses, you’ll be limited to much shorter speeds. (Below, see a graphic from a test Matt Hill ran a few years ago, based on using a 300mm lens.)

Be ready to change exposure. The moon will get darker closer to the middle of the eclipse, so an exposure that looks good at 10:30 p.m. EDT will appear dark at midnight, and your good midnight exposure will blow out the moon at 1:30 a.m. But you have to be careful about compensating for that loss of illumination by changing your shutter speed too much, lest your moon go soft from motion (see the previous point). Therefore, during totality you’ll probably want to increase your ISO instead.

Further Exploration

Obviously you can dive a lot deeper into a topic such as this. Here are a few options:

Wrapping Up

We wish all of you great success in shooting for the moon tonight! Please come back and share your photos with us.

Chris Nicholson is a partner and workshop leader with National Parks at Night, and author of Photographing National Parks (Sidelight Books, 2015). Learn more about national parks as photography destinations, subscribe to Chris' free e-newsletter, and more at www.PhotographingNationalParks.com.

UPCOMING WORKSHOPS FROM NATIONAL PARKS AT NIGHT

Moon Shots: What We Learned from Photographing the 2019 Lunar Eclipse

While lunar eclipses aren’t as jaw-droopingly exciting as total solar eclipses, they are still an amazing thing to witness, as well as to capture as photographs. And a lunar eclipse comes with a big benefit: totality lasts much longer than during a solar eclipse, so you have more time to get creative as well as not stress out!

I had last shot a lunar eclipse in 2014, which was a very special time. That blood moon was the second of a tetrad, a series of four consecutive total eclipses that occurred in approximately six-month intervals. The next time that will happen will be in 2032-33. I wonder how we will capture it then! Technology made a major leap from 2014 to 2019, so who knows how it will leap in another 13 years. Maybe we will be able to witness those lunar eclipses from the moon!

The next lunar eclipse will occur in two years, on May 26, 2021. In the meantime, we wanted to share a few tips that we learned this year to help you better prepare not only for the next eclipse but for shooting the moon in general.

And by “we,” I mean a few more people than usual. First I’ll talk about my experience shooting the eclipse this week, and then Matt will add some thoughts from his experience. Finally, we have invited six of our National Parks at Night workshop alums to share their images and lessons learned.

Onward … to the moon and beyond …

11 Tips and Tricks from the 2019 Lunar Eclipse

1. Do your research.

Understand the location you will be in to capture the moon. Will you be in an urban or rural environment? How can this location help tell your story? I saw lots of wonderful lunar eclipse phases placed over breathtaking landscapes, buildings, etc. You could do the same in an urban location.

For this year’s lunar eclipse, I was in Atlanta, a city I wasn’t that familiar with and had little time to scout. I was inspired by the skyline I saw while driving into the city, and I noted that there were plenty of overpasses that could provide a good vantage point.

2. Ascertain the elevation of the eclipse.

The 2019 super blood wolf moon (aka the lunar eclipse) over Atlanta. Foreground: 35mm lens, 25 seconds, f/16, ISO 200; background (moon): 600mm lens, 1/2 second, f/5.6, ISO 3200.

You want to foresee what foreground you can include in a single shot. I was really taken aback by how high in the sky this lunar eclipse was. It was very difficult to introduce foreground into the scene unless you were really far away or made a composite.

In hindsight, I could have gotten under the Skyview Atlanta Ferris Wheel downtown and probably made a pretty cool shot—but my last photo of a lunar eclipse (in 2014) included a Ferris wheel and I didn’t want to be known as that guy! This did make me realize that figuring out the problem—i.e., the height of the moon in the sky—can lead to unusual solutions like actually getting under your foreground to get the shot!

3. Go with two rigs.

The lunar eclipse lasts approximately 4 to 5 hours. Give yourself more options to create! It could be wide and telephoto rigs, or short-exposure and long-exposure setups.

4. Be ready for that close-up!

That big ol’ blood moon, 2019.

This is advice for shooting the moon any time of the year: Use a telephoto lens. The more you can fill your frame, the better. Higher-resolution cameras will also allow us to crop into the image more with minimal loss in detail.

This year I used a 100-400mm lens, which when zoomed in all the way was the equivalent of a 600mm with my APS-C sensor. I still cropped into the moon in post and would have preferred an effective focal length of 800mm to 1000mm in the field. While those lenses might seem expensive and out of reach, consider using crop-sensor cameras with 200-500mm or 150-600mm lenses. Also, you could adapt a telescope to fit your camera and can easily get to 1000mm.

When using a super-telephoto lens and aiming it high in the sky, watch out for lens creep, which is when your lens zooms slightly during the exposure. I once found this to be the culprit of a soft image, when my Fujifilm 100-400mm lens wouldn’t lock down at one focal length. Eventually it stayed put, but the problem was a bit frustrating and ruined several of my shots. Always zoom in and review your images.

 5. Don’t forget your wide lens.

Telephoto lenses get most of the love during the eclipses, but wide-angle lenses can offer better storytelling. They can tell something else about where the image was shot—just think about what other elements of the scene you want to combine with the moon. Two rigs gives you that option.

6. Allow plenty of time to play.

We mentioned that the lunar eclipse lasts a while. The totality, or umbra period, can last 1 to 2 hours. That’s a lot of blood moon! While the umbra phase can be the most exciting, start clicking as soon as the penumbra starts, when the moon remains white but starts to show all its phases as Earth casts its shadow.

7. Try a moon trail!

High Roller & Lunar Moon Trail, 2014. 55mm focal length, 15 minutes f/8, ISO 400.

With so much time, why not set up one rig dedicated to shooting the entire eclipse and then stack it together for a very unique moon trail? The beam will be wide and bright during the penumbra period but get skinnier and a little dimmer during the umbra period. I’ve seen only a few images using this technique, and I definitely want to give it a go next time!

Given the length of this long exposure, you’ll definitely want to make sure you have plenty of power in your camera. I’d at least want to add a second battery and attach a power grip—but for even more power and reliability I’d hook up the camera to a Tether Tools Case Relay or ONsite power solution.

8. Do a time lapse or capture some video.

I’m a still photographer, but moving images can help tell a story in more detail. This could be especially helpful if you are battling clouds or weather. Dedicate that second rig to video and keep that powered up with the Tether Tools solutions listed above.

9. Zoom while exposing.

I slapped my hand against my head when I saw these images pop up on social media. I love this technique for neon signs and buildings but it didn’t cross my mind with the moon! Especially during the dimmer umbra phase, you can get exposures of 3 to 8 seconds. Use a telephoto lens zoomed all the way in, then midway into the exposure zoom to the widest end and leave it there. Two moons for the price of one!

10. Include the moon with other night elements.

Match up that moon with car trails or other bright things that move. We often default to the telephoto close-up of the moon, but how else can we tell the night story? Emphasize movement in your image! In my image from Atlanta, I really wanted car trails and the lunar eclipse—I wanted those leading lines taking us to the moon! Perhaps you could shoot the moon next to moving water, or add star trails surrounding the moon.

11. Composite away!

Full moon and eclipse photography are techniques that totally lend themselves to creative and fantastic composites. Show us all the phases of the eclipse in an interesting pattern. Place the moon anywhere in the world! Compositing images—taking elements from multiple shots and combining them—can totally unleash a new fantasy location.

My advice on compositing is to have a clear vision and stay true to it. Larger-than-life moons make a viewer realize the moon “doesn’t belong” in the scene, however if the rest of the image is pure fantasy then it is totally acceptable. In my image from this week, the moon is bigger than it normally would have been but still has a somewhat realistic feel.


Photographer vs. Freezing Temps

by Matt Hill

The night of the lunar eclipse, it was frigid in Catskill, New York. I mean cold. 3 degrees F cold. (Interpret the “F” how you want.)

Also, I was feeling really under the weather. But I really wanted to grab some frames of the eclipse, despite all these roadblocks.

So I popped open PhotoPills and saw that the super blood wolf moon would be arcing right between the houses by my studio. I decided to shoot it from the tiny deck outside the studio door.

The Weather Underground app (left) and PhotoPills’ eclipse and Night AR features provided all the info needed about where and when to shoot the eclipse in Catskill, New York.

For about 2.5 hours, I popped in and out, trying to avoid frostbite, and I worked through an image sequence that got me fully into totality.

And then, for kicks, I ran through optimizing exposure length versus ISO during totality. I mean, it was an hour long, right? The worst thing I could get was frostbite.

I settled on shooting at 1/2 second and ISO 100. I liked it better than any of the images I shot at higher ISOs. I made this sequence of images from the set:

Nikon Z 6, Nikon 300mm f/2.8 lens. 1/125, f/14, ISO 100 (full moon); 1/2 second, f/4.5, ISO 100 (totality).

Then I thought it would be great to run one more experiment to see at what shutter speed a 300mm lens would make the moon too blurry to be seen clearly. It’s easy to do with a full moon—but I wanted to have this to show people what it looks like during an eclipse:

Honestly, I thought the 1/2 second exposure was the sharpest that was acceptable to me. Either way, note that the chart above is for a 300mm lens. Results will be even more restrictive with a longer lens, such as a 600mm. It’s important to bracket and test in the field.

Exhausted and tired, I put my gear inside and rolled into bed around 1 a.m.—after downloading and inspecting my images, naturally. ;-)


Eclipse Stories from NPAN Alums

For several days this week we saw some of our workshop alumni post incredible images on social media. We asked a few if they’d share their stories and lessons learned, and we were thrilled that they are happy to do so.


by Gary Domrow

© 2019 Gary Domrow, instagram.com/gsdpic. Canon 5D Mark IV, Canon 100-400mm f/4.5-5.6 lens with teleconverters. 1/2 second, f/8, ISO 1600.

I set up the tripod up in my driveway here in Austin, Texas. I had hoped to do a sequence but the first part of the eclipse was obscured by clouds, so I took pictures for just about 15 minutes on either side of the beginning of totality. I shot them using the Canon 100-400mm, some with the Sigma 2X teleconverter and some with the Canon 1.4X, set up on a Really Right Stuff tripod and ball head. I used the “live view and zoom in” method to focus, and actually remembered to try a few different settings for ISO, shutter speed and aperture.

Despite using that lens and teleconverter combination, I must not have been zoomed in quite all the way because the focal length is 525mm according to the EXIF data. So I cropped the final image. What you see is maybe 30 or 40 percent of the original frame. Finally, I did some minor tweaking in post with Lightroom—Exposure, Contrast, Noise, Clarity.

I guess I can’t say I learned anything new. I just practiced and reinforced the techniques that I have, which is also a good thing.

Well, I did learn later that some people are really lucky—did you see this article about the meteor hitting the moon during the eclipse? I guess as long as you are out shooting the night sky, there’s always a chance you’ll catch something unique or interesting or unexpected.


by Heather Cunningham Wendelboe

© 2019 Heather Cunningham Wendelboe, bolo-photo.com. Nikon D750, 20mm f/1.8 lens.

I’ll pretty much always have a story, because every time I go out on one of my “automotive astroscape shoots,” I set myself up for a major mistake—since I always want to try something I don’t know how to do! So here’s the whole story of my disaster.

I had planned for one my usual automotive astroscape shoots. My intention for my final image is always to share a vision as if you had looked out a window and watched the whole experience through the night—to inspire someone to go on a late-night road trip out there in the middle of nowhere. A secondary intention is to showcase my passion for driving these cars the way they were meant to be driven and not just hoarding them in a garage.

This was my first attempt at a lunar eclipse. I wasn’t thinking about what would be different than other night photos I’ve done, so I composed like I normally would. The focus and exposures actually turned out pretty good, considering the haze in the sky and the lens fogging up, not to mention the microscopic size of the moon with a 20mm lens! The main problem was that at the time I started shooting the moon, it was in the middle of my frame, and there was not enough room at the top of the frame to fit the entire sequence of exposures as planned. So, right about the time of maximum totality, the moon just dropped off the edge of the composition!

I wish I had set up the camera to shoot the entire sequence of the eclipse, and then I could have done a second setup for the composition and foreground exposure, since the final image would have to be a composite anyway.

When it came to editing, I cropped out about two-thirds of my frame to make it a vertical, which helped get rid of a lot of the vertical line distortion and placed the moons in a better position from side to side. But with the vertical orientation, looking from top to bottom, I ended up with literally the middle third of my frame being blank sky. I posted that version to the National Parks at Night Alumni Facebook group. After talking with several people in the comments about all our lunar eclipse photos, I decided to try a re-edit: I moved the moon sequence lower to fill the blank sky, then I cropped it back to horizontal.

Moving the moons to an inaccurate position in the sky bothers me, because no one who could have been there watching that scene would have seen it this way. But the resulting composition is acceptable.

Lesson learned: You can’t recover what you didn’t shoot. And if you mess up what you did shoot, you owe it to yourself to salvage it, because your failed attempt required the same effort that a successful one would have. It wasn’t your work, only your decisions, that made the difference.


by Randy Christ

© 2019 Randy Christ, MovingImagesPhotography.com. Canon 5D Mark IV, Canon 100-400mm f/4.5-5.6 with 1.4X teleconverter, on an iOptron SkyGuider Pro EQ Camera Mount. 20 seconds, f/8, ISO 100.

The photograph is a single image—no HDR, no compositing, no Photoshop. All the editing, cropping, etc. was done with Lightroom.

Image stabilization was turned off, and focus was set to manual. The camera was mounted on an iOptron SkyGuider Pro EQ mount, which was configured to track the moon precisely. The 20-second exposure time was chosen to hold in check the star trails that would occur due to the moon and stars moving at different rates in different directions. Also, this shutter speed allowed for the settings of ISO 100 and f/8, which are the sweet spots of this camera and lens.

This was my first attempt at shooting with an EQ mount, and the comedy of errors I made kept rolling all evening. Talk about lessons learned—as well as just some bad luck. But I also had some good luck, and came away with some shots I am pretty happy with.

I decided to process this particular image in the series because it caught the fleeting moment when the moon was just about to leave the umbra shadow of Earth, ending totality. During totality, the light that reaches the moon travels through the inner layers of Earth’s atmosphere, which passes along the longer-wavelength orange and red light. This is why the moon turns orange during totality. In the moments just prior to reaching the end of totality, some light reaches the moon after having passed through Earth’s ozone layer, which passes along blue, shorter-wavelength light. This results in a small strip of purple trim on the leading edge of the moon. It is a unique and splendid moment that occurs for only a brief moment in time.

Note: If you’d like to read more about how Randy created this image, see his blog post “Total Lunacy—Photographing the Total Lunar Eclipse.”


by Martha Hale

© 2019 Martha Hale, instagram.com/marthahale. Canon 5D Mark IV, Canon 70-200mm f/2.8 lens.

I was fortunate enough to shoot the solar eclipse of 2017 with National Parks at Night, so I knew I wanted to give this lunar shot a foreground element. Using PhotoPills, I scouted numerous skyline and landscape possibilities around town, only to realize this event was going to be happening straight up in the sky far away from the horizon. Change of plans. I scouted taller locations such as the statue of Vulcan in Birmingham, but newly installed multicolor LED lighting was going to be a challenge. I pondered Sloss Furnaces National Historic Landmark, but without NPAN, would they let me in that late again and turn off all the lights? Slim chance.

At the entrance to my neighborhood is a rather large replica of the Statue of Liberty. I couldn’t resist. I ended up liking a composition from directly beneath the statue with my lens aimed straight up, shooting with a Canon 5D Mark IV and a 70-200mm lens. I bounced all night between that and a Fuji X-T3 setup with a 100-400mm f/4.5-5.6 lens plus 2X extender. I was struggling with the loss of stops at f/9 with the Fuji, and with chasing the moon to keep it in the frame (should have used my star tracker from the previous eclipse), and with having to bump up the ISO so much once we were in totality.

I was getting frustrated, so when my husband came to check on me, I was ready to pack it up. But first I handed him a flashlight and asked him to point it at the face of the statue. I went back to my Canon and decided to do one final composition with my focal point on the statue, and just to be sure, took the time to do one more shot focusing specifically on the moon. I’m so glad I took that extra step, because when I got back to the full screen of my computer, the moon was slightly out of focus in all the earlier shots! I stacked the two shots in Photoshop for the win!


by Susan Wales

© 2019 Susan Wales, susanwales.ca. Nikon D810, Sigma 150-600mm f/5-6.3 lens.

I did not do a time lapse, but rather only took individual frames and put them together in Photoshop later. It would have been hard to do a time lapse because the settings changed a lot from the beginning to the end of the eclipse.

I did not realize that the color of the moon would change so dramatically from white at the start until the blood moon color developed with the full eclipse. That was fascinating to watch.

I pre-focused to infinity, locked my focus down and then shot in manual mode. I started to photograph at 8:50 p.m. (in British Columbia) and finished at 10:09 p.m. when the clouds moved in. I started with an exposure of 1/6 second, f/5.6, ISO 64 and finished at the height of the eclipse at 1.3 seconds, f/5.6, ISO 2000. I adjusted my camera settings manually as the light changed on the moon. 


by Steve Winker

© 2019 Steve Winker, whereswinker.com. Canon 6D, Tamron 150-600mm f/5-6.3 lens.

I shot the eclipse from the RV Park I’m staying at in Tucson, Arizona. Unfortunately, my site is right next to a 40-foot wall separating the RV park from Interstate 10. So there wasn’t any decent foreground. Plus, there’s a very tall bank of lights right there.

The main thing I learned was that I shouldn’t have set up so close to a very strong light source high in the air. At totality, it was almost impossible to see the moon thru the haze created by the light. The strong haze also caused my photos of the moon at totality to be a little hazy.

I really didn’t learn too much else this time. But I had shot a lunar eclipse in 2014 and I applied what I had learned from that shoot to this one. Based on that shoot and the fact that I didn’t have a foreground to use, I made the decision to zoom in and make a composite using several stages of the eclipse.

I did no cropping. I just took the five frames into Photoshop as layers, masked out the sky in each layer, and then moved the five layers so that the moons lined up.


Wrapping Up

Thank you to those six fantastic alums for sharing their images and their stories! We’re continually inspired by the photography we see coming from the fine folks we get to work with throughout the year.

So, who’s next? How about you? We’d love to see your photos of this week’s lunar eclipse, and to hear the stories behind them and the lessons you may have learned. Please feel free to share them in the comments section below or on our Facebook page.

Gabriel Biderman is a partner and workshop leader with National Parks at Night. He is a Brooklyn-based fine art and travel photographer, and author of Night Photography: From Snapshots to Great Shots (Peachpit, 2014). During the daytime hours you'll often find Gabe at one of many photo events around the world working for B&H Photo’s road marketing team. See his portfolio and workshop lineup at www.ruinism.com.

UPCOMING WORKSHOPS FROM NATIONAL PARKS AT NIGHT