Once in a Red Moon: Photographing the Lunar Eclipse

Cameras ready! This evening’s night skies will feature a total lunar eclipse.

The show will last about 3.5 hours, beginning at about 10:30 p.m. Eastern time, and ending at about 2 a.m., with totality falling between about 11:30 and 1. Moreover, the eclipse will be visible to about one-third of humans around the worldβ€”in most of Europe, Africa, and North and South America (including all of the United States)β€”providing extraordinary photo opportunities to countless photographers.

A lunar eclipse differs from its solar cousin in that we don’t get a total blackout, or a ring of fire, or any of that kind of end-of-days drama. But the moon, should weather allow you to see it, will become completely dim and red.

Why? Because a solar eclipse is a phenomenon of the light source (the sun) being blocked from view, while a lunar eclipse is a phenomenon of the moon moving into a shadow. When something is in a shadow, you can usually still see itβ€”just dimmer, and perhaps with altered color. That’s exactly what’s happening during a total lunar eclipse. The moon appears dimmer in the Earth’s shadow, and takes on first a yellowish and then a reddish hue because the only light hitting it is being bent and filtered through our atmosphere.

A Quick Rundown

Here are a few notes on photographing a lunar eclipse:

No special gear is needed beyond what you’d use to photograph any moon at night: camera, lens, tripod. You can add a cable remote, an intervalometer, a star tracker, etc., but you won’t need any special light filters or anything of that nature.

Use PhotoPills to see ahead of time where the moon will be in the sky during the eclipse. You can do this with the Eclipse panel in the Planner, or if you’re already on location just use Night AR in the Moon pill to visualize where the moon will move during the times mentioned above.

PhotoPills.com showing the location of the moon at the time of peak totality, as it can be seen from the North Rim of Grand Canyon National Park.

Consider using both long and wide lenses to create different types of compositions. The former will give you great moon portraits, while the latter will allow you to portray the moon as an element of a wider night scene.

Slow down. The eclipse will last 3.5 hours from beginning to end, and totality will last about 90 minutes. You can work through a lot of scenarios and ideas in that much time, and you can even wait out clouds that might be blocking the moon for a bit.

Pay attention to shutter speed. The moon moves faster than it appearsβ€”a little less than 2,300 miles per hour. According to Lance Keimig’s book Night Photography and Light Painting, that means the moon moves the length of its diameter every 2 minutes. If your shutter speed is too long, it will blur. The wider your lens, the longer shutter speed you can get away withβ€”even as long as 10 seconds or so. But with longer lenses, you’ll be limited to much shorter speeds. (Below, see a graphic from a test Matt Hill ran a few years ago, based on using a 300mm lens.)

Be ready to change exposure. The moon will get darker closer to the middle of the eclipse, so an exposure that looks good at 10:30 p.m. EDT will appear dark at midnight, and your good midnight exposure will blow out the moon at 1:30 a.m. But you have to be careful about compensating for that loss of illumination by changing your shutter speed too much, lest your moon go soft from motion (see the previous point). Therefore, during totality you’ll probably want to increase your ISO instead.

Further Exploration

Obviously you can dive a lot deeper into a topic such as this. Here are a few options:

Wrapping Up

We wish all of you great success in shooting for the moon tonight! Please come back and share your photos with us.

Chris Nicholson is a partner and workshop leader with National Parks at Night, and author of Photographing National Parks (Sidelight Books, 2015). Learn more about national parks as photography destinations, subscribe to Chris' free e-newsletter, and more at www.PhotographingNationalParks.com.

UPCOMING WORKSHOPS FROM NATIONAL PARKS AT NIGHT

How I Got the Shot: Grosvenor Arch Milky Way Pano

Grosvenor Arch Milky Way Pano. Nikon Z 6II with an Irix 15mm f/2.4 Firefly lens and FTZ Adapter, mounted on a Novoflex VR-System Slim Panorama System, lit with two Luxli Fiddle LED panels. Eight frames shot at 15 seconds, f/3.2, ISO 12,800 and stitched in PTGUI Pro.

The Location

One standout feature among many in the nearly 2 million acres of Grand Staircase-Escalante National Monument is Grosvenor Arch.

This hulking double sandstone arch stands 150 feet above ground. Named in honor of Gilbert Hovey Grosvenor (1875-1966), the first full-time editor of National Geographic magazine and husband of Elise May Bell, daughter of Alexander Graham Bell. Gilbert is credited with transforming the much-too-scholarly National Geographic into the illustrated and superb publication many of us have enjoyed for decades.

Figure 1. Grosvenor Arch sits in the backcountry of Utah’s Grand Staircase-Escalante National Monument, which is gigantic. Click here to download a map of the area. Satellite imagery courtesy of Google Earth.

Photographers from the National Geographic Society named the arch after Grosvenor during a 1949 expedition, as they believed he β€œhad done more than any other person to arouse public interest in geography.” So this was a fitting subject for Gabe Biderman and I to stop at during our 3-week tour of California, Utah and Arizona in 2021.

From our base in Kanab, Utah, Gabe and I made a day and night of driving north and past the entrance to Bryce Canyon (gasp!) and onward to Kodachrome Basin State Park for sunset (Figure 2).

Figure 2. Nikon Z 6 with a Venus Optics Laowa 15mm f/2 FE Zero-D lens, mounted on a Novoflex VR-System Slim Panorama System. Seventeen frames shot at 1/60, f/8, ISO 100 and stitched in PTGUI Pro.

A fun detour! But our real goal for the night lay farther down the primitive, hardpack Cottonwood-Canyon Road.

Upon arrival, we noted that 1) only one other car was present and the owner was either sleeping or hiking, and 2) there was a bathroom. Yay! The ample parking and paved walkway were welcoming after some of the back-trail adventures we’d had.

While scouting (Figure 3), I knew that my ultimate goal was the rise of the Milky Way core and the resulting arch connecting with the landform. Gabe and I studied the scene and planned the compositions. I was really into making panoramas during that trip (and still am!).

Figure 3. Scouting with PhotoPills.

The Pre-Shoot Shoot

As darkness drew upon us, we still had a long time to go before the galactic core appeared. Not ones to waste a good dark sky, we shot plenty while waiting.

We started with deploying some Low-level Landscape Lighting (LLL). Gabe hiked down the road a bit and then a little into the field to set up a Luxli Fiddle LED panel. Being over one-third of a mile from the arch, Gabe turned it on at 30 percent brightness. The result was a crisp, directional light source that defined the most important shapes and textures of the eroding rock formation.

We set up 1.5-hour star trail stack (Figure 4) and dove hungrily into our sandwiches.

Figure 4. Nikon Z 6II with a Nikon Z 24-70mm f/2.8 S lens at 34mm. Sky: 31 frames shot at 4 minutes, f/2.8, ISO 800 and stacked in Photoshop; foreground shot at 8 minutes, f/4, ISO 800.

After sitting back and enjoying the stars for a bit, we moved closer to the arch to shoot some star-point stacks, while the clock crept ever closer to the triumphant rise of the galactic center.

During that time I made this composite image with a 15-image star point sequence and a longer base image for the landscape (Figure 5).

Figure 5. Nikon Z 6II with a Venus Optics Laowa 15mm f/2 FE Zero-D lens. Sky: 15 frames shots at 10 seconds, f/2.8, ISO 12,800 and stacked in Starry Landscape Stacker. Foreground: 8 minutes, f/4, ISO 800. Blended in Photoshop.

Reviewing those images in the field, I noticed that the ground was dark in the composition. As natural as that was, Gabe and I agreed to draw out some more definition in the trees closest to us. We set up much closer to the foot of the arch to put even more of it above the horizon. Having that air around the formation really brought out the space between the eroded, airy portions, not to mention set the stage for a landing point when the Milky Way would appear.

The Shoot

It was dark. Really dark. Bortle Class 1 dark (Figure 6). So our short exposures were shot at ISO 12,800, and for star points we were using NPF settings (see below), which made the exposure even more challenging.

Figure 6. Bortle Class 1 info for the Grosvenor Arch area. Source: lightpollutionmap.info.

As we began setting up the panorama sweep, we set another Luxli Fiddle in the two trees in front of us. The concept was to cast shadows toward our lenses and radiating outward toward the arch. This gave the otherwise dull and dark trees shape and texture.

I placed and leveled my Novoflex TrioPod Pro75, then mounted my VR-System Slim Multi-Row Panorama System. This setup gives me reliable and repeatable rotations. Repeatability was necessary because I planned to execute the pano sweep three times with different settings. (Though I did end up getting it in one passβ€”lucky!)

I chose the Irix 15mm lens for this shot. NPF exposure duration for that lens on my Nikon Z 6 is 18.04 seconds for Default and 9.02 seconds for Accurate (Figure 7). (See the post β€œNPF: The New Rule for Shooting the Sharpest Stars in the Sky” for further information.) I was already at ISO 12,800 and didn’t want to push further. I opted for an educated guess of 15 seconds to drink in as much light as I could. I felt comfortable leaning toward letting in more light in the near-darkness versus a β€œcorrect” exposure with little information to post-process.

Figure 7.

After test shots, I waited for the Milky Way to be in the ideal position, and then I committed and shot the sequence. Job done! Well … almost.

The Processing

In Lightroom Classic, I first made basic local adjustments. Then I processed one of the image sets (Figure 8) by adding a mask for the sky using the new AI-assisted Masking tool. I also brushed in the negative space under the arch and cleaned up some of the land/sky mask using the Subtract tool. I adjusted to taste for an ideal sky.

Figure 8.

Then I created another mask using Select Sky (Figure 9), and I inverted that to mask the landscape instead. Again I cooked to taste, being extra careful not to over-boost the shadows and accentuate the noise in them.

I also got rid of sky junk, of which I found a surprising amount (Figure 10).

Figure 9.

Figure 10.

Once I got my adjustments down, I synchronized them across all the images. (Note: When you have one of the new AI-created masks and you sync it across images, you have to go in and recalculate each of them. Adobe, are you listening?)

After confirming that each of the eight pano images was processed correctly, I used the Export to PTGUI menu command and chose TIFFs with Lightroom Adjustments.

In PTGUI Pro, I moved through many of the different projections, looking for one that provided an ideal, natural perspective.

Figure 11.

Figure 12.

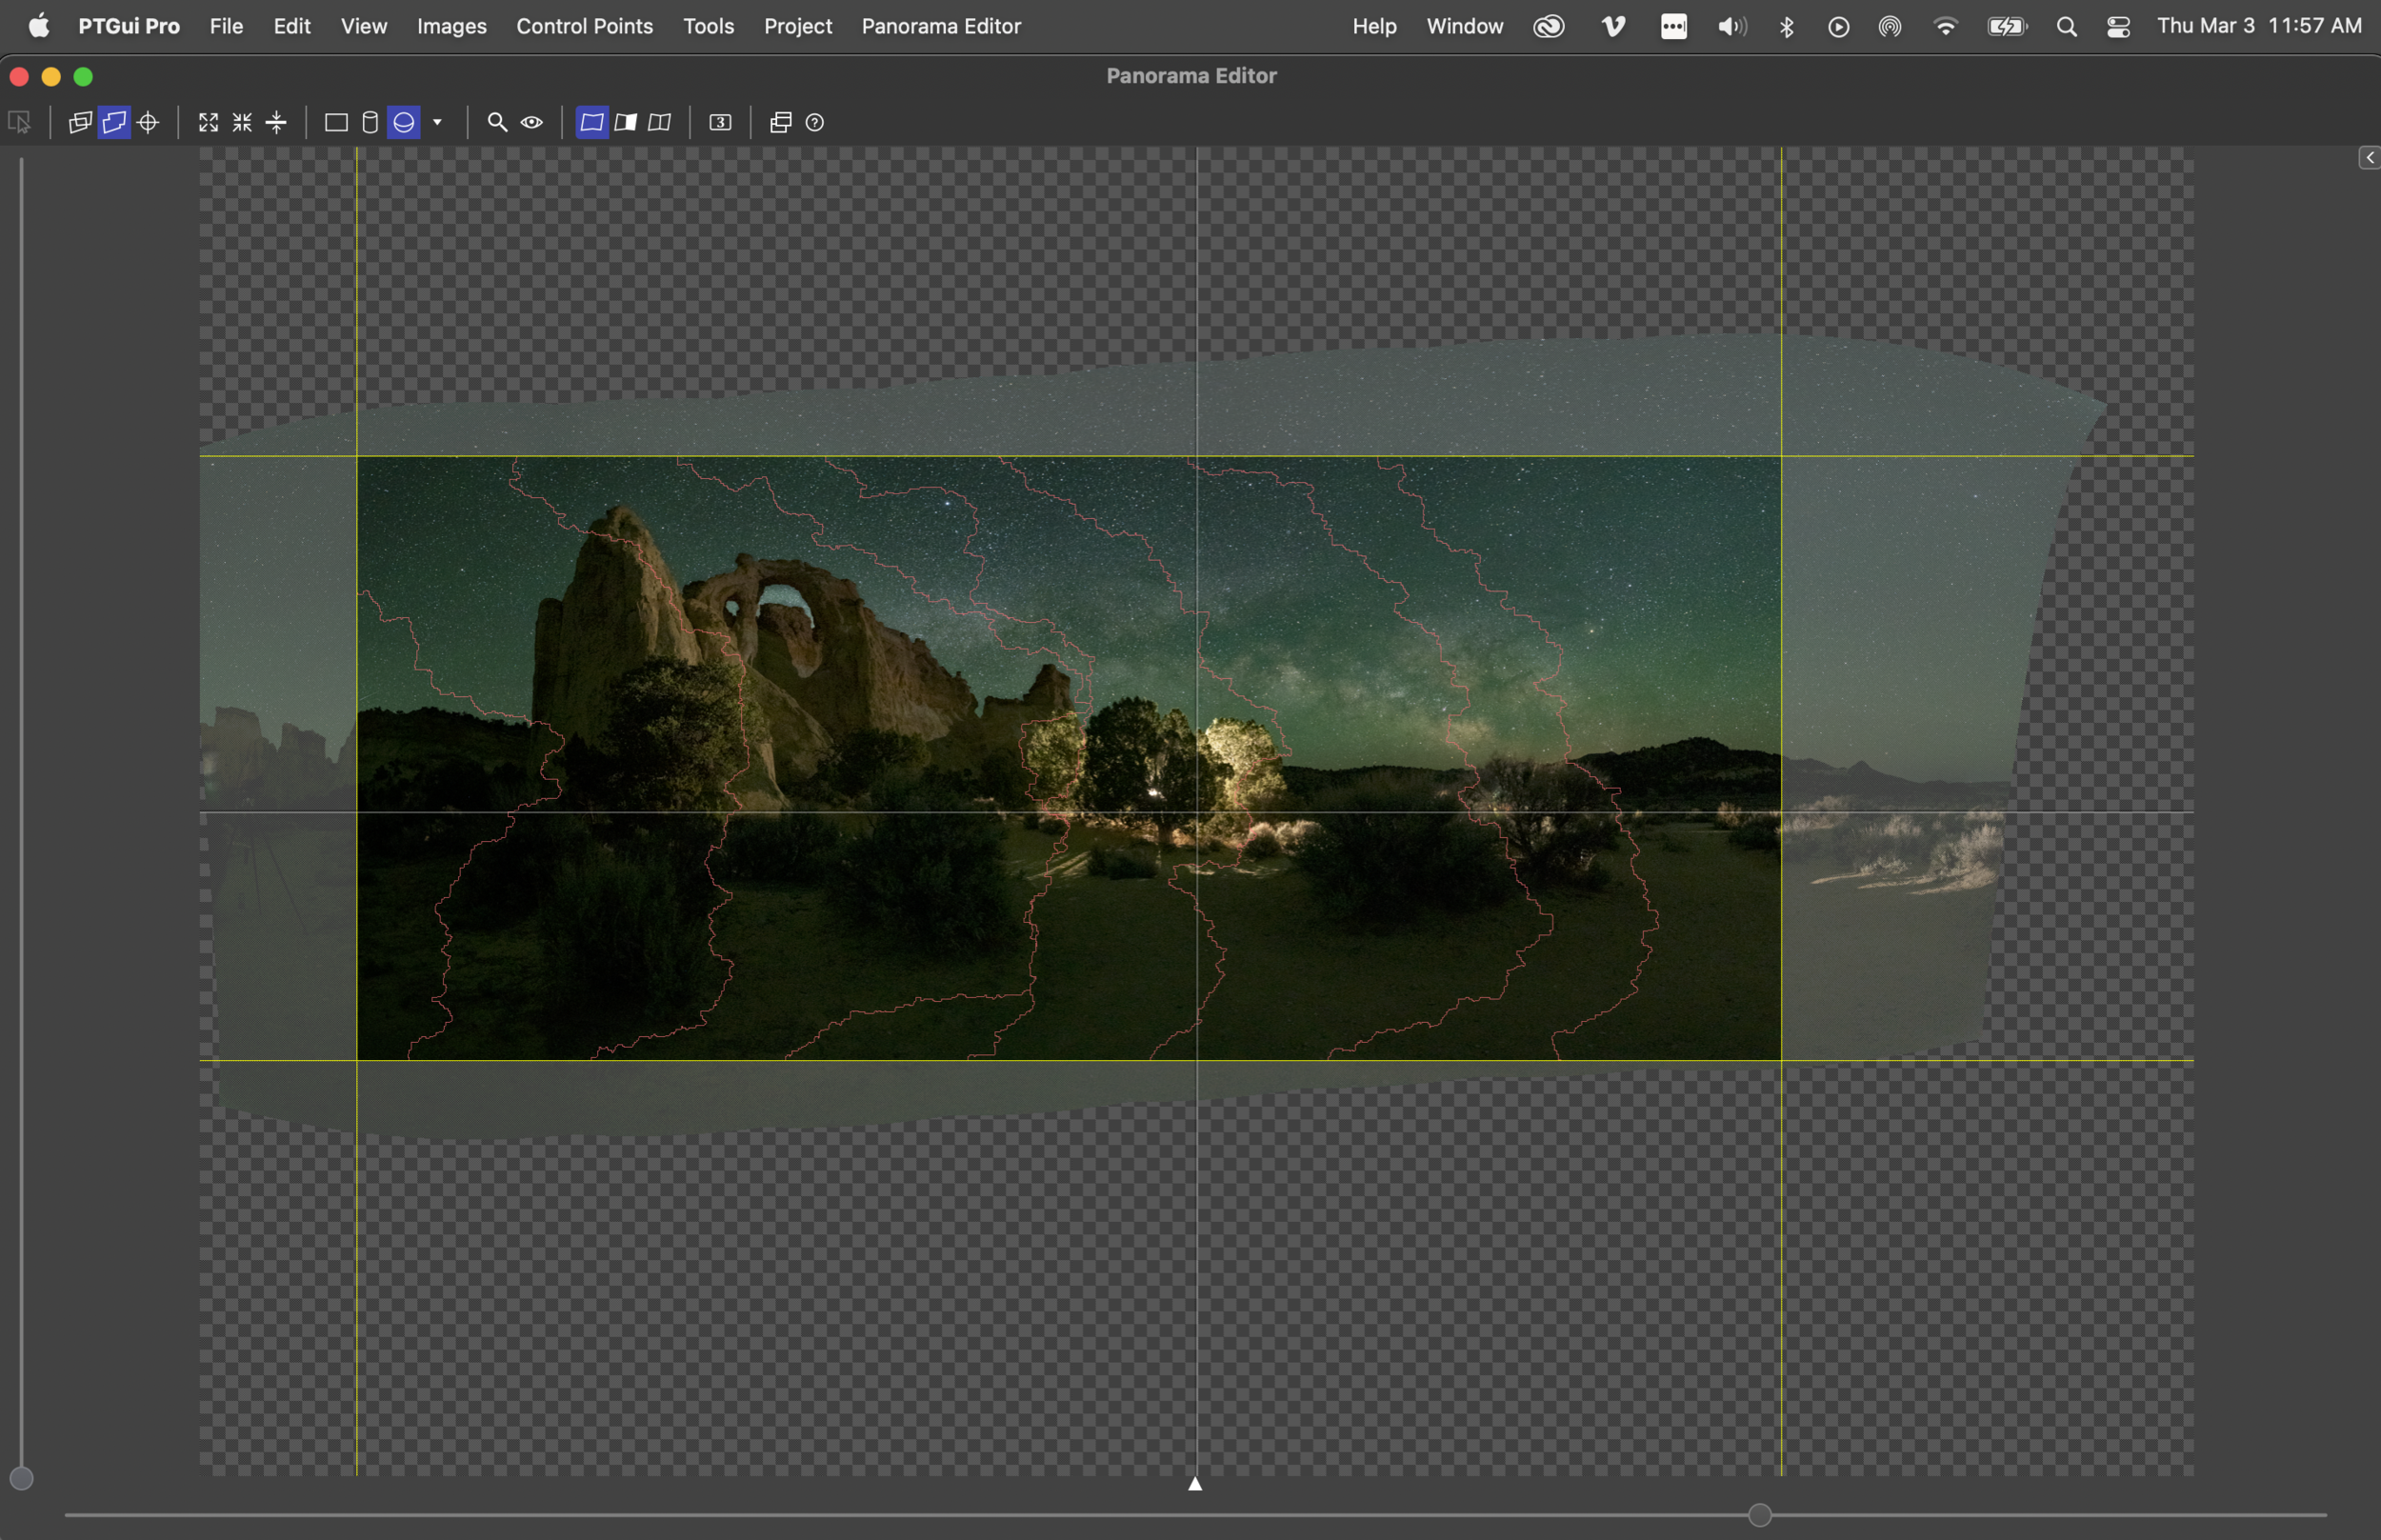
I ended up with Equirectangular (Figure 11) and reduced the field of view to 270 degrees (Figure 12). A final step in PTGUI was to drag in crop lines from each edge for a final composition (Figure 13).

Figure 13.

I exported from PTGUI to the same folder as the raw files, then synchronized the folder in Lightroom Classic to get that final image back into my catalog. Then I studied the image one last time. I noticed the trees in the foreground got bright again, despite careful processing before stitching, so I brushed in a local exposure reduction (Figure 14).

Figure 14.

Then it was time to make a final crop. I feel that the classic 3:1 ratio is perfect for this photo (Figure 15). It balances all the important elements in the scene.

Figure 15.

Wrapping Up

I find the final image (Figure 16) very true to the planning and preparation that went into this.

Figure 16. Nikon Z 6II with an Irix 15mm f/2.4 Firefly lens and FTZ Adapter, mounted on a Novoflex VR-System Slim Panorama System, lit with two Luxli Fiddle LED panels. Eight frames shot at 15 seconds, f/3.2, ISO 12,800 and stitched in PTGUI Pro.

It always pays to know when your celestial objects are going to be in the right place. PhotoPills was crucial in planning this from the hotel in Kanab.

What’s also essential is to look at a scene and have a bunch of other β€œtools in your toolbelt.” In this case, I was laser-focused on making a pano with the Milky Way arch, but it wasn’t the only photo I made that night. I made star trails, star point stacks and even a vertorama (not included here).

Making other photos while waiting on your dream image is the right way to warm up and to work out the kinks in any scene.

I hope you enjoyed coming along with me to one of the jewels in the crown of Grand Staircase-Escalante National Monument. Seize the night!

Further Learning

If you want to learn more about planning with PhotoPills, sign up for the waitlist for our PhotoPills Bootcamp: Bryce Canyon and be sure to get on our mailing list, as we’re sure to offer more PhotoPills workshops in the future.

If you want to shoot scenes like this under the amazing dark skies of the Kanab area, another outstanding opportunity to learn more about astro-landscape photography is by joining the outstanding group of instructors at the 2022 Nightscaper Conference April 26-29. Limited early bird tickets are available now.

Just for fun.

Matt Hill is a partner and workshop leader with National Parks at Night. See more about his photography, art, workshops and writing at MattHillArt.com. Follow Matt on Twitter Instagram Facebook.

UPCOMING WORKSHOPS FROM NATIONAL PARKS AT NIGHT

Growing the Community: We Are Now Running the Nightscaper Conference

If you’re a regular reader of this blog, or a regular anything with us, then you know how important we consider community to be. We treasure our community hereβ€”we feel so fortunate for this great group of folks bound together by our common love of going outside at night with cameras. And we love how this community has grown since it began back in 2015.

Well, that community is about to grow even more. We are absolutely thrilled to announce that we have acquired the Nightscaper Photo Conference.

This amazing event was created a few years ago by the venerable Royce Bair, the original nightscaper, who we have had the pleasure of collaborating with behind the scenes since early 2021. The first conference was held in 2019, and it quickly became an admired common ground and gathering spot not just for night photographers, but also for scientists, artists and activists who care about night skies.

We have of course been very aware of the Nightscaper Conference and community for quite some time, and have long admired and respected the spirit of everyone involved, from Royce and his staff to all the photographers and others who are so passionate about exploring dark skies. We look forward to celebrating and carrying on that spirit.

Why are we Doing This?

When Royce approached us last year with this idea, it was a match made in heaven. Or perhaps the cosmos aligned. Royce is looking to spend more time with his family, and we’re always looking for ways to grow our community and to work with even more people who love the night. So this arrangement was truly beneficial for everyone. We eagerly discussed it and agreed to accept his offer.

Gabe and I attended the 2021 Nightscaper Conference and absolutely fell in love with the community and the event. The spirit and passion of everyone we met fits so well with everything we do and with everyone we already know and love, and at the same time it brings a unique energy into the fold.

We are eager to carry forward the dedication and care that Royce put into organizing and leading the first two Nightscaper Conferences. For our part, we are bringing to bear all our skills and care to make the event even more of something to remember every year.

The Conference

This in-person conference is happening in Kanab, Utahβ€”a hub with access to dark skies and stunning landscapes in southern Utah and northern Arizona.

We know that many of you have been itching for a reason to get out and get shooting. This is a great opportunity to scratch that itch!

White Pocket, Vermilion Cliffs National Monument. Nikon Z 6II with a Venus Optics Laowa 15mm f/2 FE Zero-D lens, light painted with two Luxli Fiddle LED panels. 13 seconds, f/2.8, ISO 12,800; 15 frames processed in Starry Landscape Stacker and stitched in PTGUI.

What’s New for the 2022 Conference?

The event is now 4 days instead of 3β€”April 26 to 29. We believe that having more time to spend in sessions and networking will give attendees an even richer experience.

Each session will be 1 hour long, to fully explore a topic.

We are planning to have 25 speakers this year, and 20 of them will be giving two sessions each, further allowing topics to be even more fully expressed.

The five organizers from National Parks at Night will be presenting one session each.

There will be four panel discussions to explore important topics to the community. Topic ideas are welcome and we’ll be soliciting those within the Facebook community and Instagram, so be sure to follow both.

We are adding elective image review sessions on the second, third and fourth mornings. You will be able to sign up for image reviews with participating speakers, for a reasonable fee. Further information about this will be released privately in the coming weeks to conference registrants.

Each in-person registrant will receive a custom-printed conference ring-spun shirt with glow-in-the-dark ink! You’ll be able to pick this up at the conference registration booth. And we may even make sweatshirts for pre-order!

This conference, as mentioned before, will be live and in-person in Kanab. Nestled along the southern border of Grand Staircase-Escalante National Monument, Kanab is also an amazing launching pad for adventures to Bryce, Zion, Capitol Reef and Grand Canyon national parks, and much, much more.

Grosvenor Arch, Grand Staircase-Escalante National Monument. Nikon Z 6 with a Venus Optics Laowa 15mm f/2 FE Zero-D lens, light painted with two Luxli Fiddle LED panels. 8 stacked images shot at 4 minutes, f/4, ISO 1600.

Each session will be recorded and posted online for paid registrants to watch and re-watch at their leisure for a full year. We will also offer Replays-Only for folks who can’t make it to Kanab this April.

There will not be a simulcast livestream, as we believe that focusing on the in-person experience and community is important, and although the technology to stream is available, it’s better to record and post it. However, there will be some vital speakers who cannot travel and we will be recording their presentations. We plan to simulcast those recorded sessions online so the Replays-Only ticket-holders can watch something during the conference dates.

What Will be the Same?

Even if you attended last year, there are lots of reasons to come again.

If you are already in love with the Nightscaper Conference, you’ll be happy to know that we have no interest in trying to reinvent this event. We love it the way it is. The focus on sharing, listening, skills, techniques, data and community will all be the same. We want to encourage everyone to gather to exchange ideas, to engage in spirited discussions and to go out shooting together.

Some speakers are returning, and some new voices will be presenting. See the lineup on the Speakers page of the website.

We will provide all in-person registrants with lunch each day of the conference and dinner the first evening. All other meals are your responsibility. Fortunately, Kanab has lots of wonderful places to eat!

We are using Sched to organize the sessions and physical locations. Expect this to be released closer to the conference. It will include an iOS and Android app for up-to-date info.

Tickets

The total number of in-person tickets is limited to 300 so we can all be as safe as Covid protocols can allow.

  • There is a limited number of in-person early bird tickets that are first come, first served: 100 at $499 each.

  • When these are gone, the remaining tickets will sell for $699 each.

For those of you who cannot travel, we are offering Replay-Only tickets to watch all sessions streaming for 1 year after the conference.

  • There will be early bird Replay-Only tickets available on a first come, first served basis: 150 at $299 each.

  • When those sell out, Replay-Only will be available for $349.

How do You Stay Involved?

Join us at one of the most inspiring dark sky locations in the United States. Meet other night-minded creatives and get the creative juices flowing in the classroom, as well as go out on each night to explore the dark skies and surreal landscapes of the Kanab region.

Please share the 2022 Nightscaper Conference with your friends, other astro-landscape and deep-sky photographers, and those who want to jump-start their skills. We also encourage you to share it with folks who are just getting into the craft.

Let’s come together as one night photography community to explore ideas, to explore this beautiful region, and to fall in love with the night again.

Social Media

Royce will continue to run his Instagram account @roycebairphoto, where he shares photos tagged #nightscaper from the Facebook group and elsewhere on Instagram (links below).

National Parks at Night is taking over the Nightscaper Conference Instagram account @nightscaperconference.

We will also be assuming ownership of the Nightscaper Facebook group, but have no plans to change anything, as the moderators of that group are amazing, dedicated and passionate. We love what they do and look forward to working alongside them.

Follow our Instagram.

Join our Facebook group.

Tickets are on sale now. Learn more at nightscaper.com.

Matt Hill is a partner and workshop leader with National Parks at Night. See more about his photography, art, workshops and writing at MattHillArt.com. Follow Matt on Twitter Instagram Facebook.

UPCOMING WORKSHOPS FROM NATIONAL PARKS AT NIGHT

Words, Words and More Words: Announcing the Night Photography Glossary

Jargon. Lingo. Parlance. Vernacular. At the bottom line, they’re all just words. But words are important. Words help us understand each other, they help us understand concepts, they help us learn new ideas. And the words that have nuanced definitions for a particular field are critical to understanding that field well.

Auto mechanics have their own vocabulary. For example, to them β€œdipstick” means something entirely different. Software engineers have their own terminology. For example, β€œincremental development.” Sailors have theirs. β€œArgh!”

And night photographers? Heck yeah, we have our own language too. Heaven help the stranger who walks into a night shoot and tries to make sense of, β€œHey, I set the LENR when using my intervalometer, and now I have gaps in my star-stacked Silky Way, not to mention moire. And don’t even get me started on my lighting ratio and ambient exposure. Hot pixels! Bortle!!!”

Yeah, we have a lot of words.

At National Parks at Night, as photography instructors we spend a fair amount of time talking about those words and termsβ€”words and terms from A to Z, such as β€œazimuth” and β€œzodiacal light.”

Now we’ve put those words together into a glossary. Over 250 terms about night photography, along with over 80 images to illustrate. The vocabulary of this fun and wonderful thing we do.

We’re making The Night Photography Glossary available to all, to read over your morning coffee. You can do so two ways:

  1. We have added a Night Photography Glossary page to this website.

  2. We have published a Night Photography Glossary e-book, with a fun, illustrative layout. For this we are chargingβ€”well, whatever you’d like to pay us. You may enter $0 and download for free, or you may send us some funds in exchange for our educational offering. Whatever it feels worth to you, is fine with us.

Either way, these are living documents. We will make updates to the Night Photography Glossary over time, adding terms and updating definitions. The webpage will always be kept current, and occasional updated versions of the e-book will be available as well (if you download, you’ll receive an email whenever we post a new version).

OK, enough words from usβ€”in this announcement, at least. Move on over to all the words in our glossary. Soon you’ll be able to tell all your friends about how you bulb-ramped that time-lapse and then used your colorimeter to ensure accurate K and dark-frame-subtracted the hot pixels. Bortle!

Chris Nicholson is a partner and workshop leader with National Parks at Night, and author of Photographing National Parks (Sidelight Books, 2015). Learn more about national parks as photography destinations, subscribe to Chris' free e-newsletter, and more at www.PhotographingNationalParks.com.

UPCOMING WORKSHOPS FROM NATIONAL PARKS AT NIGHT

Diggin' Gear: Announcing a Brand New Blog to Help Solve Your Night Photography Problems

Photographers love gear, and many photographers love talking gear. The reason isn’t a mystery. What’s in our bag are the tools we use to pursue our passion, and they are an integral component of our ability to create the work we envision.

Of course, not all gear is β€œnecessary.” If you have a camera, a lens and a medium, then you can make photographs. And if you can make photographs, then creativity is really the only additional speed bump on the road to photographs that are fulfilling to craft.

Still, many other pieces of gear ease the process in different ways, and that’s advantageous. It’s not because we’re lazy and need the process to be fasterβ€”it’s because easing some of the challenging aspects of photography frees up time and energy that can be better used on expanding that creativity.

In short, good gear solves problems.

Between the five of us here at National Parks at Night, we’ve found a lot of gear to solve a lot of night photography problems. Every now and then we write a blog post when something disruptive comes along, such as the Nikon Z 6, or the Luxli Viola, or the Phottix Aion. But we haven’t had a space for sharing the nearly endless stream of other products we experience and adopt into our kits and workflows.

Until now!

Today we are announcing the National Parks at Night Gear Blog.

This blog will feature short posts about tools that solve night photography problems. We’ll post not on a predetermined schedule as we do with our main blog (where you are reading this), but rather whenever some cool product piques our interest. That might be once per month, or could be several times in a week.

We’re starting today, with reviews on five pieces of gear, a few of which we’ve loved for a while and a few of which we’ve discovered recently:

  1. the Coast HP7R flashlight

  2. the Focus on Stars focusing tool

  3. the Gitzo GIGT2545T Traveler Series 2 tripod

  4. the Ledlenser P6R Work flashlight

  5. the PhotoPills app

You can find them all on our:

Over the next few months we’ll give you tastes of other equipment we believe in: bags, lights, software, lenses and whatever. We’ll let you know on our social media channels every time we post something new. Then once we’ve shown you enough of what this will all be about, we’ll give you a way to opt in to subscribe to these posts too.

In the meantime, we hope you enjoy the beginning of this practically endless exploration of the gear we love to work with.

Chris Nicholson is a partner and workshop leader with National Parks at Night, and author of Photographing National Parks (Sidelight Books, 2015). Learn more about national parks as photography destinations, subscribe to Chris' free e-newsletter, and more at www.PhotographingNationalParks.com.

UPCOMING WORKSHOPS FROM NATIONAL PARKS AT NIGHT