Technique

From Beginning to End, How to Expose a Solar Eclipse

Itโ€™s almost here! The Great North American Eclipse happens only two days from now, on April 8, 2024.

Much of Americaโ€”especially the camera-owning folkโ€”has been waiting for this day since being dazzled in 2017 by the last total eclipse to span the continent. The hype is real, and the reason is good.

To help folks get ready, last week we published a brand new e-book, There Goes the Sun: A Guide to Photographing a Solar Eclipse. Below is an excerpt from that book.

The book covers pretty much everything youโ€™d want to know about photographing an eclipse, from gear to scouting, from shooting to editing, and more. The excerpt below is from the chapter on shooting. We hope it gives you an edge toward getting some great images on Monday.


THE SUNโ€™S MOVEMENT

The sun moves its own diameter every 2 minutes. Setting a shooting interval for every 2 minutes will make sure that you capture many phases of the eclipse without any overlap. Gabe stacked the accompanying eclipse photo with a frame shot every 3 minutes, which gave enough separation between each shot.

Note that without a tracker to keep the sun in the middle of the frame during all the phases of the eclipse, you will need to readjust your frame every 10 minutes with a 300mm lens or every 5 minutes with a 600mm lens.

Eclipse composite. ยฉ 2017 Gabriel Biderman. Nikon D750 with a Nikon 14-24mm f/2.8 lens. 13 images stacked in Photoshop.

CAMERA SETTINGS

Settings are very subjective. Just like any day or twilight shot, you can be creative with adjusting your exposure for a desired effect that emphasizes movement, clarity or depth.

Also note that the exposure can vary depending upon your filter strength, clouds in the sky and how high the sun is (eclipses that happen low to the horizon will need to cut through more atmospheric haze, which reduces luminosity).

Your exposure will change as the eclipse progresses, and further on in weโ€™ll detail what you can expect, in chronological order.

We suggest reading through it a few times to get comfortable with how the light, and therefore your settings, will change over the course of a few hours.

A good starting point for exposing for the sun, with a solar filter on the lens, with clear skies, is:

1/500, f/8, ISO 800

Why these settings? These are safe settings that will play to the strength of most cameras and lenses for excellent image quality. Letโ€™s explain why:

Aperture

An aperture of f/8 is the sweet spot for most lenses and will not cause extreme diffraction or flare. If you are using a telephoto lens, stopping down to f/11 would also work and be more in the sweet spot.

Shutter Speed

The general rule for handheld telephoto photography is to use a shutter speed thatโ€™s the reciprocal of your focal length. For example, for a 500mm lens the shutter speed would be at least as fast as 1/500. Theoretically this prevents the image from getting soft due to camera movement caused by heavy gear.

That said, we recommend that you use a tripod and turn off VR/IS/OIS for the eclipse. This will make any relatively fast shutter speed effective. Weโ€™ve shot totality at as low as 2 seconds as part of exposure brackets to get even more detail in the corona. However, during the partial phases the sun will be brighter and we can play to the safer shutter speeds between 1/125 and 1/1000 to the best sharpness. Even at fast shutter speeds, with long lenses, try to trigger your camera with your built-in or external intervalometerโ€”this will help prevent any camera shake.

ISO

This is probably the most subjective choice. How comfortable are you shooting with your camera at ISO 800, 1600, 3200 or 6400? If there are ISOs you want to stay away from, you can probably pull that off. This will be easy during the partial phases, as the bright sun will easily allow for ISOs of 100 to 800.

However, once the eclipse is 90 percent full, things start to get dark. During totality the brightness will be equivalent to the beginning of nautical twilight. There will be a need to let in more light, and ISO is usually the best setting to push up.

Note that the higher the ISO, the more noise will be prevalent in the image. However, we find that modern cameras (2020 and beyond) can easily handle ISOs up to 6400. Plus, these days there are plenty of ways to reduce noise with post-processing.

TELEPHOTO SHOT

Gabe Biderman set up for a telephoto shot of the 2023 annular eclipse.

A telephoto shot will be taking up most of your attention.

Focal length and tracking are the key components to photographing the eclipse with a telephoto lens.

Another important aspect is to practice, practice, practice prior to the eclipse. Most likely a telephoto rig will be less familiar than what you use on a daily/weekly basis. Get used to tracking the transit as well as pointing the camera and lens high in the sky.

Does your camera have a swivel-out screen? That will make aiming high at the sun a lot easier.

If you donโ€™t use a tracker, you will need to continually recompose, or the sun will move out of your frame in mere minutes. If do use a tracker, keep an eye on it and make sure it doesnโ€™t flip and fall over. Definitely practice this in the months/weeks leading up to the eclipse.

Base Exposure

In terms of exposure with a telephoto, you have your base of 1/500, f/8, ISO 800 for shooting the sun prior to and through the beginning of the partial eclipse. We strongly advise bracketing to nail an exposure. Time will be scarceโ€”you donโ€™t want to waste any fumbling with third-stop adjustments. And memory is cheap, so bracket and fire away, then find your best exposures in post.

To do this, set your bracketing to three frames with one-stop increments. You can continue to use this three-stop bracket through 90 percent of the partial eclipse as the exposure wonโ€™t change much, unless clouds come in.

Alternatively, if youโ€™re comfortable that you have the perfect exposure, you can just take that one shot every 2 to 3 minutes.

How do you know if your telephoto exposure is correct?

Figure 1.

A good exposure for a partial eclipse is one that doesnโ€™t have extreme blooming around the sun and that keeps the sun spots sharp. Check your histogram. Figure 1 was for an image shot with a Lee solar filter. Note that the histogram is pushed 90 percent to the right, but the highlights are not clipping. Shadows, of course, are being clipped due to the black sky surrounding the sun. The exposure settings were 1/250, f/8, ISO 800.

Losing Light

Once the eclipse gets to 90 percent total, youโ€™ll need to adjust your exposure. Anticipate that. You should really pay attention once the sun is half hidden. Begin to monitor your exposures even more frequently. Check the histogramโ€”is anything overexposed? Is there blooming around the sun? The black around the sun should be solid black, because we are basing the exposure solely on the sun. We want it bright, but not overexposed.

Once the sun starts to look like a crescent, you might have to open up one stop (either raise your ISO or lower your shutter speed). By the time the eclipse is at 90 percent and closing in on totality, you might need to adjust your exposure by opening up an additional one to two stops. Monitor your histogram and continue to bracket three frames at one-stop increments.

Diamonds in the Sky

Right before totality, the first diamond ring phenomenon appears: a sharp burst of light around the edge of the moon that signals the last gasp of sunlight before totality begins (Figure 2). The first diamond ring is difficult to photograph because it lasts for approximately 10 seconds and you need to juggle a few things. First you need to remove your solar filter (perhaps remove it a few seconds early, anticipating when it will happen), then you need to adjust your exposure to the light without the solar filter on (which will be an additional two to three stops you need to let in).

Donโ€™t sweat it. The diamond ring also happens at the end of totality, so youโ€™ll get another chance. And itโ€™s much easier to nail the second one.

Figure 2. Diamond ring phenomenon. ยฉ 2017 Gabriel Biderman. Fujufilm X-T2 with a 300mm lens. 1/15, f/22, ISO 800.

Totality

A good starting point for totality is:

1/60, f/8, ISO 1600

However this is just a launching off point. We advise bracketing seven frames with one-stop increments. If you are in burst mode, you can knock these off pretty quickly.

Bracketing generally is applied to your shutter speed, so set your ISO and aperture to something you are comfortable with and that also allows the bracket to not go deep into long shutter speeds (in the seconds).

That being said, we have seen plenty of creative shots during totality that use either HDR or composite blending to incorporate shutter speeds up to 20 seconds. These overexposed shots will really show off how far the corona extends. If you bracket, you can retain some of the brighter highlights and then blend it all together in post.

Post-Totality

If you had set a timer to the beginning of the eclipse, then youโ€™ll be one step ahead in preparing for the second diamond ring effect. Stop down your aperture to f/16 for the diamond ring, as that will amplify the sunburst coming off the moon. Youโ€™ll have about 10 to 15 seconds to bracket and nail the diamond ring before too much of the sun is revealed and starts to just blob out.

Thatโ€™s when it is time to put the solar filter back on and adjust your exposure to a crescent sun. Set your interval for every 2 minutes and adjust your exposure as the sun gets brighter and brighter. Soon youโ€™ll be around the previously recommended exposures of 1/500, f/8, ISO 800, and you can just continue to bracket three frames for every interval. Continue to do this for the rest of the partial phases.

Figure 3.

If you do this youโ€™ll set yourself up to accomplish:

  • capturing any single phase of the eclipse

  • capturing multiple phases of the eclipse that can be composited together creatively (Figure 3)

  • an HDR of your bracketed images to bring out more detail and dynamic range

  • a time-lapse of the eclipse (if you shot even more intervalsโ€”this is recommended more for people with trackers that will keep the sun steady in the middle of the frame)


Are You Ready for the Eclipse?

Eclipse photography is a ton of fun, but you need to be prepared. In addition to the details about planning exposures, our e-book also covers:

  • gear critical for eclipse photography

  • safety guidelines

  • finding where the sun will be

  • how to use the light of the eclipsed sun

  • processing eclipse photos, including blending and compositing

  • how to become an eclipse chaser

  • and more!

To get your copy of There Goes the Sun, click below:

Wrapping Up

When youโ€™re done shooting the eclipse, weโ€™d love to see your images! Share in the comments below, or on our Facebook page, or on Instagram (tag us @nationalparksatnight #nationalparksatnight #seizethenight). Be sure to tell a story tooโ€”the technical aspects, the challenge overcome, or a tale of the experience.

Chris Nicholson is a partner and director of content with National Parks at Night, and author of Photographing National Parks (Sidelight Books, 2015) and Photographing Lighthouses (Sidelight Books, 2024). Learn more about national parks as photography destinations, subscribe to Chris' free e-newsletter, and more at www.PhotographingNationalParks.com.

UPCOMING WORKSHOPS FROM NATIONAL PARKS AT NIGHT

Embracing Clouds in the Night Sky

ยญยญEverybody loves a clear night sky. It can be existential to feel the draw of an endless dome of stars, take in a brilliant Milky Way or be fortunate enough to catch a dazzling display of northern lights. Across the globe, photographers and non-photographers alike marvel at the magic of the night.

What then do we do when clouds move into our star-filled nights? Give up and go home? Heck no. We can change our approach. Embrace the clouds! They can be every bit as magical as the Milky Way or a display of auroras.

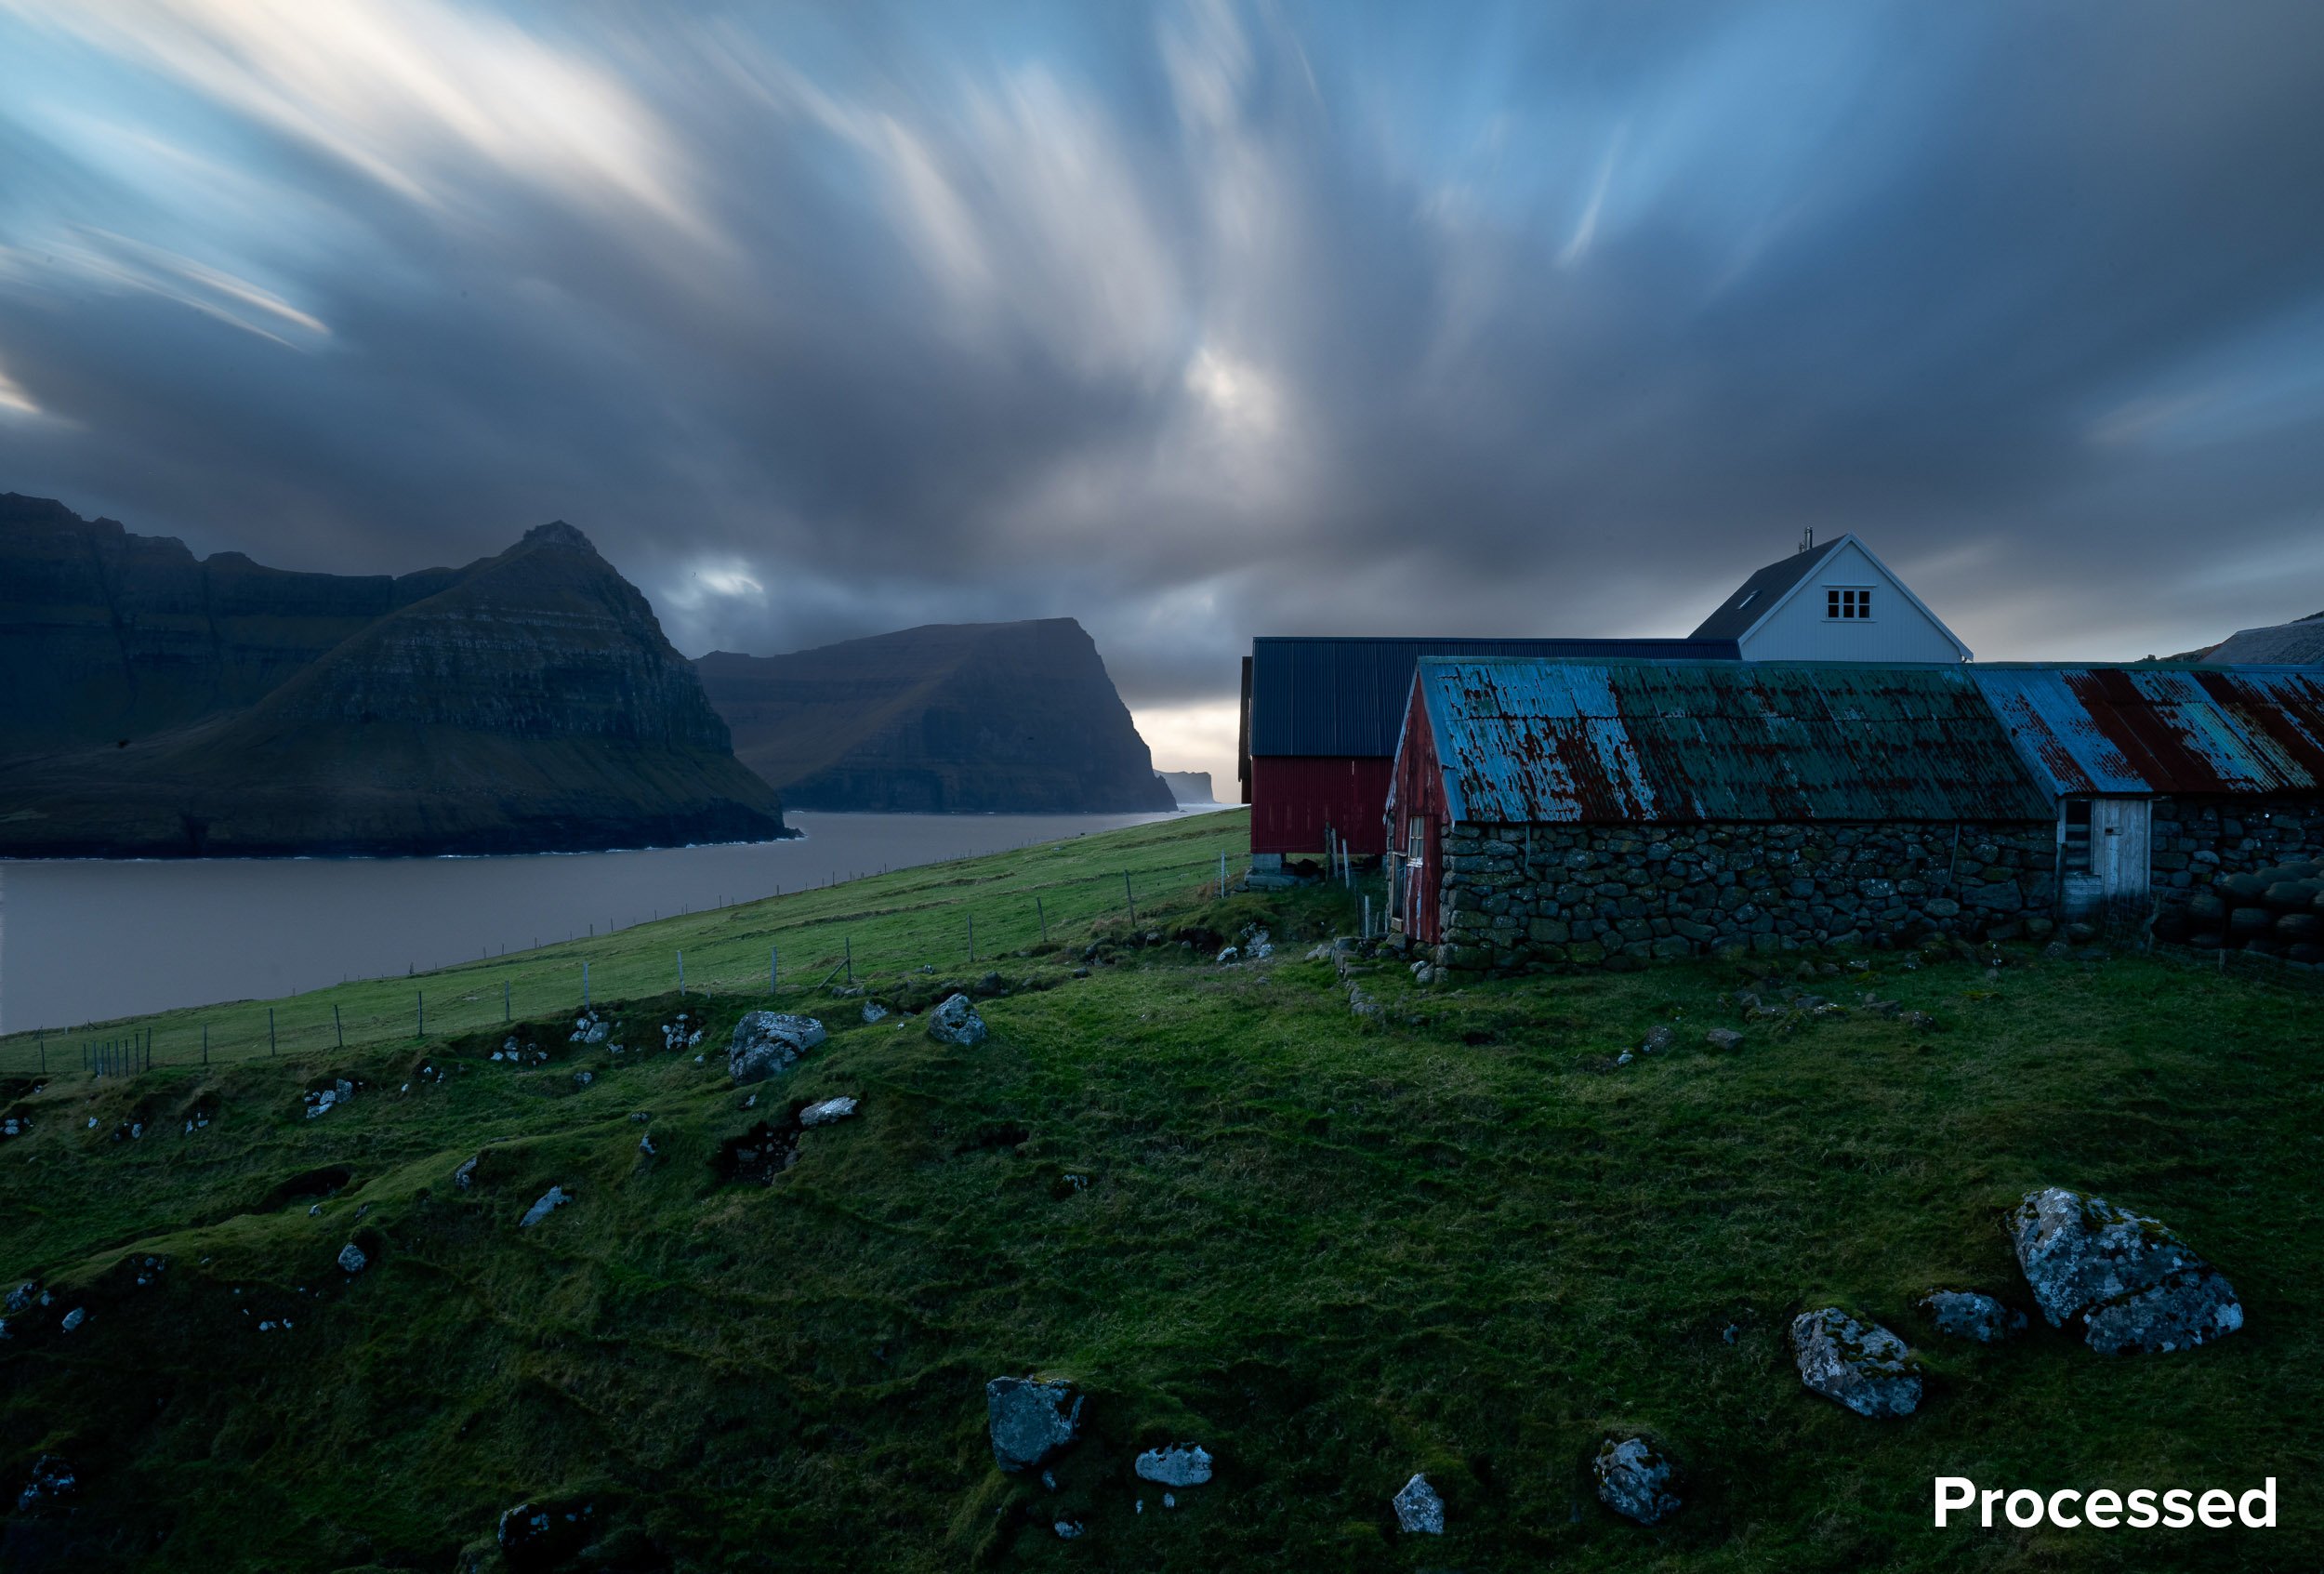
Faroe Islands. Nikon Z 6II with a Nikon 24-70mm f/2.8 lens at 27mm. 2 minutes, f/22, ISO 80.

Shifting Gears

One of the greatest pitfalls of landscape and astro-landscape photography is getting stuck on pre-conceived ideas. You may enter each night with an idea of exactly what youโ€™ll see and how youโ€™ll photograph it. This comes from being flooded with imagery from the most iconic places across the world captured under the most perfect conditions. So as we are getting ready to head out, we have already envisioned how our shots will look, and that is exactly what we expect and hope to happen.

So when the clouds roll in, obscuring our beloved stars, itโ€™s time to shift gears. Itโ€™s really just a simple matter of moving your mindset from needing to capture a clear night sky to allowing yourself to experiment with the conditions above you. Donโ€™t get caught in โ€œI have to recreate this scene as I have seen it beforeโ€โ€”instead embrace โ€œWhat would it look like if I tried this?โ€

This mindset could be applied to most types of photography, and indeed itโ€™s a worthwhile consideration for many situations. But for now, letโ€™s focus on clouds at night. Once you pivot from preconceived notions, itโ€™s easy to begin to experiment.

I was expecting to capture circumpolar star trails over Park Avenue in Arches National Park when the clouds set in. Shifting gears, I exposed for 5 minutes instead of a full hour, which would have resulted in very few stars and blanket of clouds. Nikon D4S with Nikon 16mm f/2.8 fisheye lens. 5 minutes, f/2.8, ISO 400.

Knowing that the clouds were sticking around all night, I chose to spend my time light painting this scene in Big Bend National Park rather than concentrating on the sky. Notice that the light-painted foreground dominates the scene while the sky is relegated to being the secondary subject. Nikon Z 6 with a Nikon 14-24mm f/2.8 lens at 14mm. 3 minutes, f/8, ISO 800.

Creating Cloud Trails

You can use clouds moving across a dark sky during a long exposure to create a very dynamic image.

For starters, try different shutter speeds. In some cases a 30-second exposure might do the trick, while in others you might need a 3-minute exposure to achieve the desired look.

Stopping down to f/10 from our typical wide nighttime apertures of f/2.8 or f/4 allowed me to expose for 2 minutes. This in turn provided time for me to light paint the moai of Rapa Nui (Easter Island). Nikon D4S with a Nikon 24-70mm f/2.8 lens at 60mm. 2 minutes, f/10, ISO 200.

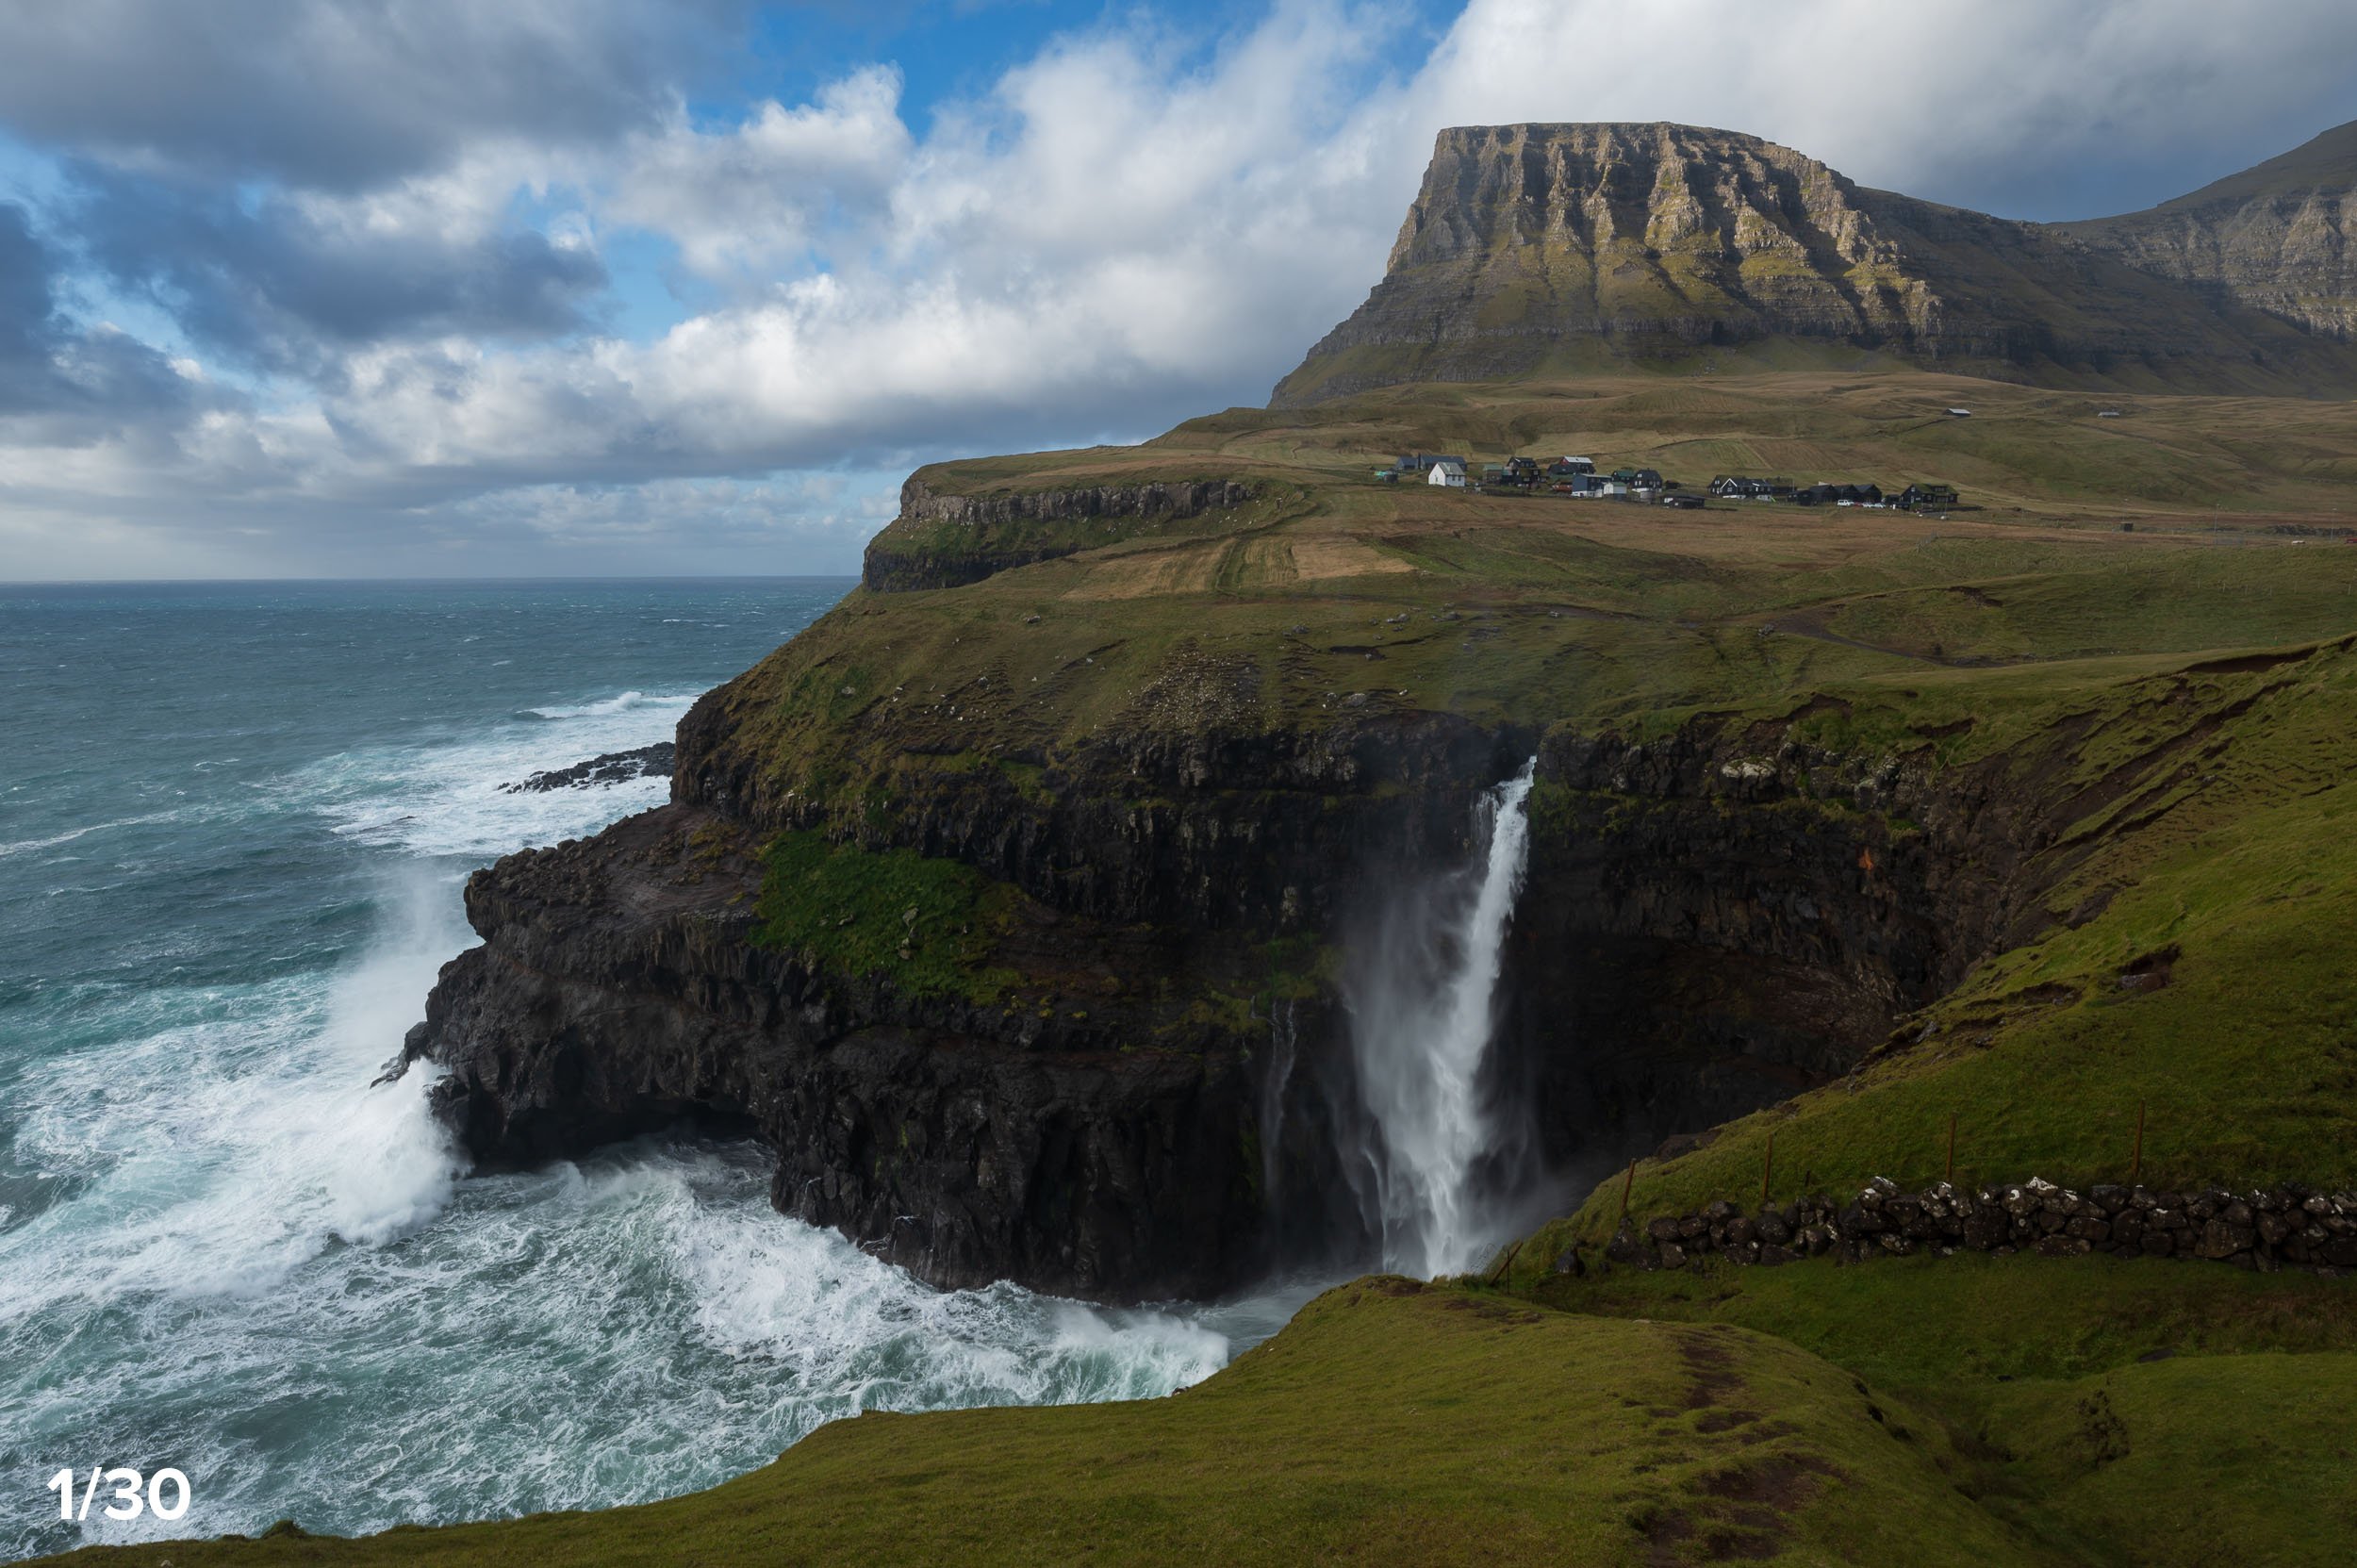
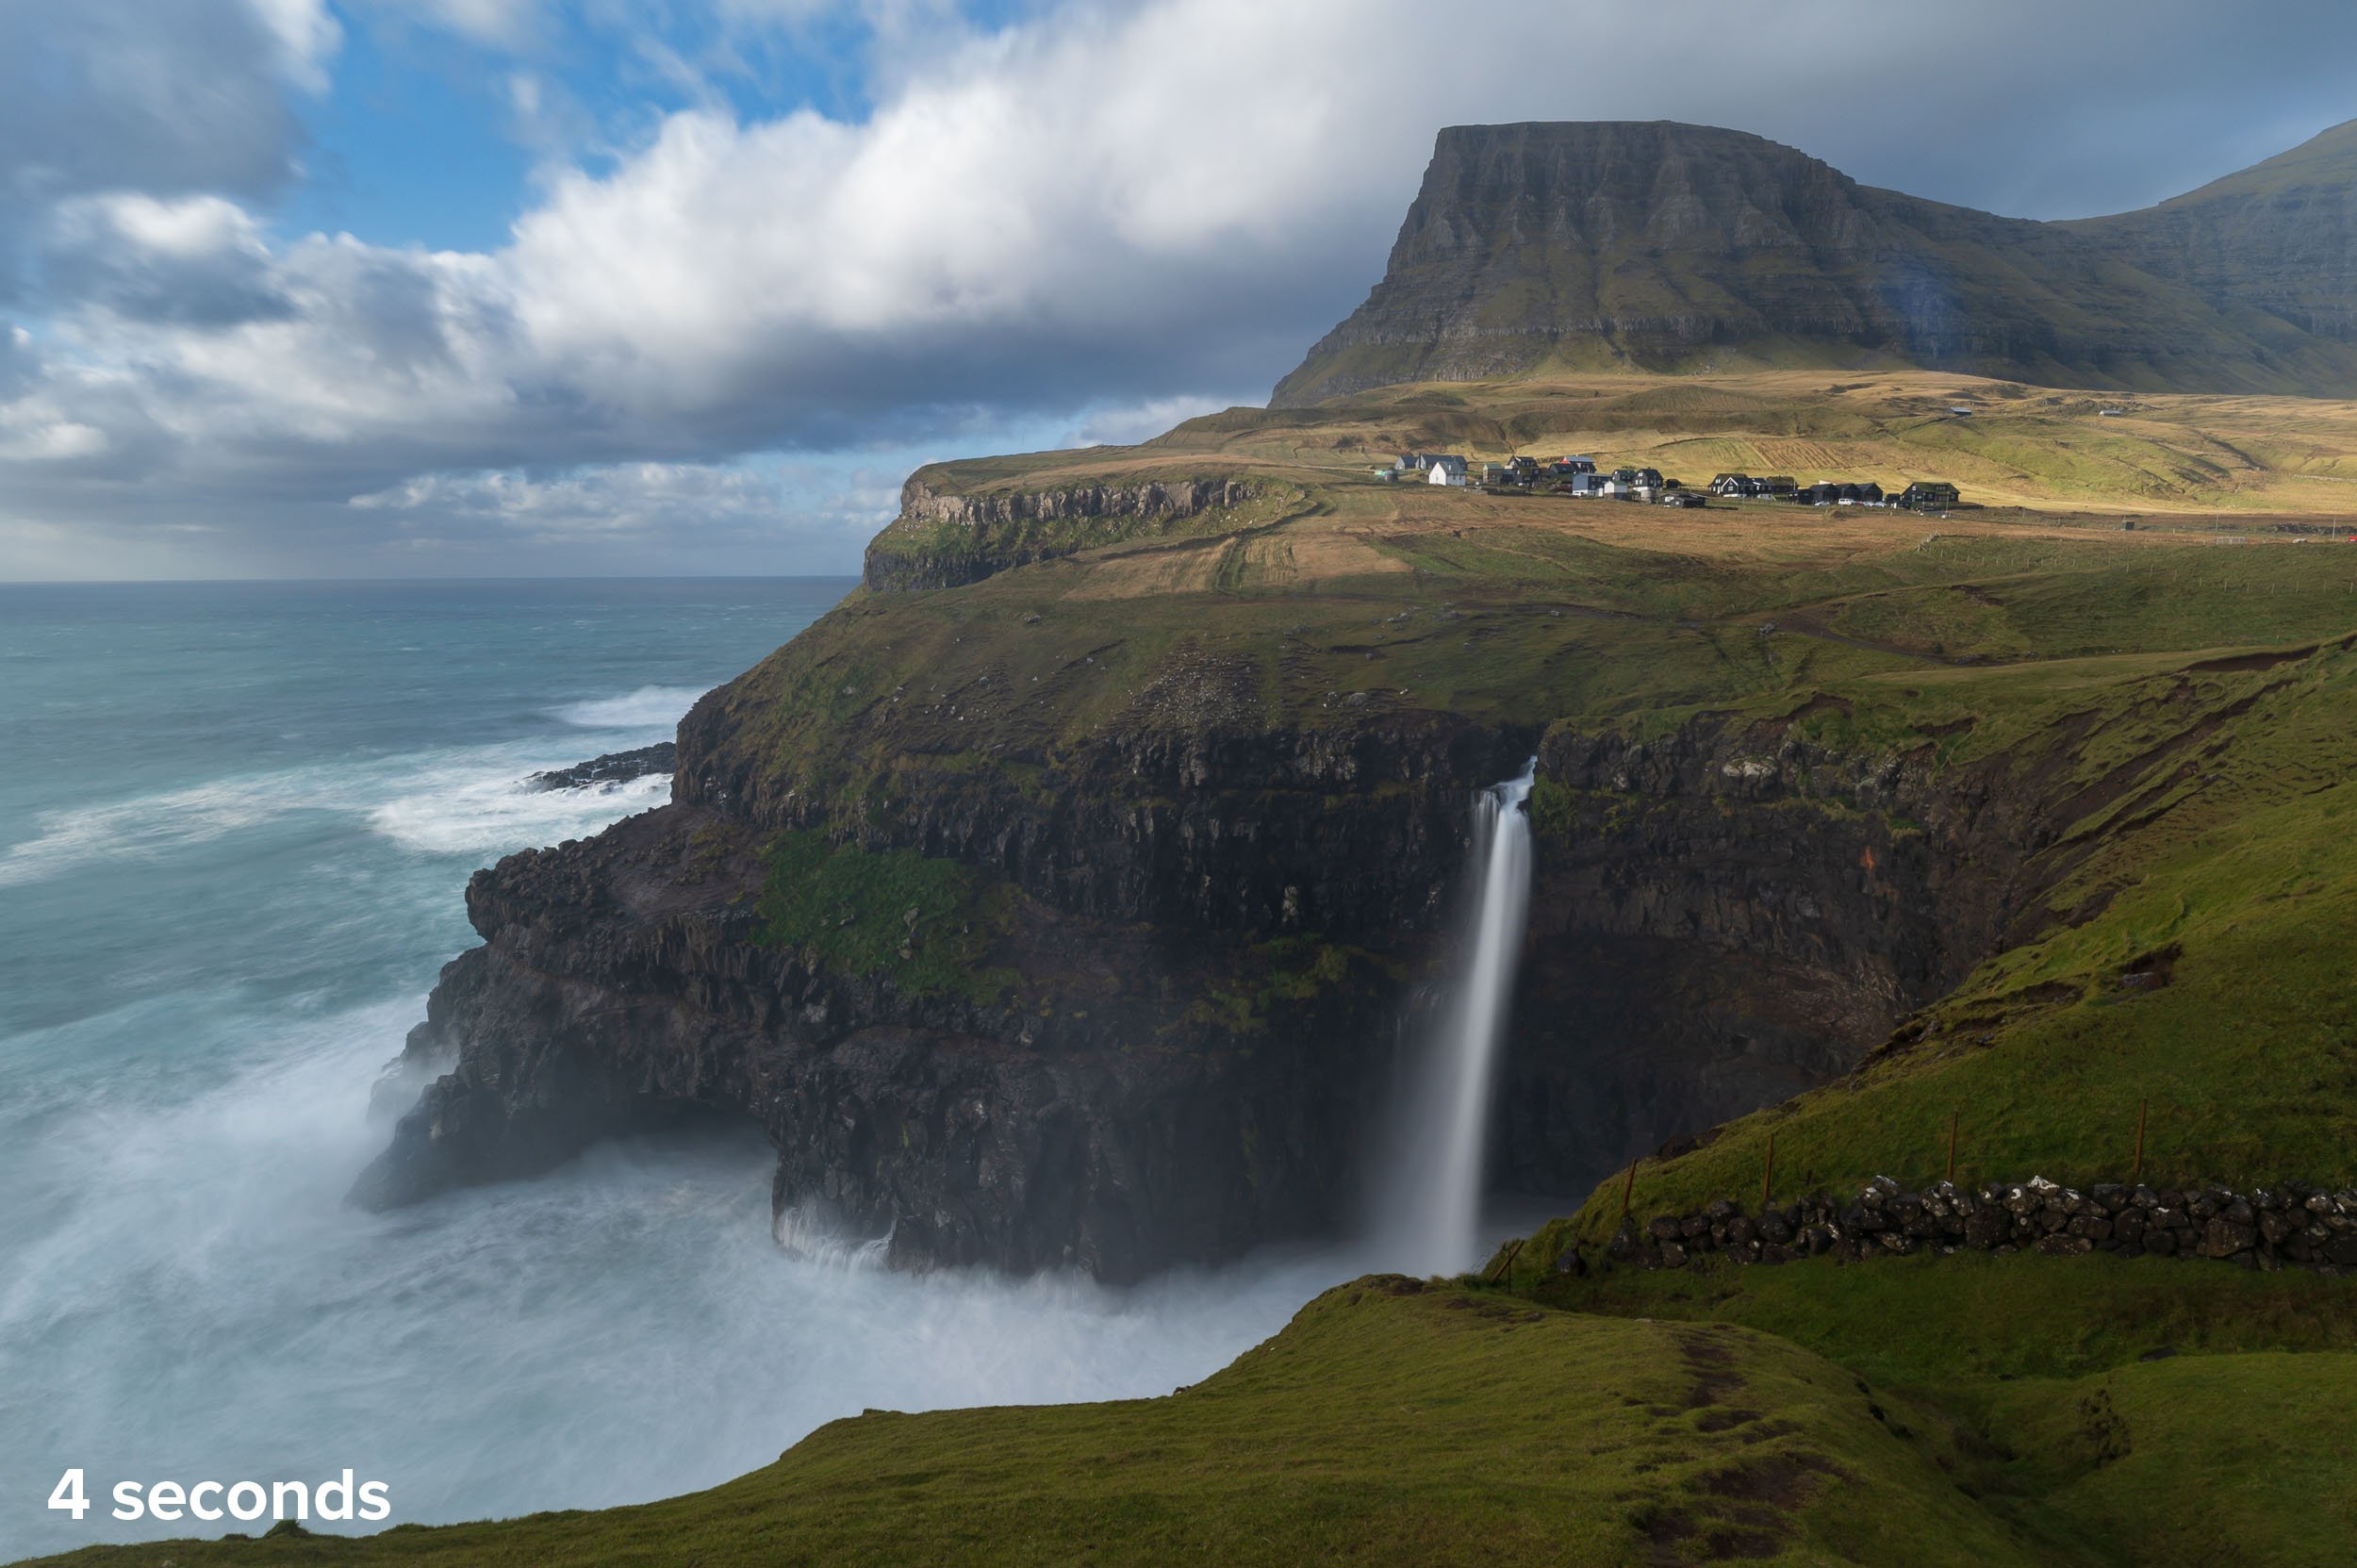
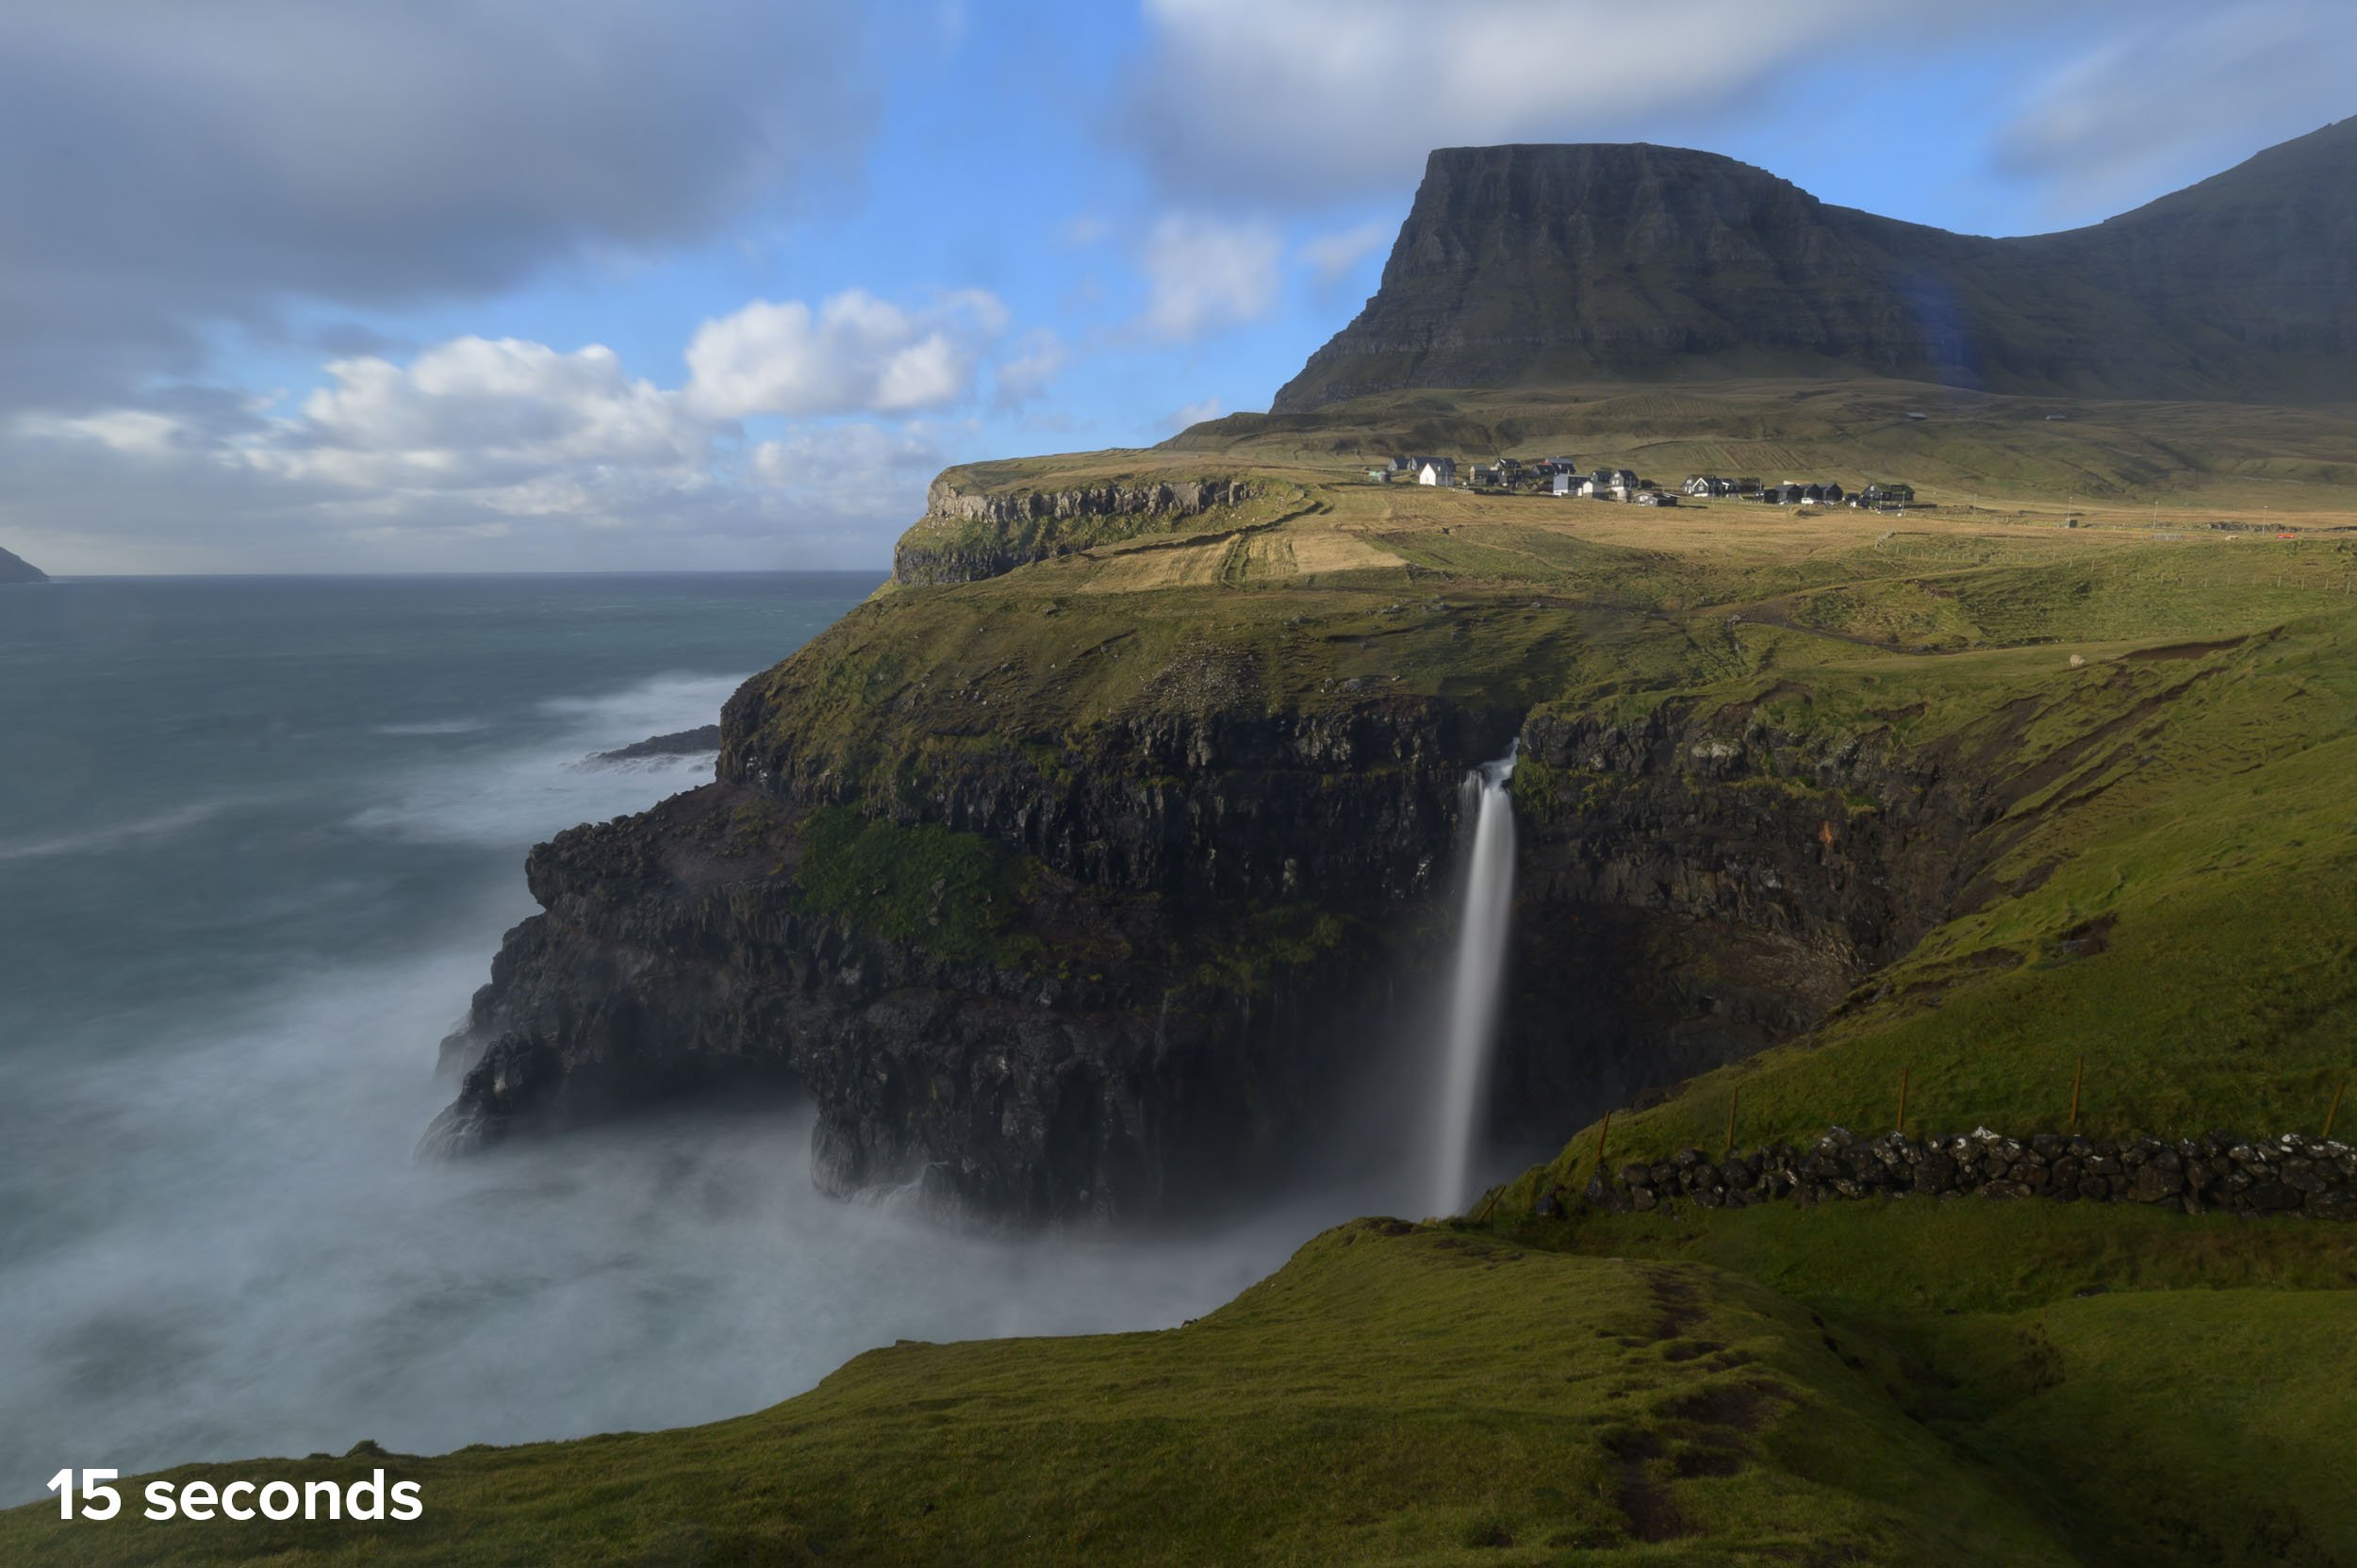
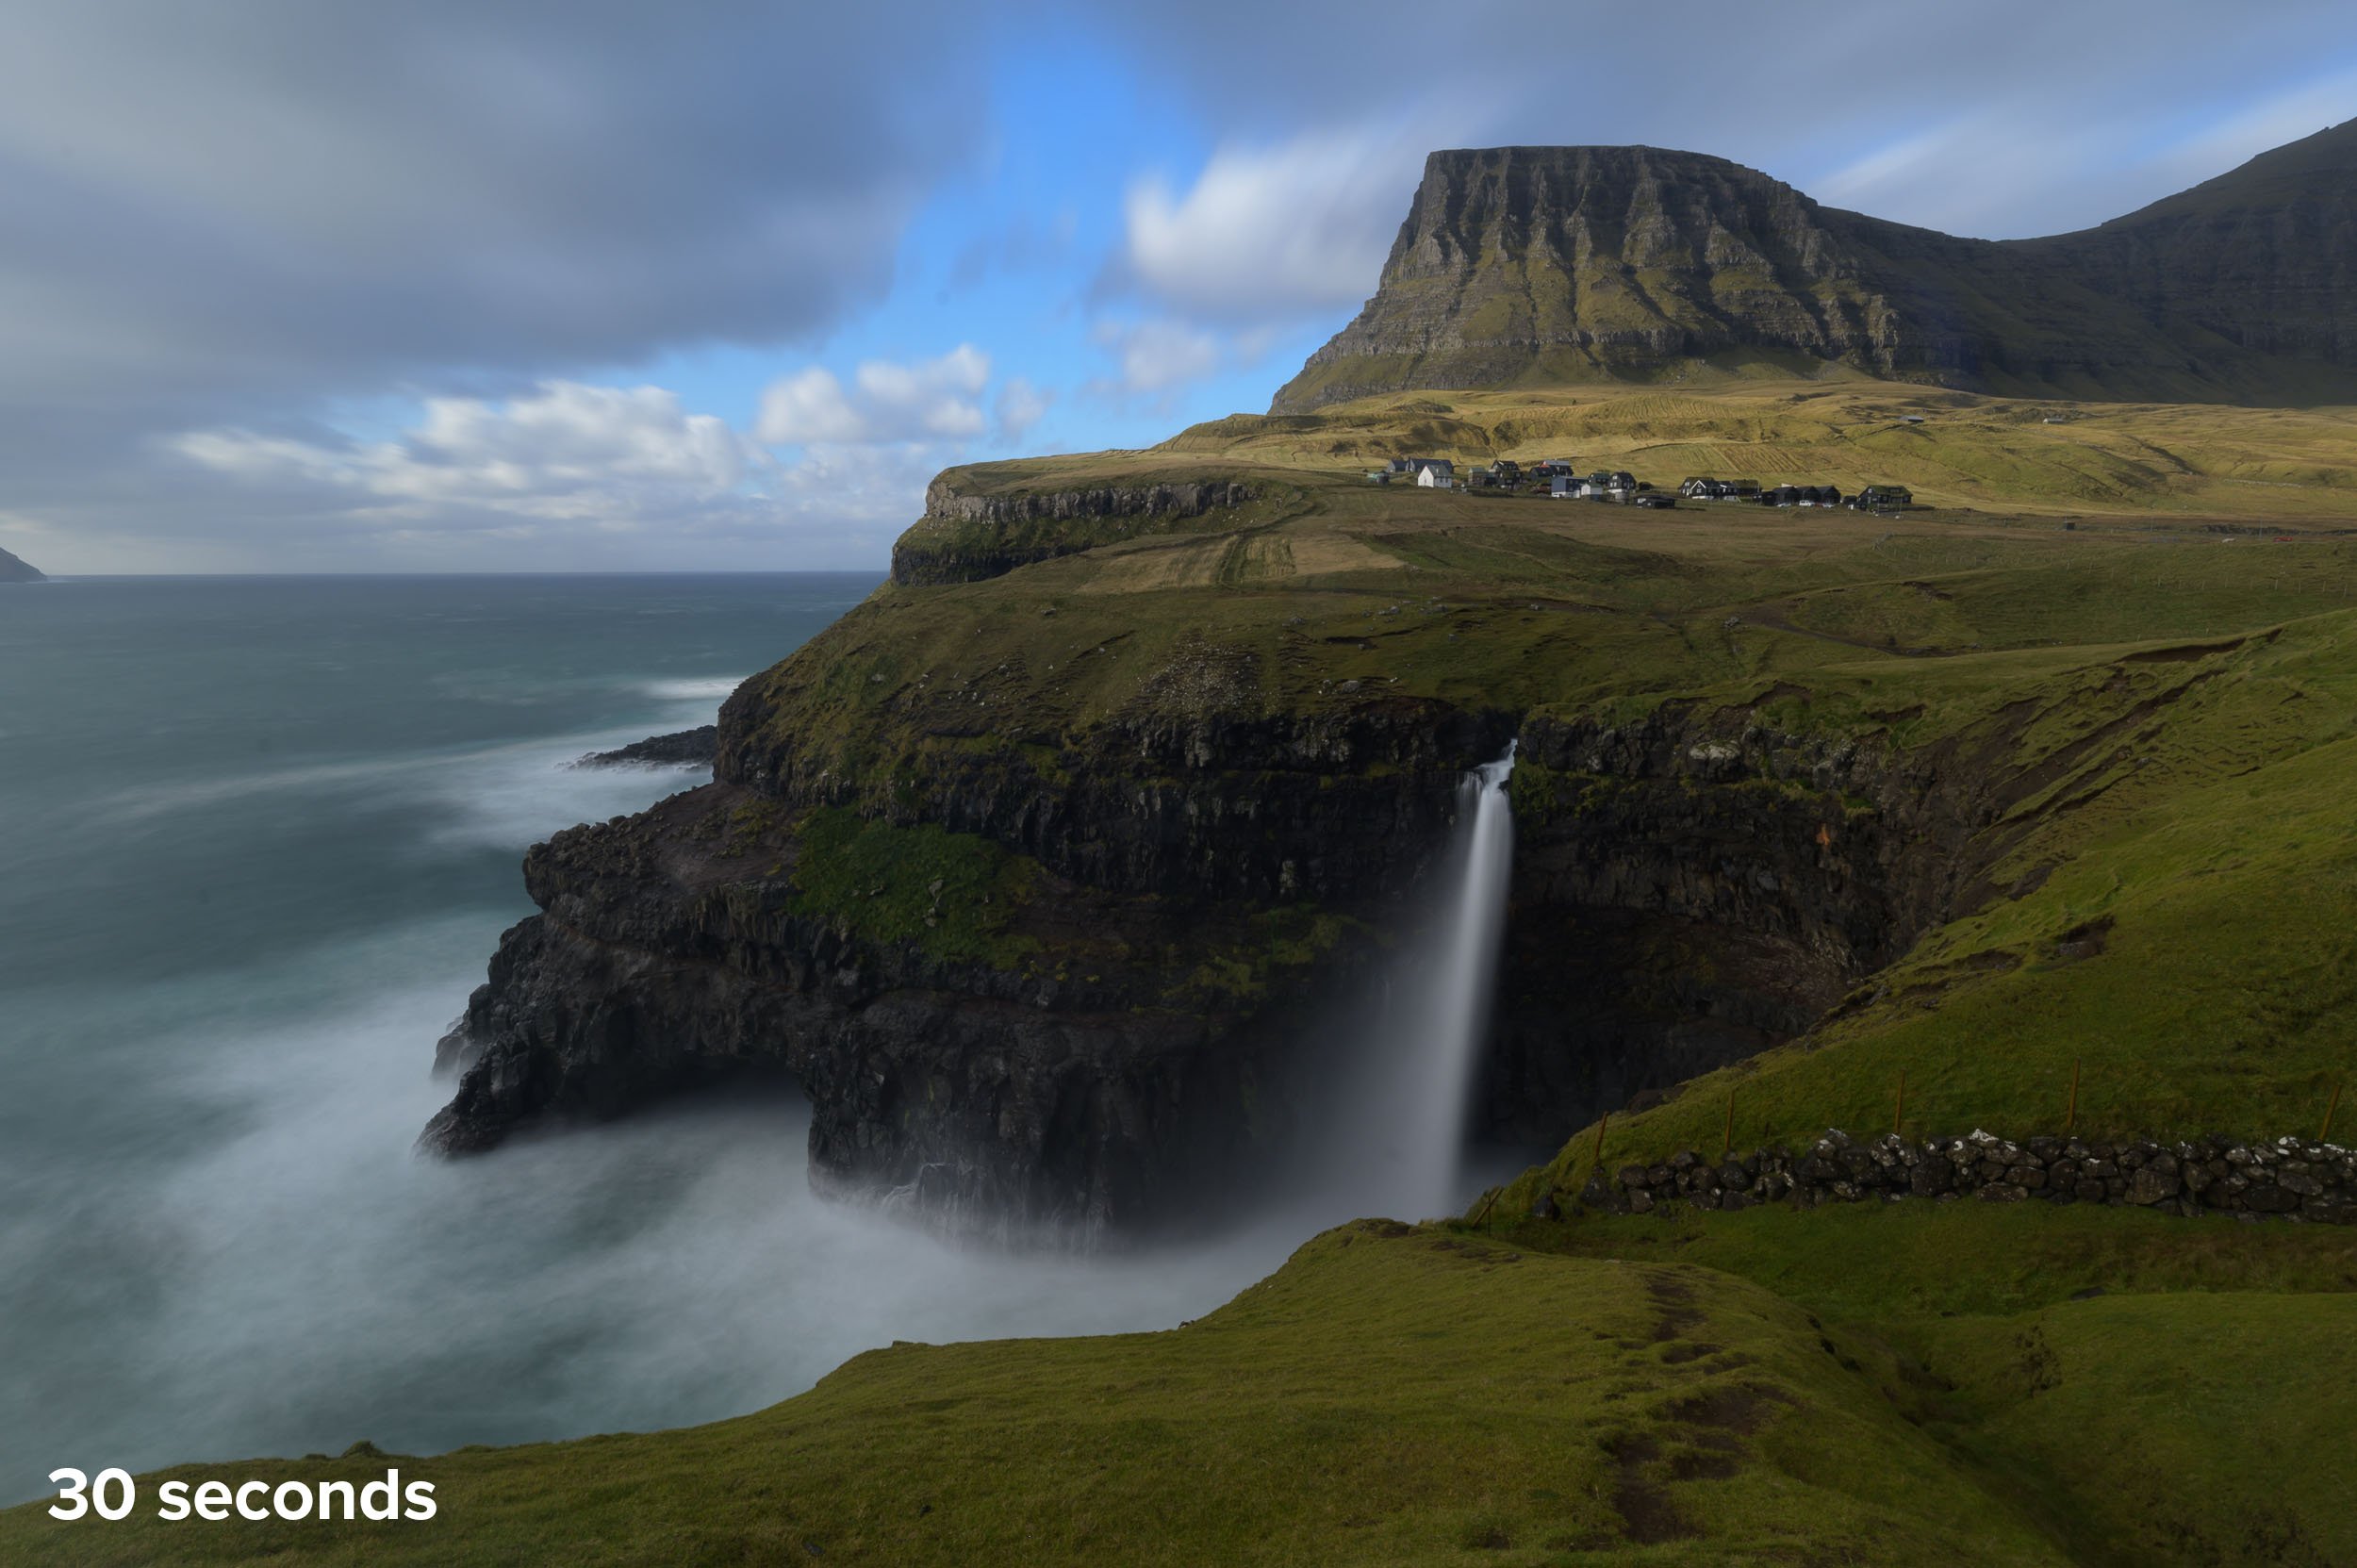
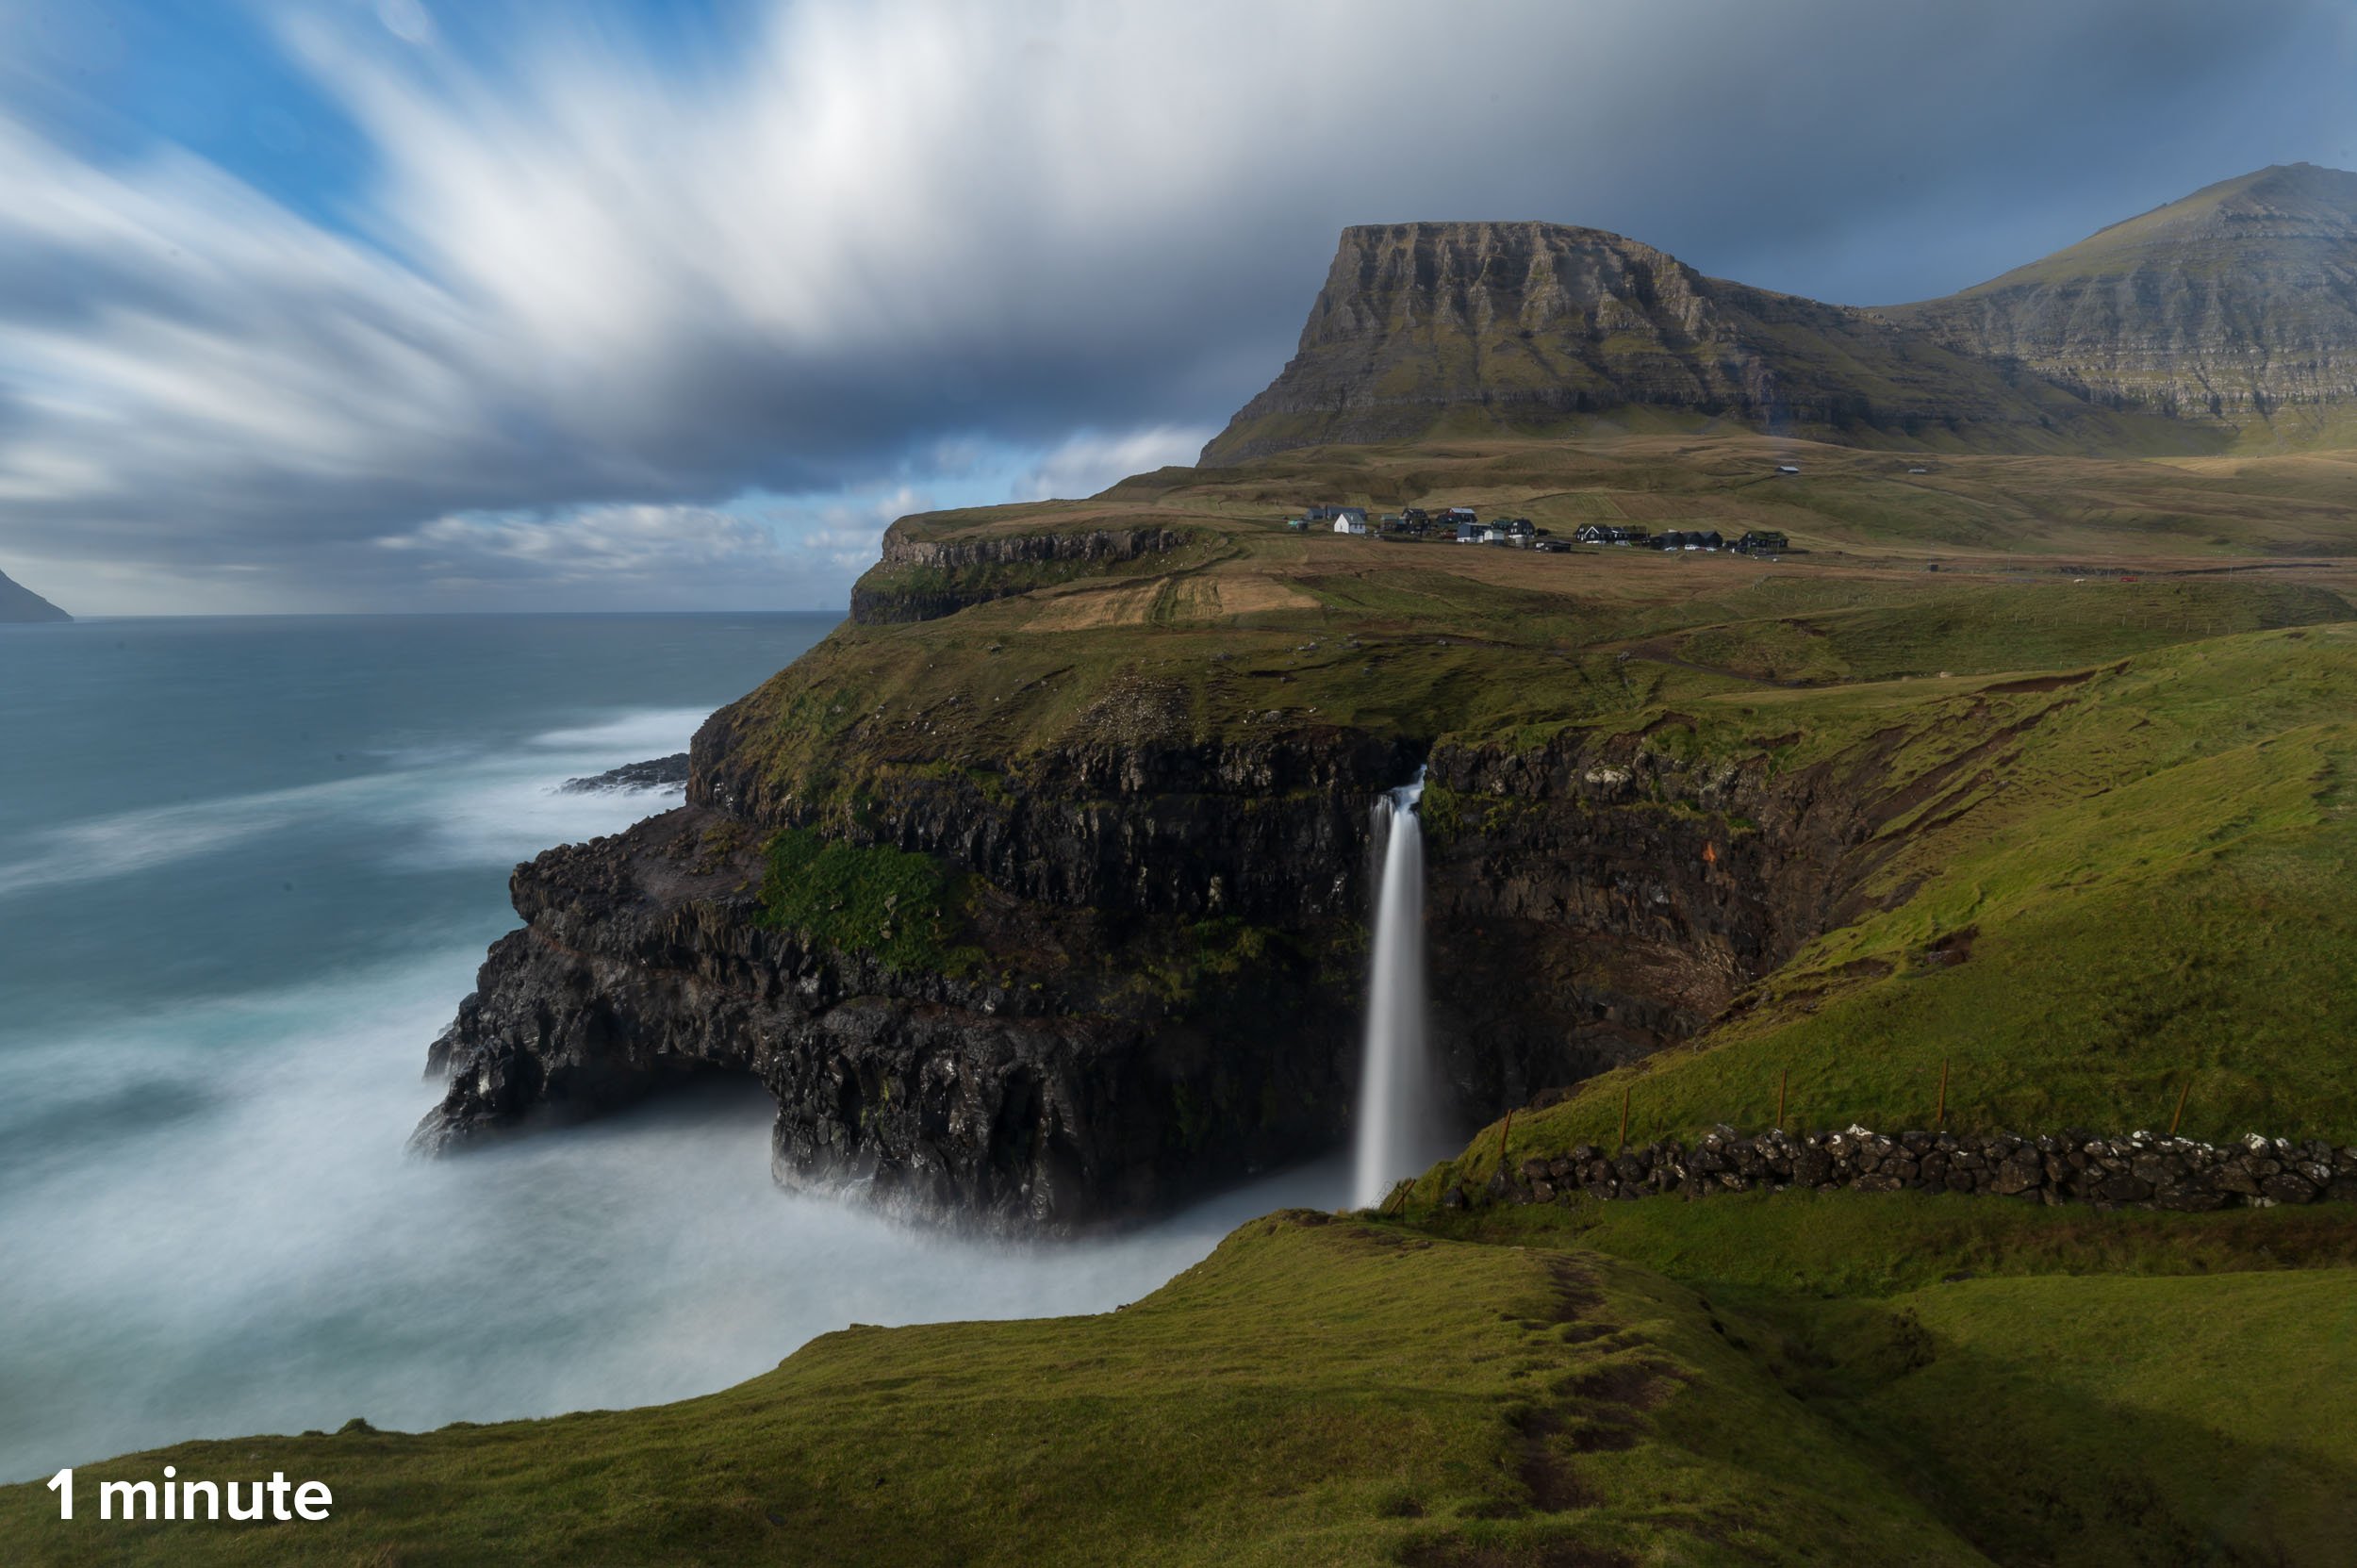
Itโ€™s hard to say what shutter speed is best, because it varies in different conditions. Try different speeds to determine what may look best in your current situation. In the following example I tried multiple shutter speeds when shooting the Muฬlafossur Falls in the Faroe Islands.

Muฬlafossur Falls, Faroe Islands. Nikon Z 6II with a Nikon 14-24mm f/2.8 lens at 18mm. f/14, ISO 50.

Since we are more concerned with the look of the clouds as opposed to getting pinpoint stars, we have more leeway in our exposure times.

For example, many folks think that night skies should be captured only at either a relatively short shutter speed (8-15 seconds) to render the stars as points or a very long shutter speed (15 minutes or more) to render them as long trails. While this is sound practice for clear skies, the presence of clouds allows for more flexibility. The main consideration here is the look of the clouds rather than the length of the star trails. Even a shorter speed of 2 minutes renders the stars as small streaks and is enough to let the viewer know the image was made at night.

Faroe Islands. Short exposures of 6, 8 or 10 seconds typically render the clouds as an awkward blur. The stars may be points, but the blur of the clouds is not enough to render a surreal quality. This exposure appears to be a mistake as the clouds are not sharp enough or blurry enough. Nikon Z 6II with a Nikon 24-70mm f/2 lens at 27mm. 6 seconds, f/2.8, ISO 6400.

A 1- minute exposure gives the clouds enough time to streak across the sky. Nikon Z 6II with a Nikon 24-70mm f/2.8 lens at 27mm. 1 minute, f/4, ISO 400.

Clouds as a Compositional Element

Once we begin to add clouds into our photographs (day or night), we need to start thinking about them as an important compositional element. Their structure and placement within the frame are important. The cloud streaks will read as lines, and therefore we consider them just as we would any other lines in a photograph.

Horizontal lines crossing the frame from left to right or right to left tend to have more of a calming effect. They seem to be more at rest. Since these types of lines donโ€™t add a lot of energy, they require a dominant foreground as a contrast, or you could further the calm mood by choosing a more subtle foreground.

Horizontal lines tend to have a calming effect as they streak over dynamic Miami. Nikon D4S with a Nikon 70-200mm f/2.8 lens at 70mm. 30 seconds, f/10, ISO 800 (foreground) and 3 minutes, f/10, ISO 160 (sky), blended in Adobe Photoshop.

Diagonal lines and converging lines have much more visual energy. They are caused when clouds are moving directly at us (converging) or just off to our right or left (diagonal). This type of cloud movement can become very dramatic elements in our compositions. The use of wide- and superwide-angle lenses helps accentuate these lines.

Clouds moving from the lower left of the frame to the upper right create diagonal lines over the Chisos Basin in Big Bend National Park. Nikon Z 6 with a Nikon 24-70mm f/2.8 lens at 24mm. 2 minutes, f/11, ISO 800.

Converging lines are created when the clouds are moving directly at you as in this scene from Glacier National Park. Nikon Z 6 with a Nikon 24-70mm f/2.8 lens at 24mm. 3 minutes, f/4, ISO 200.

Bettering Your Odds

Since our clouds will play such an important role in our final composition and itโ€™s nearly impossible to predict the final look of an exposure, itโ€™s important to shoot lots of frames.

I begin by experimenting with shutter speed. Once I find a shutter speed that renders the clouds in a manner I find complementary to the rest of the scene, itโ€™s time to shoot that same shutter speed over and over again. Each frame will capture the clouds in a different position, so by shooting more frames, we increase the chance of getting a pleasing position for the clouds.

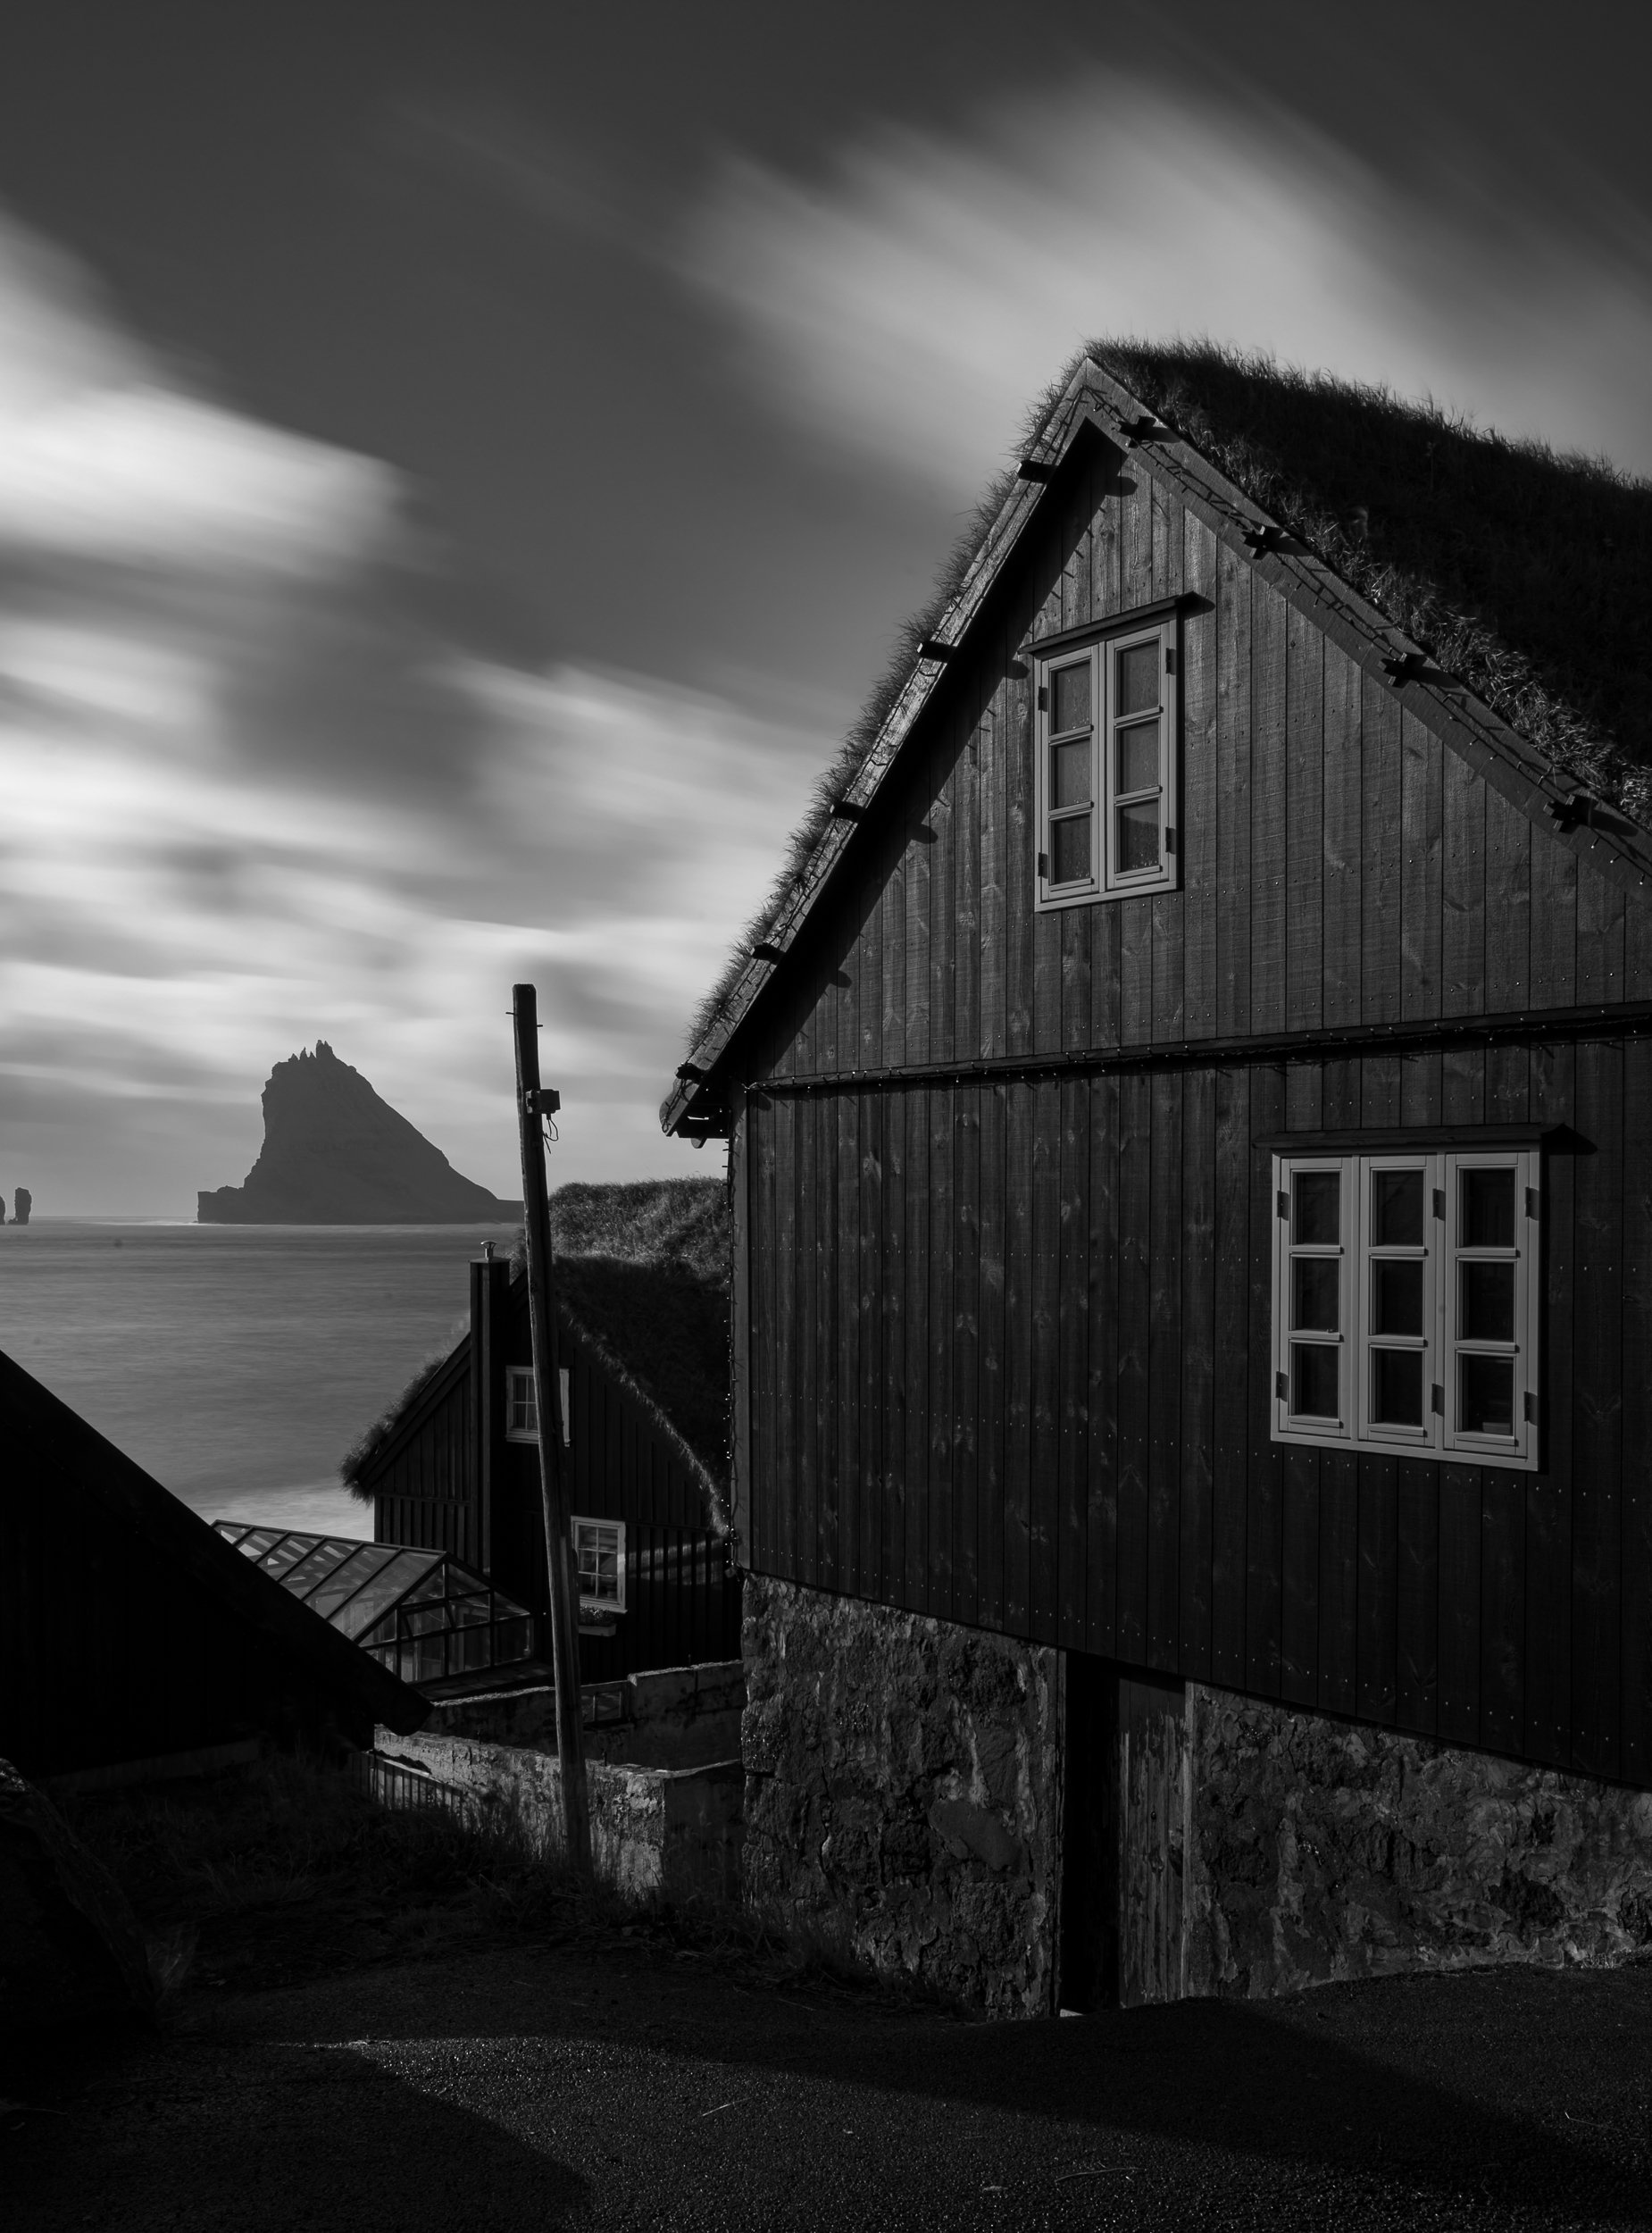
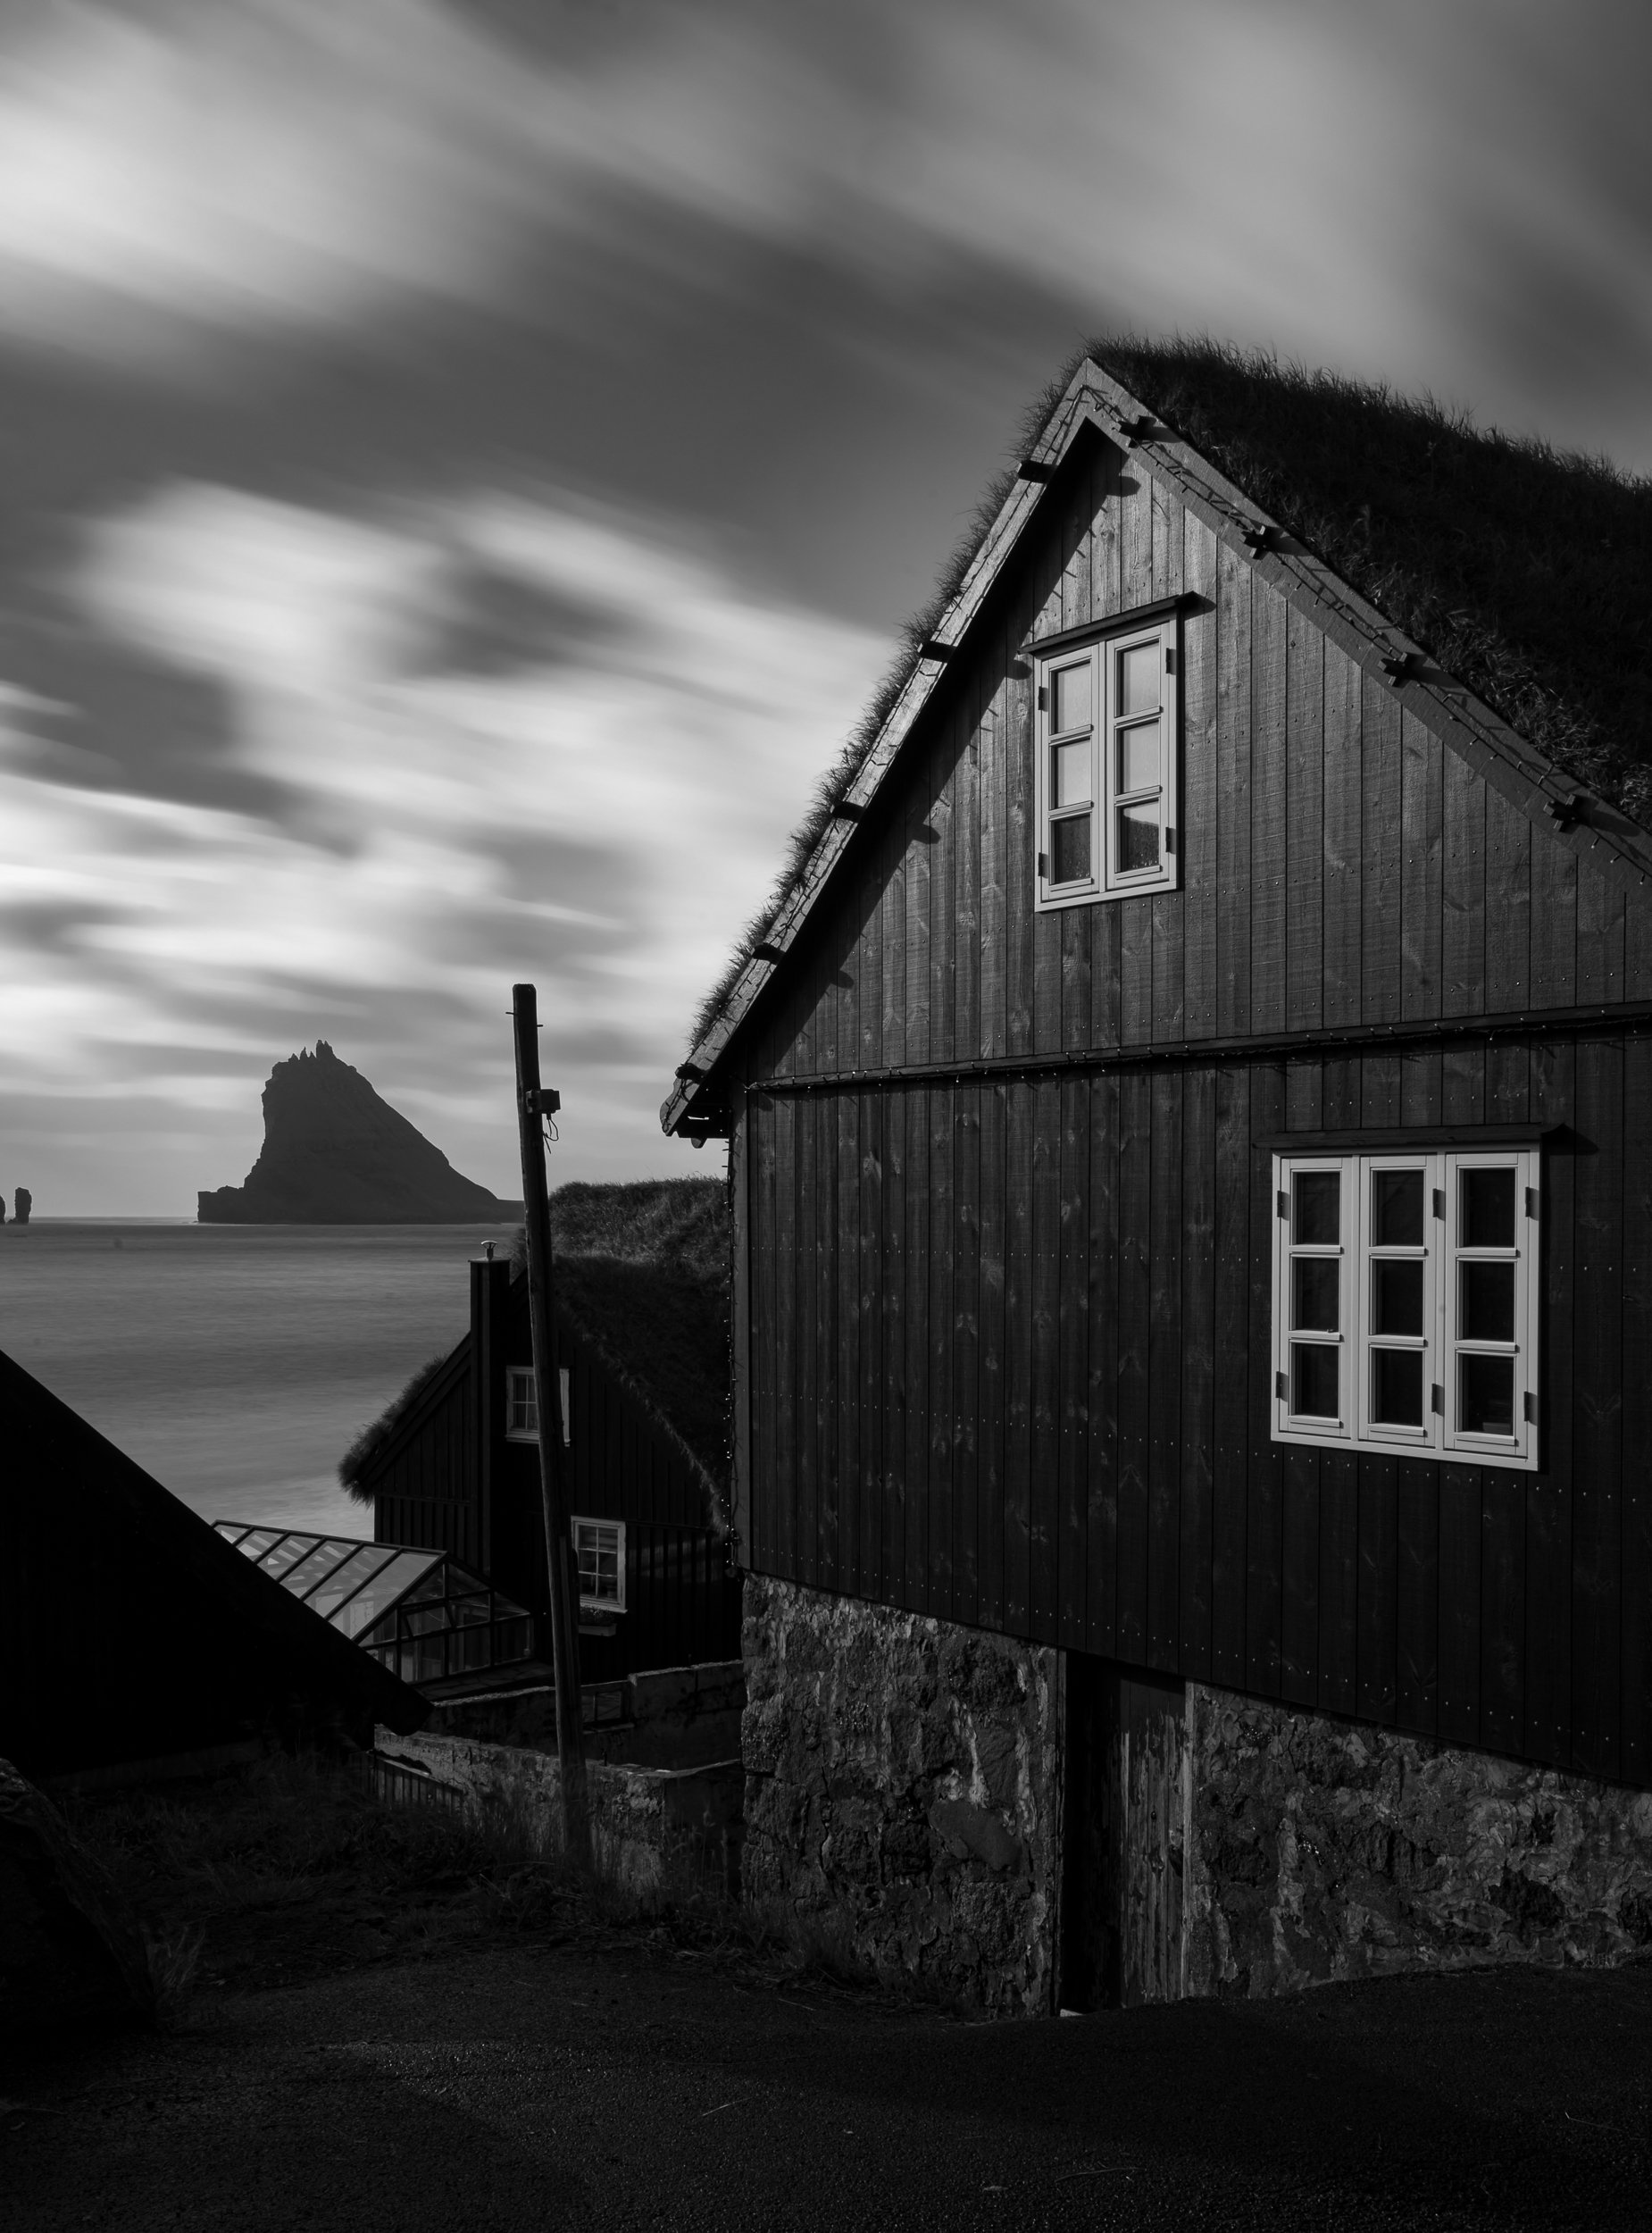
I shot the following photos at the same exposure. Notice how the clouds complement the scene more in some frames than in others.

Nikon Z 6II with a Nikon 24-70mm f/2.8 lens at 33mm. 30 seconds, f/20, ISO 50.

Cloud Height and Moon

Another consideration when creating cloud streaks is the moon phase and location. Clouds in the night sky will be greatly enhanced with some moonlight. If there is no moon or city lights to illuminate them, the clouds will be far less visible and tend to simply obscure our sky rather than add an interesting element. A quarter to full moon is a good time to capture cloud trails over the landscape.

The full moon to camera left illuminated the clouds as well as Going to the Sun Mountain in Glacier National Park. Nikon D850 with a Nikon 14-24mm f/2.8 lens at 21mm. 6 minutes, f/4, ISO 100.

Shooting straight into the full moon over Lady Boot Arch in the Alabama Hills of California. Nikon D4S with a Nikon 14-24mm f/2.8 lens at 14mm. 4 minutes, f/5.6, ISO 200.

Cloud type and height can vary dramatically, as will the effect in the resulting photographs. Lower-elevation clouds have a much stronger impact on the composition than higher-elevation clouds. The higher clouds tend to become more transparent during long exposures. This type of cloud can be a subtle element in your final frame.

High clouds can be a subtle element when long exposures render them as more transparent, as seen in this photo from Zion National Park. Nikon D4 with a Nikon 24mm f/2.8 lens. 4 minutes, f/5.6, ISO 200.

Where to Find the โ€˜Bestโ€™ Clouds

Where can you find clouds? Anywhere, really. But those dramatic low clouds are more common the closer you get to the polesโ€”that is, generally regions closer to the Arctic and Antarctic tend to have more low clouds, and the regions closer to the tropics tend to have more high clouds.

Youโ€™ll also find more low clouds around the ocean. This is why I love doing cloud photography in places like the Faroe Islands, where weโ€™re running a workshop this coming May. Not only is Faroe close to the ocean (being a remote island, after all), but itโ€™s also at a relatively northern latitude. That combination can make for nights filled with dramatic low clouds racing across the beautiful landscapes. You can see that in many of the photos accompanying this post.

High clouds are fun to work with too, so if you like that effect, know that youโ€™re more likely to see them as you get to locations either closer to the equator or more inland from the ocean.

And of course youโ€™re more likely to see low clouds in the mountainsโ€”because youโ€™re at a higher elevation, closer to the clouds!

Post-Processing

Simply capturing the clouds may not be the end of the process. Often weโ€™ll need to enhance them in Lightroom to bring out their true drama.

A common technique is to create a mask for the sky and increase Dehaze. This will add the needed overall contrast to the sky that brings out the structure of the clouds. However, along with this contrast comes a deeper saturation and darkening of the whole sky. The simple fix is when increasing the Dehaze slider, follow up with decreasing Saturation and increasing Exposure.

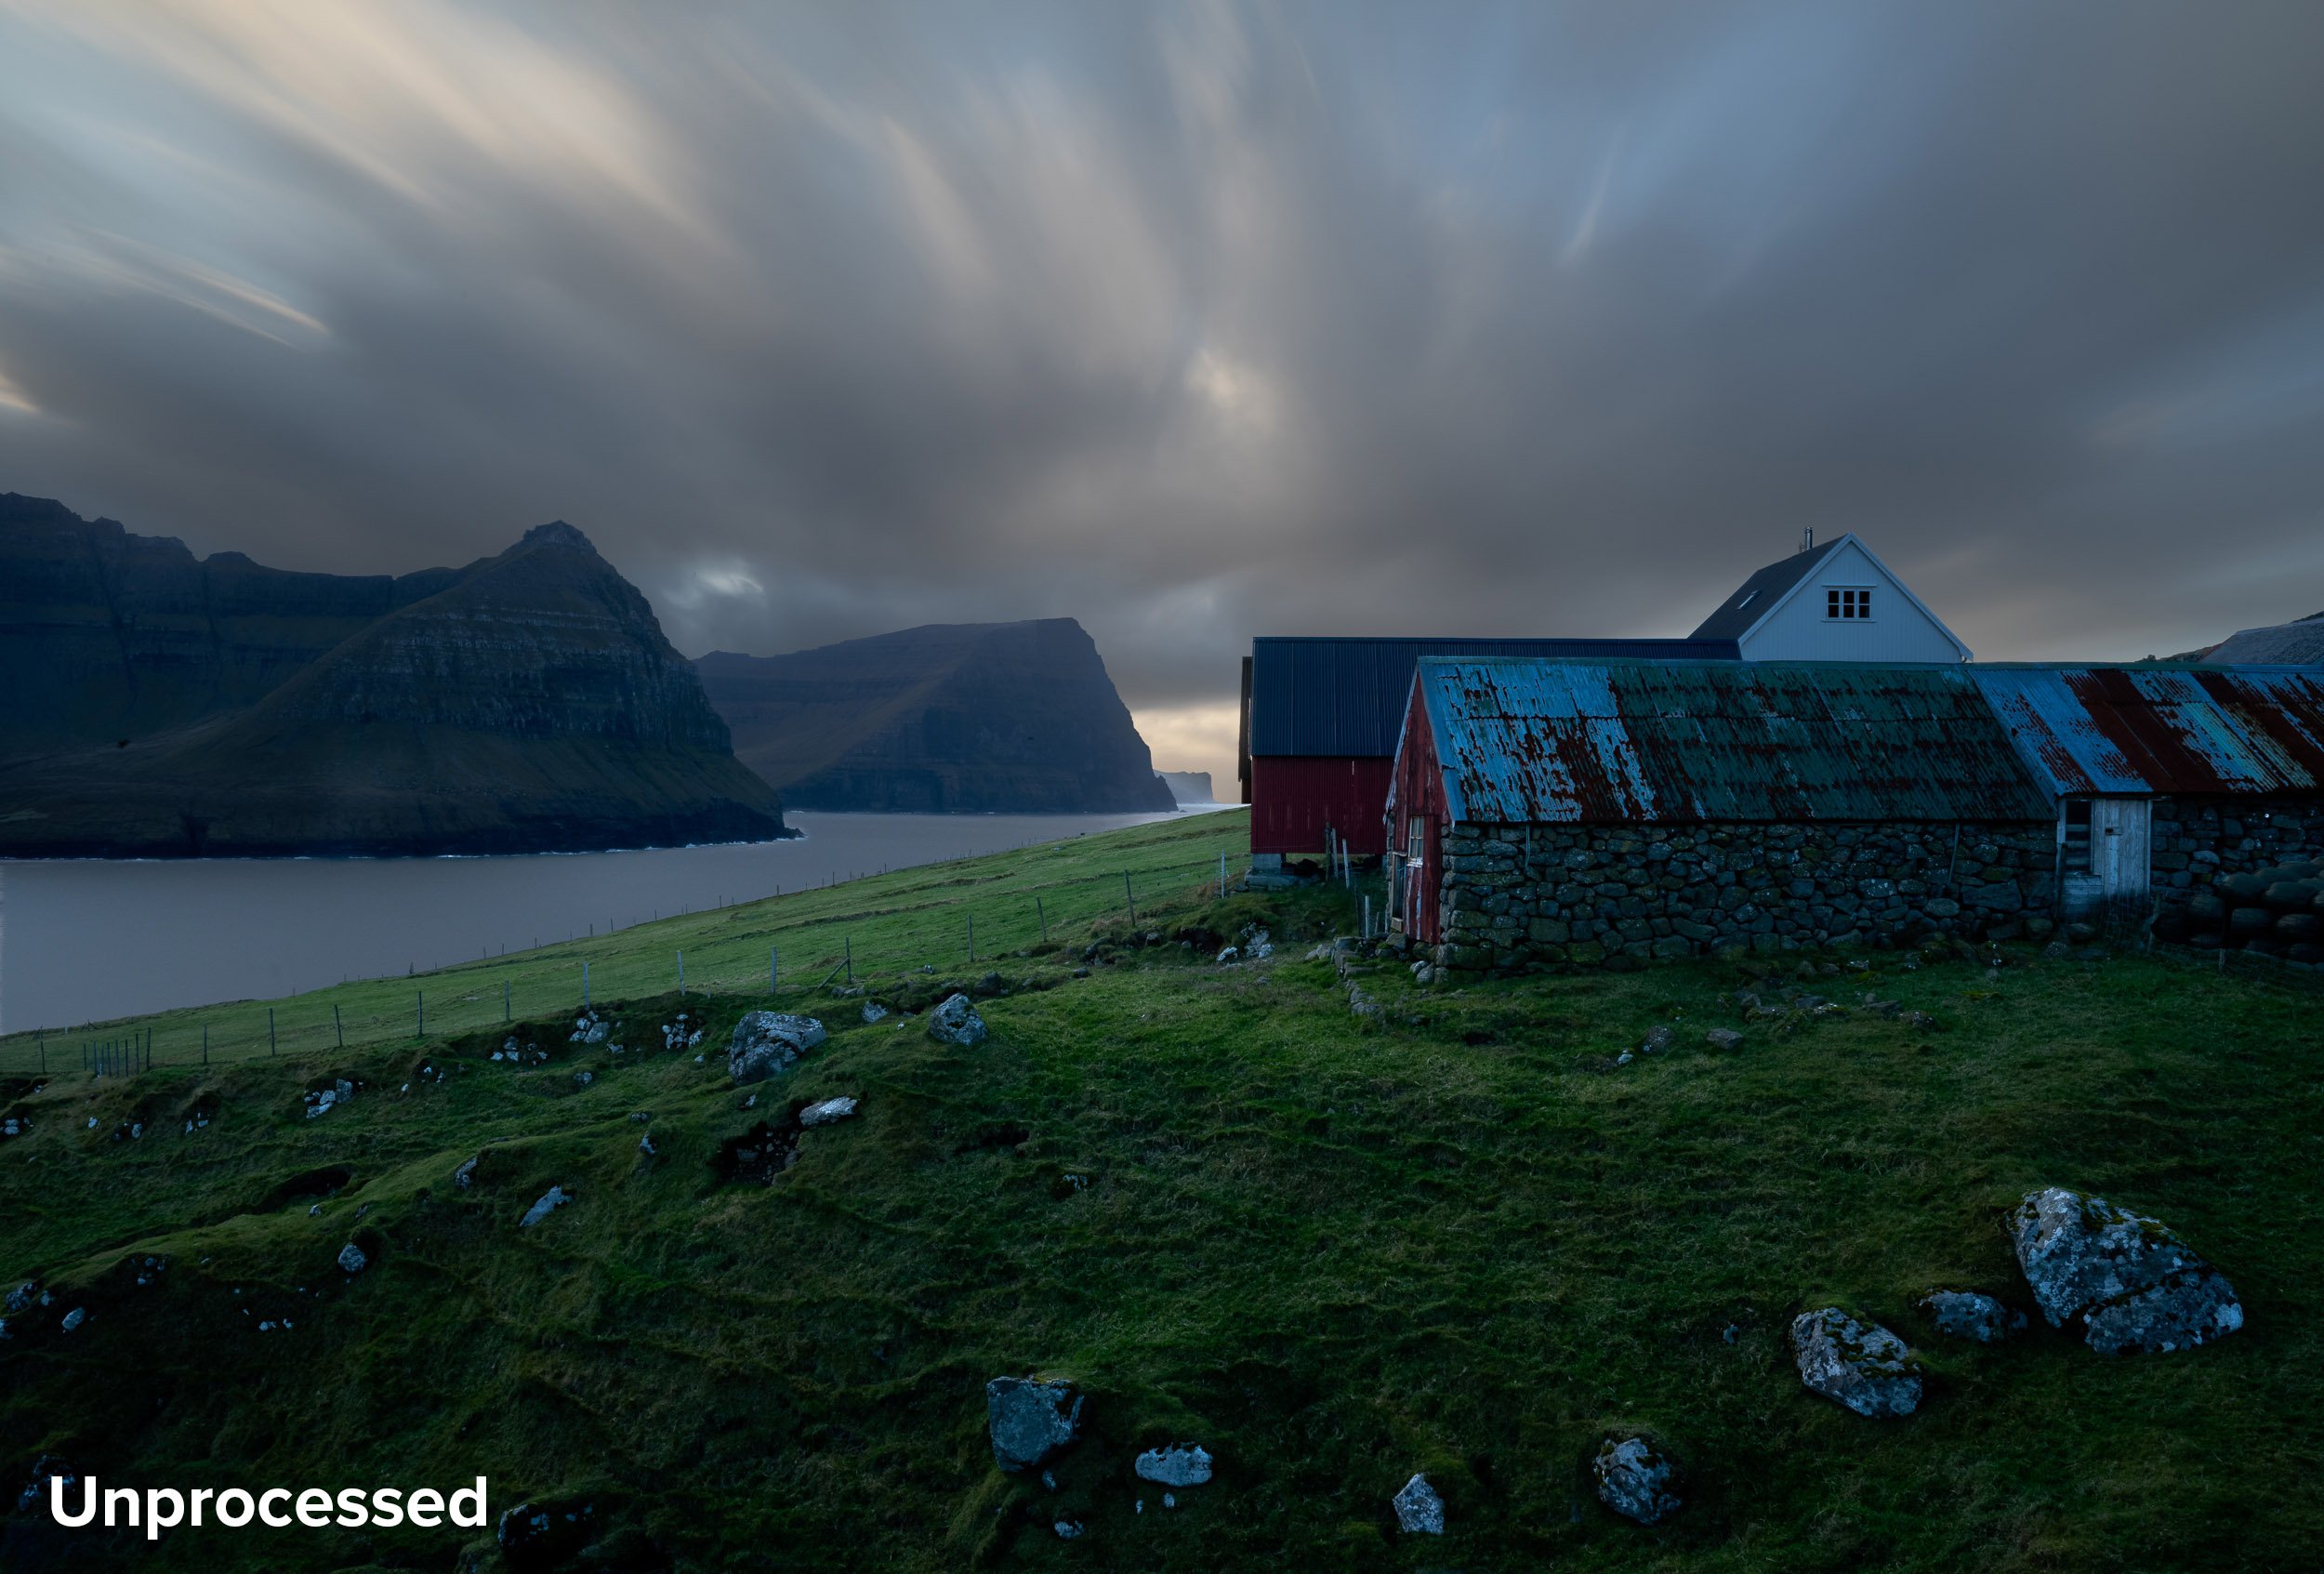
For this image from Faroe Islands, I created a sky mask in Lightroom and increased Dehaze to +55. This oversatured the blues and darkened the entire sky, so, still within the sky mask, I increased Exposure to +1.00 and decreased Saturation to -25.

Wrapping Up

I hope this gives you some motivation to stay out even when the sky isnโ€™t clear. Donโ€™t pack it up and go home when the clouds roll in. Embrace them! Experiment with different shutter speeds and lots of frames to create those beautiful cloud streaks across your night skies.

If this inspires you to shoot clouds at night (or if youโ€™re already doing it), then weโ€™d love to see the results! Share in the comments below, or on our Facebook page, or on Instagram (tag us @nationalparksatnight #nationalparksatnight #seizethenight).

Tim Cooper is a partner and workshop leader with National Parks at Night. Learn more techniques from his book The Magic of Light Painting, available from Peachpit.

UPCOMING WORKSHOPS FROM NATIONAL PARKS AT NIGHT

The Night Photographer's Guide to Star Stacking (Part I)

Note: This is the first in a three-part series about creating star trails with the stacking technique. Part I, below, covers how to shoot the raw materials. Come back soon for Part II, in which Tim goes over the required post-production, followed by Part III, in which he shows how to clean up the artifacts of the technique (such as plane trails).

To learn more about night photography techniques that involve photographing with processing in mind, attend our Shoot for the Edit: Colorado workshop in September 2022!


Night photographers are fortunate to have many ways to interpret a subject. The night sky can be captured with a stunning Milky Way core, or as a deep sea of stars that register as thousands of points of light. We can illuminate the foreground to give the sky a sense of place, use filters to give the stars a fantasy look or use longer exposure times to render the stars as trails across the sky.

Star trail photos are fun to shoot, and they bend reality by dilating time in a way that humans canโ€™t otherwise perceive. Yet, shooting star trails is rife with potential obstacles, from camera limitations to stray light and more.

In a series of blog posts that starts today, Iโ€™ll show you how to create star trails by using a special technique that works around those potential problems: star stacking. In this first post Iโ€™ll discuss how to shoot for star stacking, in the next post Iโ€™ll cover how to process the images, and then in a third post Iโ€™ll teach how to rid your stacks of plane trails and other artifacts of the process.

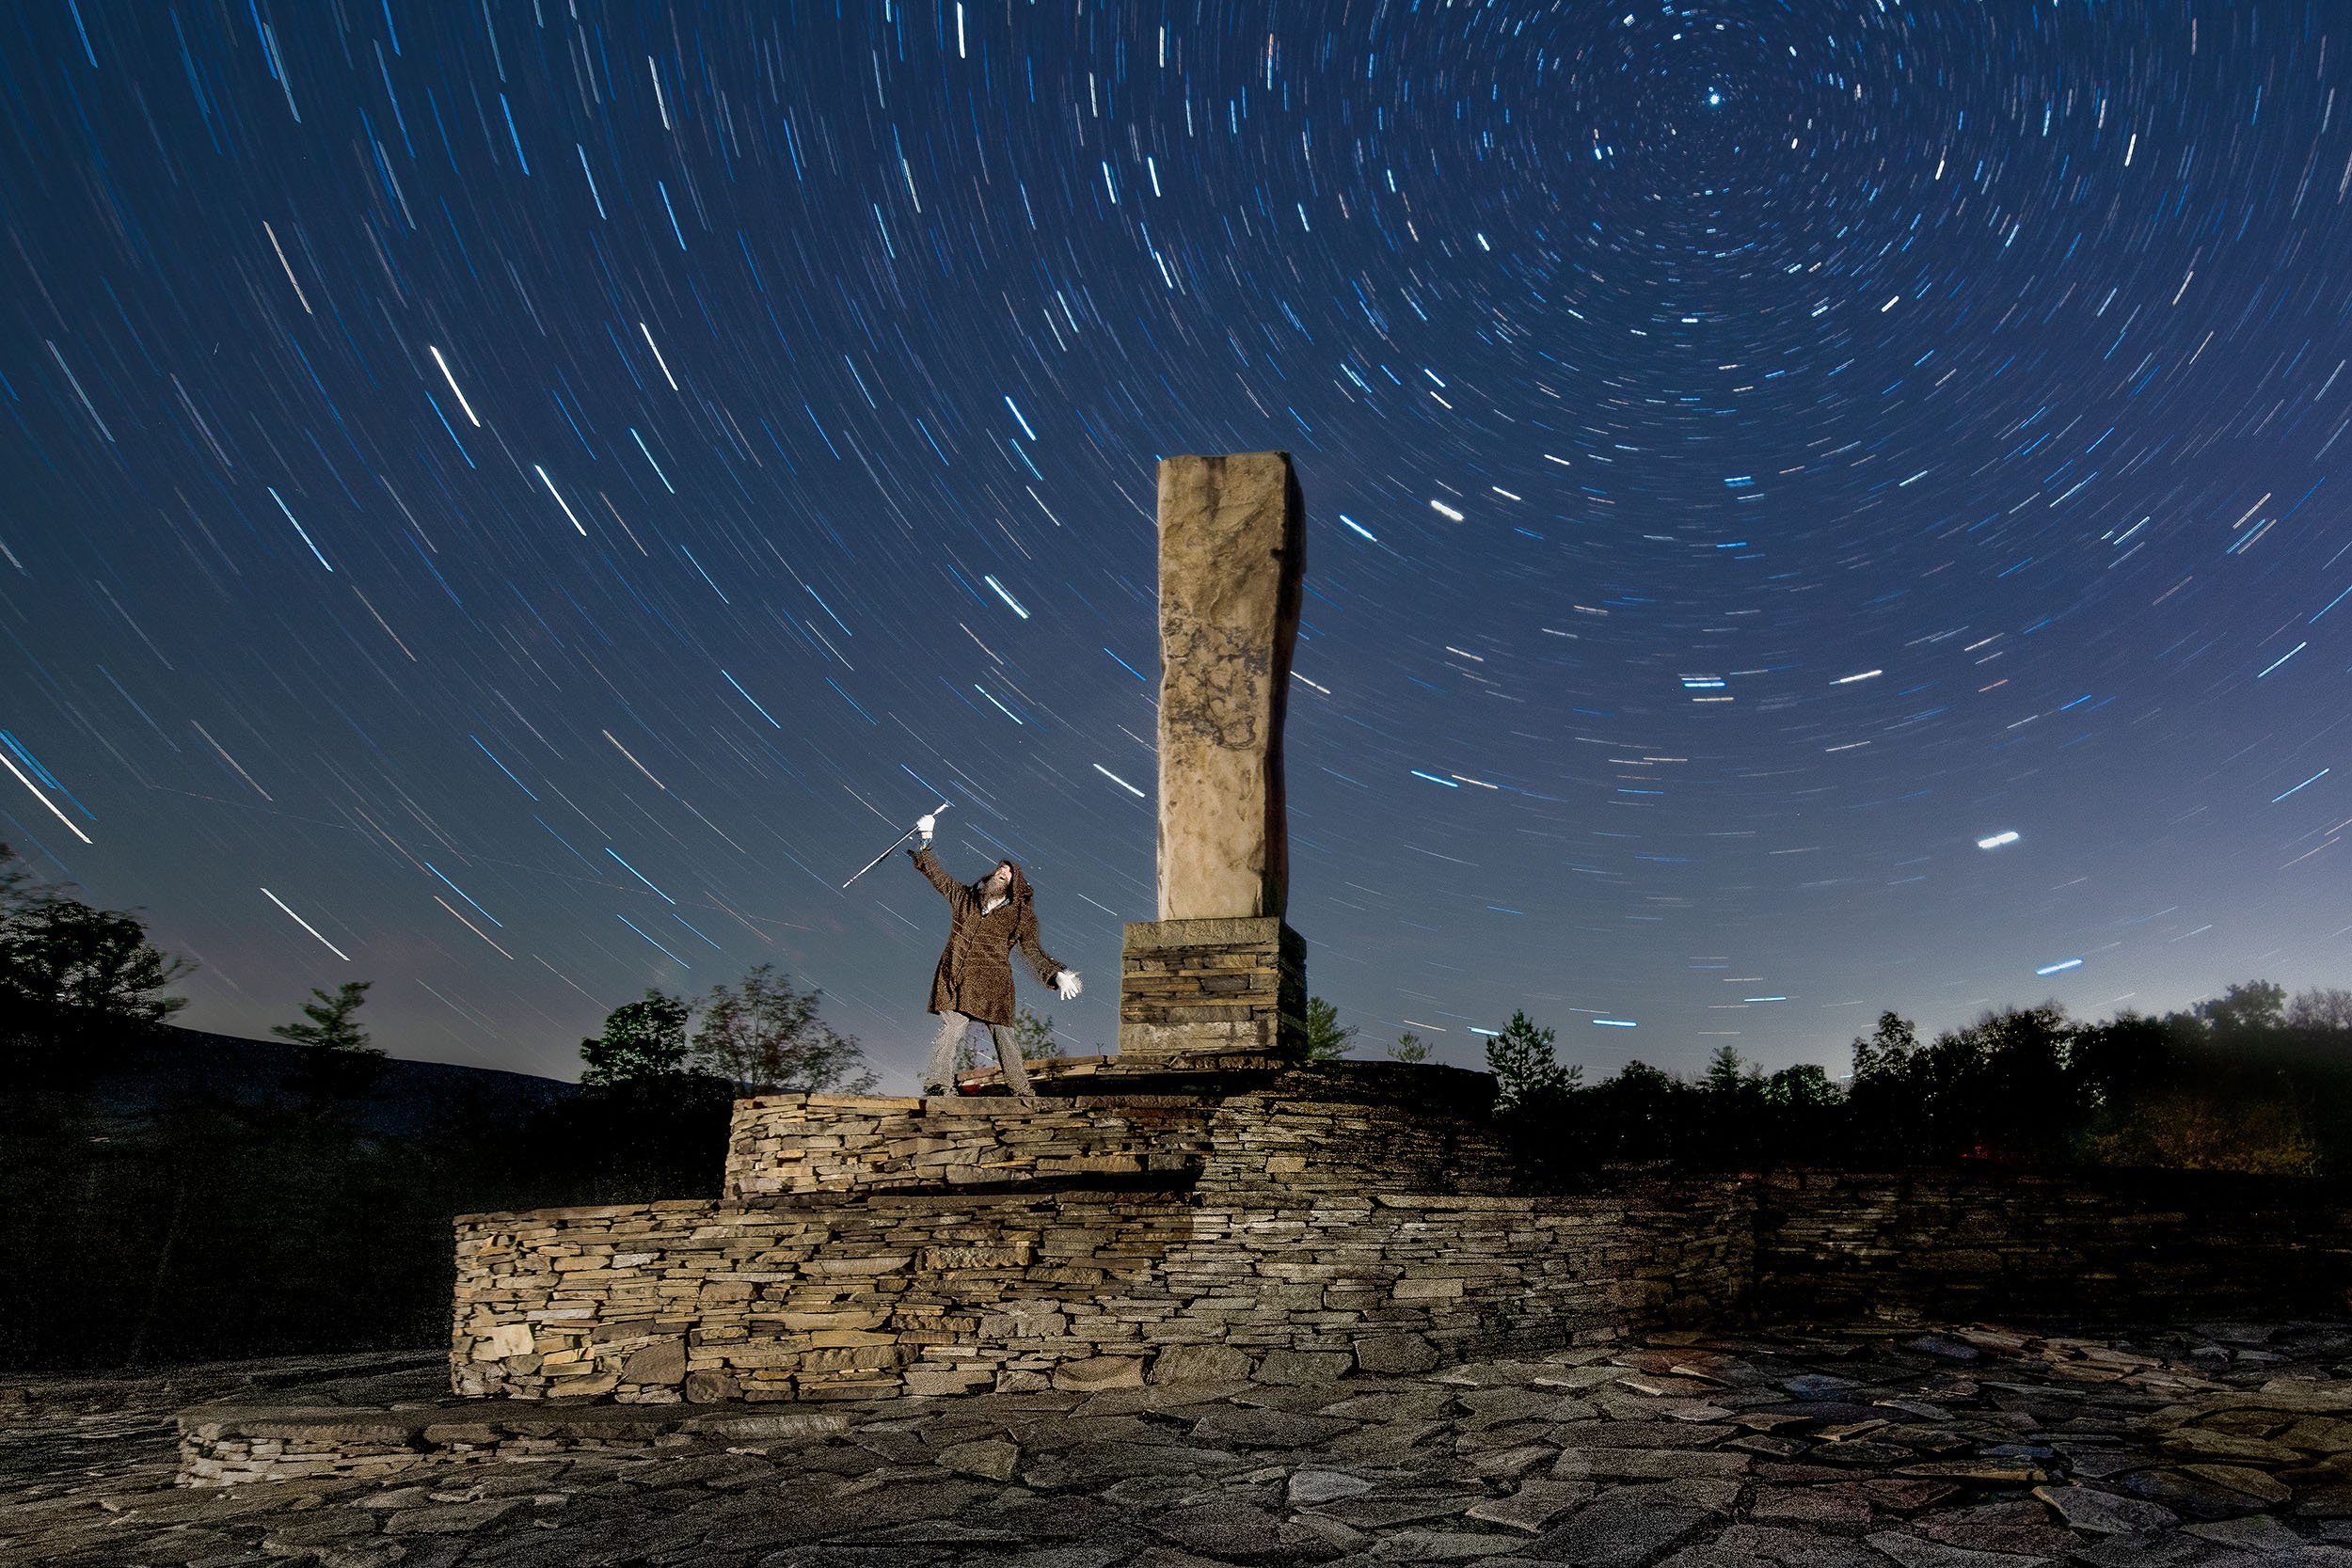
Woodstock, New York. Nikon D850 with a Nikon 14-24mm f/2.8 lens. 3 frames shot at 25 seconds, f/4, ISO 100, stacked in Photoshop.

Why to Stack

There are two primary methods of creating star trails: capturing one long exposure or capturing many short exposures and stacking them together in Photoshop or other similar programs. The latter involves more post-production work, so why would we choose that? Letโ€™s take a look at the pros and cons of each method:

One Long Exposure

Advantages:

  • No need for post-processing to create the star trails. All the trails are in the one image.

  • No fussing with a complicated intervalometer. Simply plug in a cable release, set your camera to Bulb, press and lock your cable release, and mark your watch. Turn off the cable release when the time is up. Easy.

Disadvantages:

  • Youโ€™ll need to use Long Exposure Noise Reduction (LENR). This is the feature that we turn on when shooting very long exposures (i.e., more than a few minutes). The problem is that this setting renders most cameras unusable for twice the exposure time. Setting your camera to shoot an hourlong exposure renders your camera unusable for anything else for 2 hours!

  • You may not always be able to shoot long exposures when there is a lot of moonlight or artificial illumination, because all that light can blow out your exposure.

  • With one long exposure you risk having your image ruined by any number of lighting mishaps. Someone could walk through your scene with a flashlight. Cars could illuminate parts of the landscape you preferred to be dark. The list goes on and on.

Multiple Shorter Exposures

Advantages:

  • No need for LENR. (In fact, you canโ€™t even use it, because turning on the feature would create gaps in your star trails in the final stacked image.)

  • Itโ€™s easier to remove unwanted lights from any individual frame, or to mask in just one clean foreground.

  • It can be easier to incorporate light painting into your image without the worry of ruining your entire shot. In fact, you could even shoot different takes on your light painting and mask in your favorite.

Disadvantages:

  • Slightly harder to set up the exposures. Youโ€™ll need to use either your cameraโ€™s built-in intervalometer or purchase a separate corded or cordless intervalometer.

  • It requires more time in front of the computer.

Yellowstone National Park. Nikon Z 6 with a Nikon 14-24mm f/2.8 lens. 8 frames shot at 5 minutes, f/4, ISO 400, stacked in Photoshop.

The decision to shoot one long exposure or shoot many shorter exposures and stack them together during post-processing is often a matter of circumstances rather than a simple preference. You simply canโ€™t make superlong exposures when there is a lot of moonlight. Also, if a lot of other people are around, youโ€™d be wise to break up the total exposure time into smaller segments just to safeguard against accidents.

All in all, shooting shorter exposures and stacking them is now the more common way of creating star trails.

Shooting Star Stacks Step by Step

Capturing the night sky can be complex, with many different considerations to create the final image, and shooting a star stack certainly doesnโ€™t make it simpler. Hereโ€™s a basic outline of necessary steps:

  1. Set White Balance.

  2. Set ISO.

  3. Determine and set aperture and shutter speed.

  4. Turn off noise reduction.

  5. Compose.

  6. Focus.

  7. Run a high ISO test.

  8. Calculate the final exposures.

  9. Program your intervalometer.

  10. Shoot.

Camera Settings

With any type of photographyโ€”day or nightโ€”we need to adjust our cameraโ€™s settings to suit the situation. Figure 1 shows a good general place to start for your nighttime test shots:

Figure 1.

High ISO Test Shots

Once your camera is set, you have a composition and youโ€™ve focused your stars (see Chris Nicholsonโ€™s great post โ€œ8 Ways to Focus in the Darkโ€), itโ€™s time to make some test exposures. The test exposures will help you fine-tune your composition and ensure your stars are sharp. We run these tests at high ISOs so that we can run them fasterโ€”we donโ€™t want to waste time running tests that are 5 minutes each!

Itโ€™s easiest to start with a shutter speed that will render the stars as dots rather than dashes. This will help you determine if the stars are actually sharp. (It will also render a usable star point or Milky Way shot, so youโ€™ll have that in the bag too!)

Calculating the proper shutter speed is best done using the night photographerโ€™s best friend, PhotoPills. Open the Spot Stars pill (Figure 2). First, near the top right, choose the camera youโ€™re using. (You can set the default in Settings, which is a great shortcut if you use PhotoPills a lot.) Then input your focal length and aperture.

Figure 2.

Figure 3.

PhotoPills will make its calculations and supply you with an ideal shutter speed according to the NPF Rule. This will be the maximum time you can open your shutter and still keep your stars as dots rather than dashes. For example, with my Nikon Z 6II and a 14mm lens, the NPF Rule tells me that I shouldnโ€™t shoot any longer than 18.48 seconds (Figure 3). For the purpose of these test shots, I would round up to 20 seconds. (But if I was shooting for the Milky Way, I would round down to 15 seconds.)

At this point, you can fire a test shot. Zoom in on your LCD to ensure your stars are sharp.

Once your test exposures have determined that you have good focus, you no longer have to adhere to the NPF ruleโ€”after all, our eventual goal is to get those stars to trail. If test shots reveal sharp stars but an underexposed image, then increase your shutter speed since, again, trailing stars are your goal anyway.

Calculating Shutter Speed

Our aim is to star-stack, but we need to know how long in total we want to shoot. Itโ€™s best to start by figuring what one long exposure would be, and then work back to break it up into individual exposures.

Letโ€™s assume the camera is now set to 30 seconds, f/2.8, ISO 6400. Letโ€™s turn those points into some trails. To do that weโ€™ll need to increase the shutter speed, and to compensate weโ€™ll lower the ISO.

The Six-Stop Rule (Figure 4) is an easy way to make these changes. This rule states that for a given exposure, the amount of time in seconds at ISO 6400 equals that amount of time in minutes at ISO 100. (The difference between ISO 6400 and 100 is six stops, thus the name of the rule.) In our example exposure from above, 30 seconds at ISO 6400 translates into 30 minutes at ISO 100.

Figure 4.

Of course, maybe we donโ€™t want to keep the shutter open for 30 minutes. Thatโ€™s OK. The Six-Stop Rule has given us our base long exposure, and we can work our way up from there. Again sticking with our same example exposure from above, other usable equivalent exposures can be seen in Figure 5.

So if you wanted one long exposure to capture star trails you could use 30 minutes at ISO 100. If you wanted a longer exposure, you could stop down your aperture one stop and keep your shutter open for an hour. But for this tutorial on star stacking, we want more, shorter exposures.

Figure 5.

Calculating Shutter Speed for Stacking

Youโ€™ll use the same test shot data to calculate exposures for stacking.

Our initial test exposure of was 30 seconds, f/2.8, ISO 6400. This means we could shoot any of the following combinations and get the same overall brightness:

  • 30 minutes at ISO 100

  • 15 minutes at ISO 200

  • 8 minutes at ISO 400

  • 4 minutes at ISO 800

  • 2 minutes at ISO 1600

  • 1 minute at ISO 3200

The shorter of those combinations by themselves would not produce very long star trails. But when we shoot a lot of frames and stack them together later, these combinations will create trails as long as we want them to be. For example, to make an hourlong trail, you could:

  • shoot 15 4-minute exposures at ISO 800

  • shoot 30 2-minute exposures at ISO 1600

  • shoot 60 1-minute exposure at ISO 3200

Youโ€™re really free to choose whatever combination works best to achieve your vision.

Just keep one thing in mind: Because you canโ€™t use LENR with this technique, youโ€™ll want to keep your shutter speed short enough to avoid long exposure noise. This limit is different for different cameras in different conditions, so itโ€™s a good idea to test your camera to learn how it behaves. But as a benchmark, a 2-minute shutter speed is safe for many cameras in most situations. If you donโ€™t know for sure that your shutter can stay open longer without resulting in long exposure noise, then just stick with that 2-minute limit and you should be OK.

Death Valley National Park. Nikon Z 6 with a Nikon Z 14-24mm f/2.8 lens. 53 frames shot at 30 seconds, f/2.8, ISO 160, stacked in Photoshop.

Shooting the Raw Materials

Weโ€™re finally ready to make pictures!

When shooting the series of shorter exposures, youโ€™ll want to shoot them consecutively with as little time in between each shot as possible. To achieve this youโ€™ll take two steps:

  1. Turn off Long Exposure Noise Reduction. Again, LENR takes time after each exposure, which would create gaps in your stacked trails.

  2. Program your intervalometer. (Matt Hill has an excellent video on setting up an intervalometer.) If your camera has a built-in intervalometer and youโ€™re comfortable using it, then of course you may do that. But we find that external intervalometers are usually a little easier to use, and they donโ€™t have the shutter-speed limitations that the internal ones do. A key is to set the interval between your frames to as short as possible in order to minimize those gaps. For most intervalometers, the minimum interval is 1 second, which is short enough to get the job done.

In terms of how many frames to shoot, that depends on how long you want your trails to be. If you want an hour and youโ€™re shooting 5-minute exposures, then youโ€™ll need 12 frames. In that case, you can program your intervalometer to fire 12 times. Or you can set your intervalometerโ€™s number of shots to infinity, and just stop it manually when you feel like you have enough to work with.

Once the intervalometer is set, click the start button, sit back and enjoy the night sky.

And while youโ€™re at it, be sure not to touch your tripod! If your tripod moves even a smidge, your frames wonโ€™t align in Photoshop later. That can be fixed, but itโ€™s best not to cause the problem to begin with.

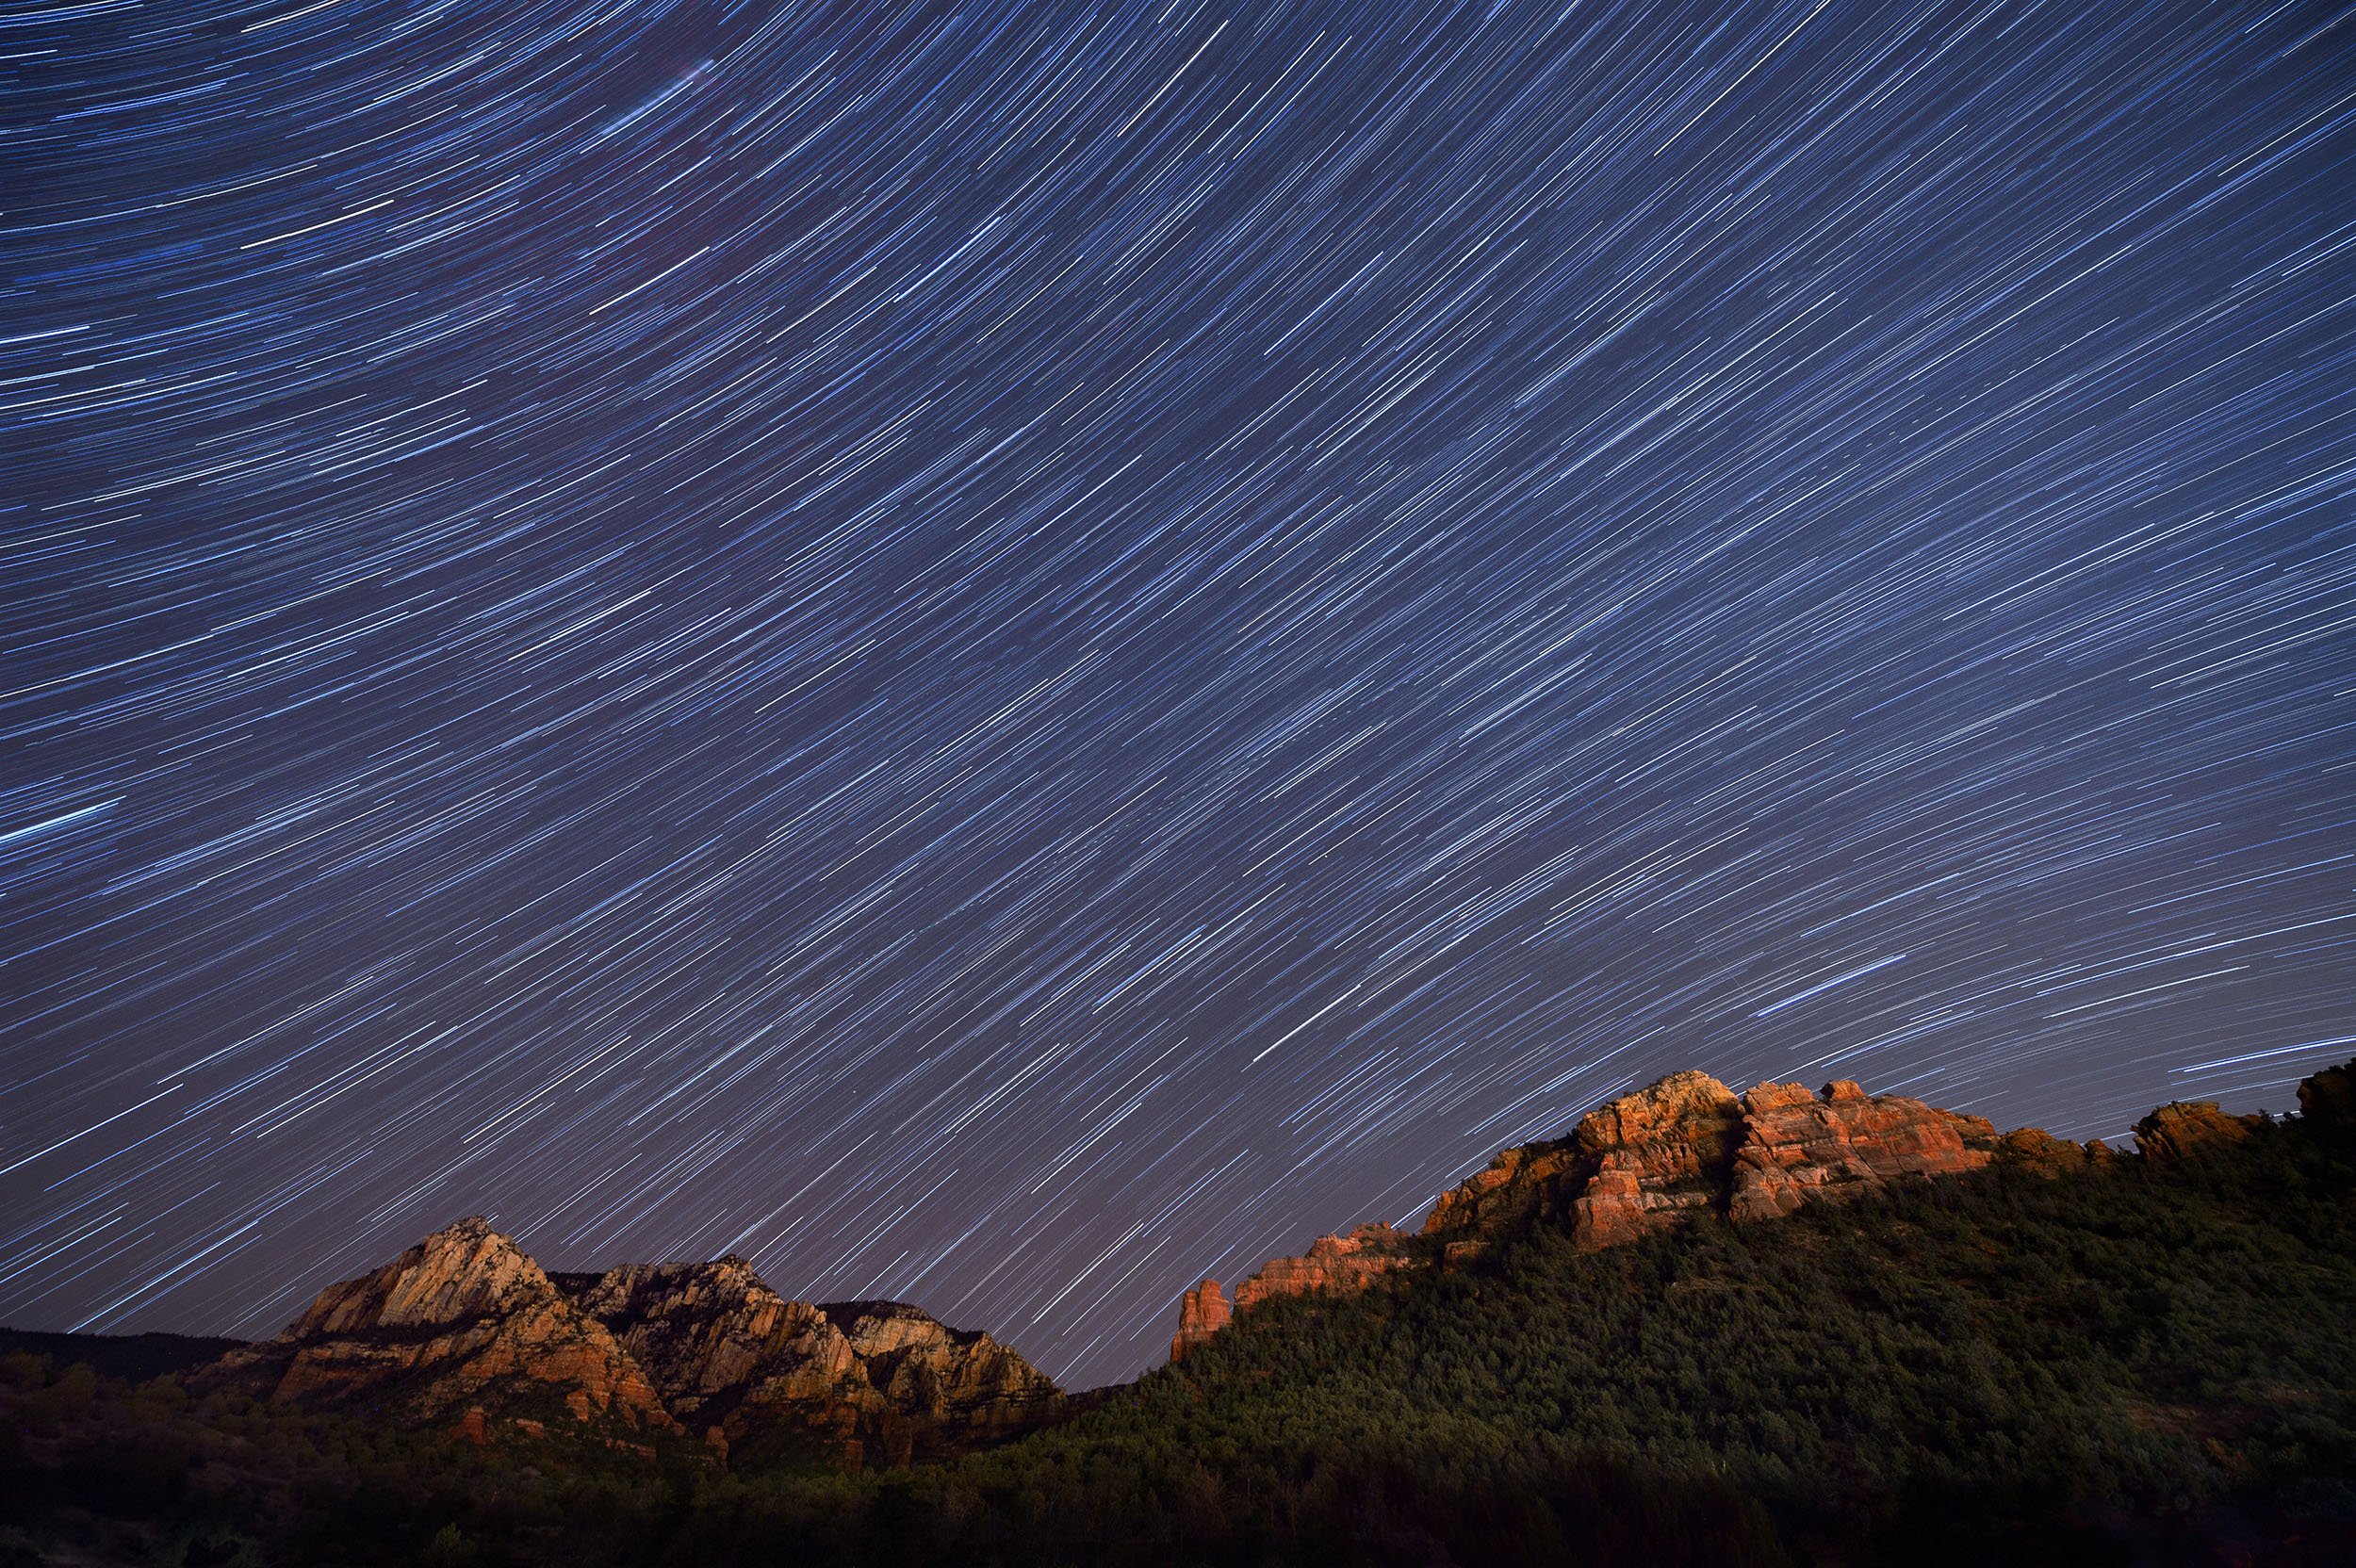
Sedona. Nikon D4s with a Nikon 14-24mm f/2.8 lens. 8 frames shot at 8 minutes, f/4, ISO 200, stacked in Photoshop.

Putting it All Together in Post-Production

Once your images are made, youโ€™ll want to get to the computer to stack them into star trails. Thatโ€™s the next step in your process, and itโ€™s the next blog post weโ€™ll publish. Stay tuned for Part II, coming soon.

Want to learn more about shooting for star tracking and then editing those images into trails? Join us for our Shoot for the Edit workshop in Colorado next month!

Tim Cooper is a partner and workshop leader with National Parks at Night. Learn more techniques from his book The Magic of Light Painting, available from Peachpit.

UPCOMING WORKSHOPS FROM NATIONAL PARKS AT NIGHT

Living Room Long Exposures: Seizing the Night at Home

A few weeks ago I returned from our Lofoten workshop to a totally different world.

Upon arriving back in NYC, I passed the โ€œtemperature testโ€ but was asked to go into 14 days of self-quarantine. While two weeks indoors might cause us to go stir-crazy, I always try to look on the positive side of things. So I decided to use my time to count my hats and to work on a ton of other home-based projects.

By nature, I like to live creatively. I need to take pictures, preferably ones that bend time, and I was getting antsy with this much time on my hands. What could I create in an 800-square-foot apartment? Let me preface my answer by mentioning the following limitations:

  • My view out the window is of South Brooklyn.

  • I have no official studio space.

  • I live with my wife Nancy and Theo the Cat.

I thought of what great artists have done indoors. There was Sugimotoโ€™s brilliantly inspiring Theater series for which he photographed old-school movie houses using one long exposure for the duration of the film (Figure 1). And dreams came alive in Steve Harperโ€™s beautiful time-filled 4.5-hour self-portrait while sleeping (Figure 2).

Figure 1. โ€œRadio City Music Hall, New York, 1978.โ€ Hiroshi Sugimoto.

Figure 2. โ€œSelf Asleep.โ€ Steve Harper, 1984.

Sufficiently motivated, I started writing down ideas and a shot list.

My self-quarantine took place mainly in our living roomโ€”which is 300 square feet and filled to the brim with โ€œstuff.โ€ Yet, I sat there calmly with the lights out and enjoyed watching the twilight shine through the windows, its cool blue light crawling across our warm-toned walls. I binge-watched some TV and thought about how long an exposure would be required to light the room with a 50-inch TV. And, of course, I wondered what I would look like to a camera while sleeping and dreaming for 4.5 hours.

How Long Can You Go?

That was obviously the first question I wanted to answer.

I slept on the couch for a good portion of my self-quarantined return. This actually provided the best space for me to work on those โ€œsleeping selfieโ€ shots. I treated it just like any other long exposure:

Step 1. I left the lights on to finesse the composition and focus, and then left the camera in manual focus.

Figure 3. Testing the focus and composition. Nikon D750 with an Irix 15mm f/2.4 lens. 8 seconds, f/11, ISO 320.

๏ปฟStep 2. I turned off the lights and did a high ISO test shot at 30 seconds, f/5.6, ISO 6400. This allowed me to check for extraneous light sources spilling into the image.

Figure 4. Note the light coming from another room as well as the light spots on the bed coming from the window curtain not being completely closed. Nikon D750 with an Irix 15mm f/2.4 lens. 30 seconds, f/5.6, ISO 6400.

Step 3. The previous test shot was still very dark, so I increased my ISO by one stop and opened my aperture by two stops for the final test: 30 seconds, f/2.8, ISO 12800.

Figure 5. Nikon D750 with an Irix 15mm f/2.4 lens. 30 seconds, f/2.8, ISO 12800.

๏ปฟStep 4. That looked good, so using the Six-Stop Rule, I knew an equivalent long exposure would be 30 minutes, f/2.8, ISO 200. But 30 minutes wasnโ€™t enough for me. I wanted one hour, plus a little more depth of field. So I took away two stops of light by closing down my aperture to f/5.6. I then extended my shutter speed to 60 minutes and raised my ISO to 400.

Step 5. For the final shot it was also very important to turn on the in-camera Long Exposure Noise Reduction (LENR). My apartment runs about 70 degrees F and any exposures over 6 minutes start to show the red, blue and green confetti noise in the image. LENR removes the noise, but also requires the equivalent amount of time to process in-camera. So my 1-hour exposure with LENR actually took 2 hours to complete. Fortunately I was using the Tether Tools Case Relay, which lets you connect to any USB power pack. I used the 10,000-mAh Rock Solid, which lasted another 6 hours!

Figure 6. The final shot. Nikon D750 with an Irix 15mm f/2.4 lens. 1 hour, f/5.6, ISO 400.

However, while shooting longer exposures, I made a very unfortunate discovery with both my Nikon D750 and Z 6. The LENR wasnโ€™t effective with shutter speeds over 1 hour at 70 F. Even with LENR turned on, the D750 showed a ton of noise at 3 hours and the Z 6 started to show noise at 2 hours.

Figure 7. Zoomed-in view of the of the D750 3-hour exposure, with long exposure noise (left). (Click to expand the image and see the noise.)

Figure 8. Zoomed-in view of the of the Z 6 2-hour exposure, with long exposure noise. (Click to expand the image and see the noise.)

(Not to be daunted, I know of one type of camera that does not suffer from any type of long exposure noise: film cameras! So I ran another long exposure with film, and can hardly wait to develop it.)

Living Room Light Painting

Another fun technique that is easy to practice in your living room is light painting. Sure, most of us donโ€™t have mountains or sand dunes right outside our window that we can paint, but there are plenty of objects inside that can help us sharpen our lighting skills.

The Door

The first thing I noticed was my door. In my previous sleeping photos, I loved the glow through the door frame and wanted to explore that visual. But shooting only a dark door wouldnโ€™t be enough. So, light painting to the rescue!

One of the first lessons we teach in light painting is to paint the subject from an oblique angle. This sidelighting can bring out wonderful texture in any surfaces, including walls and doors.

I stood on my ottoman and closed my hand over the head of my Coast HP5R flashlight to create a small snoot. This created unique beams that reminded me of light streaming through half-open blinds.

The rest of the room was dark, and my exposure was based on just the light painting. I used the T (Time) mode on the Z 6, pressed the trigger on my Vello Shutterboss II to start the exposure, did my light painting, and pressed the trigger again to close the exposure. I could have used Bulb mode instead, but I generally default to T for something as easy as this.

The fun thing with the door project was creating a slightly different pattern each time (Figures 9 and 10). Which one do you prefer?

Figure 9. Nikon Z 6 with a Nikon Z 24-70mm f/4 lens, lit with a Coast HP5R. 25 seconds, f/8, ISO 1600.

Figure 10. Nikon Z 6 with a Nikon Z 24-70mm f/4 lens, lit with a Coast HP5R. 37 seconds, f/8, ISO 1600.

The Leica

The next challenge for a light painting subject was my classic camera collection. I used my macro lens, got in tight and decided to use a soft style of light painting. I darkened the room and shined my flashlight though a Lastolite Halo 2-Stop Diffuser. The Halo is a great portable way to take a small light source that typically produces hard shadows and turn it into a big (32 inches, in this case) light source that creates a much softer light.

Product photography usually requires even illumination with multiple lights so you can easily โ€œsee the product.โ€ I achieved this effect with one diffused flashlight and a long exposure. During shutter speeds of 10 to 20 seconds, I started my light painting from the side but then moved the light near to straight-on.

Figure 11. Nikon Z 6 with a Tamron 90mm f/2.8 macro lens, lit with a Coast HP5R through a Lastolite Halo 2-Stop Diffuser. 20 seconds, f/5.6, ISO 320.

Figure 12. Nikon Z 6 with a Tamron 90mm macro lens, lit with a Coast HP5R through a Lastolite Halo 2-Stop Diffuser. 15 seconds, f/11, ISO 800.

You can see different effects of experimenting with how long I held the light at different angles. Figures 11 and 12 were shot in a completely dark room. I noticed that the light was spilling onto my white wall and thus creating a brighter background than I wanted. So for the last shot (Figure 13), I moved back a bit and angled the light source down so there was minimal spill, thus creating a darker background.

Figure 13. Nikon Z 6 with Nikon Z 6 with a Tamron 90mm macro lens, lit with a Coast HP5R through a Lastolite Halo 2-Stop Diffuser. 10 seconds, f/11, ISO 800.

The Don

Obviously, we at NPAN are big fans of night portraits. This is something that, with a willing partner, you can practice in a darkened room at home. In my case, my partner wasnโ€™t as willing, so I did the next best thing: I practiced with a wooden Don Quixote.

For this shot, I wanted to move away from the product photography style and go back to creating dramatic lighting. I chose my Mini Maglite๏ปฟ, which has a warm-toned xenon bulb that emits a low 14 lumens. Direct light allowed me to work close to the figure and create more contrast.

I rolled a thick piece of paper around the head of the Maglite. This makeshift snoot helped me create a tight beam so that I could be very specific with where I placed the light, as I wanted to ensure it wouldnโ€™t spill on the table or background.

Figure 14. Test shotโ€”no light painting, just ambient exposure. Nikon Z 6 with a Tamron 90mm f/2.8 macro lens. 4 seconds, f/11, ISO 800.

Figure 15. Final shotโ€”with all the ambient light turned off, the light painting creates the drama. Nikon Z 6 with a Tamron 90mm f/2.8 macro lens, lit with a Mini Maglite. 5 seconds, f/11, ISO 800.]

Multiple Exposures vs. Long Exposures

Multiple exposures have been trending lately. Multiple-moods portraits seem to encapsulate our feelings in these anxious times.

Iโ€™m multiple-exposure curious. I used to do it in the darkroom, but now mirrorless cameras make it so easy to do in-camera. You take a picture, the LCD shows the overlay, and then you take another. This allows you to best align your images in-camera.

Call me old school, but I prefer doing it this way: Turn out all the lights and shoot one long exposure, then move about the scene and pop a flash when youโ€™re wherever you want to appear. This freezes yourself in the frame multiple times.

I set about this challenge, and after several tries I started honing in on the proper timing and power of the flash. I directed myself into three different positions and popped a handheld Profoto A1 each time. The overall exposure was 80 seconds and the power level of the flash was 7.5.

One of the tricks to pulling this off was ensuring that the A1 only helped the photo, and didnโ€™t hurt it with its lit digital back. I had to run around while being careful not to shine the digital read-out light toward the camera, which would have caused a light streak in the scene. Needless to say it was a frantic 80 seconds, especially with changing hats for every pop of the flash!

Figure 16. Nikon Z 6 with a Nikon Z 24-70 f/4 lens, lit with a Profoto A1. 82 seconds, f/8, ISO 50.

I also tried using the cameraโ€™s multiple exposure mode, which did make for a more relaxed experience. I set my camera to Time mode and clicked the shutter open. I walked into the scene, assumed position and popped the flash. Then I walked back to the camera, stopped the exposure, reviewed the image, switched hats and started the second shot.

Multiple exposure mode is often for two shots being combined, but most cameras will let you do more than that. Be careful in how you layer together your composition, so as not to converge your figures or your lighting.

Figure 17. Nikon Z 6 with a Nikon Z 24-70 f/4 lens, lit with a Profoto A1. In-camera triple exposure set to โ€œaverage,โ€ each shot at 30 seconds, f/8, ISO 50.

Comparing the shots, we can see itโ€™s possible to get similar results with each technique. The overall exposure in the first is brighter because more ambient light filtered into the room during the longer exposure. Which do you like better?

Ending on a Fun Note

This last shot was my ode to Sugimotoโ€™s theater series with the updated โ€œstay at home and bingeโ€ twist. The only light source in the room is the TV, which was showing an episode of Schittโ€™s Creek. Theo the Cat jumped into the scene and held still for the 8-second exposureโ€”a true night photographerโ€™s pet!

Figure 18. Theo the Cat. Nikon Z 6 with an Irix 15mm f/2.4 lens. 8 seconds, f/13, ISO 1250.

Are you looking at your living room a little differently now? Why donโ€™t you give it a try? We challenge you, our community, to experiment with some indoor long exposures. Limit yourself to one room in your house. Turn off the lights and let your creativity guide you in the dark.

Then, share the photos with us! Last week we launched โ€œThe Night Crew Image Review,โ€ a free livestream program on our YouTube channel, which will run every Thursday at 8 p.m. ET. Weโ€™re giving you a 10-day deadline. Work on those indoor long exposures and submit them to us at npan.co/imagereview by noon ET on April 16. Tune in that night to see what you and others created, and weโ€™ll offer some tips at the same time.

Gabriel Biderman is a partner and workshop leader with National Parks at Night. He is a Brooklyn-based fine art and travel photographer, and author of Night Photography: From Snapshots to Great Shots (Peachpit, 2014). During the daytime hours you'll often find Gabe at one of many photo events around the world working for B&H Photoโ€™s road marketing team. See his portfolio and workshop lineup at www.ruinism.com.

UPCOMING WORKSHOPS FROM NATIONAL PARKS AT NIGHT

Photographing Phantoms: How to Capture Ghosts and Spirits in Night Images

โ€œDarkness falls across the land, the midnight hour is close at hand.โ€
— Vincent Price

I recently spent an incredibly fun night at the historic Sleep Hollow Cemetery in New York with the B&H Video team and the wonderful model @seashellspells. Our mission was to make an educational video on how you can create โ€œghostsโ€ and โ€œspiritsโ€ with long exposures.

You can view the video below, and then read all about how I approach making โ€œghostโ€ images at night.


Humankind has been fascinated with spirits for a very long time. And that includes photographers. Some of the first photographs ever made focused on โ€œspirit photography,โ€ which was incredibly popular from the 1860s until the early 20th century.

Figure 1. Haunted Lane, by Melander & Bro, 1889. A well-choreographed image taken during the height of spirit photography.

Figure 2. Brown Lady of Raynham Hall. One of the most famous ghost photographs of all time, taken by Captain Hubert C. Provand and Indre Shira on assignment for Country Life. This โ€œghostly imageโ€ is on the negative and was probably created by long exposure and movement.

Early in my career, I was influenced by the modern photographer Duane Michals, who created beautiful and whimsical storyboard tales that often incorporated spirits.

Figure 3. The Spirit Leaves the Body, 1968. Duane Michals was the master of double exposures to create apparitions in his story telling.

Of course, weโ€™ve all seen a ghosting effect in some of our imagesโ€”when our exposures get longer and a person moves through. But rather than the effect being an accident, how can we control it and bring these โ€œspiritual beingsโ€ into existence?

Ghostly Gear

No specialized camera gear is needed. Any body and lens that has manual controls and manual focus options will do.

A tripod is keyโ€”you need something solid to put your camera on so you can capture the spirits moving through the frame. A Vello Shutterboss II or remote release will help you achieve exposures longer than 30 seconds, which can be very helpful in darker scenarios.

Another item is something we donโ€™t always use as much in our regular night work: a flash. While you can use flashlights and LEDs to create more abstract ghosts, a flash is a must for โ€œcapturingโ€ a spirit with more detail. Take your flash off your camera and trigger it by hand or with a wireless remoteโ€”this will also create more depth to your scene.

Finally, a neutral density filter will help you attain longer exposures, especially if you want to โ€œcatch a ghostโ€ during the day.

The Boo Basics

First, figure out your base exposure. You will need dim conditions (or that neutral density filter) to achieve a long exposure. Whether you turn off all the lights in the room or go outside during the day or night, you will need an exposure between 10 and 20 seconds to form a proper ghost (Figure 4).

Think about mass and time. If you have a 10-second shot and your model moves out of the scene after 5 seconds, the camera will continue to expose and youโ€™ll be able to see through their body. If the model stays for more time, they will be more solid; if less time, youโ€™ll see through them even more.

Figure 4. I always start with putting the model in the image for half the exposure and then adjust accordingly. Here we see the model in the 10-second shot for (from left to right) 5 seconds, 3 seconds and 2 seconds. I liked the 3-second shot the best, but the 2-second could be interesting to use if I wanted something more ethereal. Nikon Z 6 with a Nikon Z 14-30mm f/4 lens at 30mm. 10 seconds, f/5.6, ISO 6400.

Background Considerations

Be aware of your background and choose contrasting clothes according to your goals. A couple of examples:

I created one of my first ghost photos back in the film days (Figure 5). I had the model dress in a white slip and we photographed in a recently abandoned house during the day. I was able to obtain a long exposure of 10 to 20 seconds by stopping down my aperture. I directed her to move from sitting on the bed to touching the black dress hanging on the wall. Because she moved around, her mass wasnโ€™t in one place too long. But just as important was that most of the room was light-colored, just like her clothes, so she appeared in the image only when she was standing in front of the darker background of a dress hanging on a wall (Figure 1).

Figure 5. Pentax K1000. Approximately 10-second exposure on Kodak TriX 400 film.

My next stab at making a ghost was a self-portrait at the Circus Maximus in Rome (Figure 6). This fared much better. The steps were white marble and my clothing was darker. The exposure was 3 minutes and I sat on the steps for half the time.

Note that my ghost is fairly sharp. No one can stay still for 1 second, let alone 1.5 minutes. I was able to achieve this two ways:

  1. Sitting on the steps with my arms on my lap provided a very stable position for me to hold still and count to 90.

  2. Iโ€™m small in the image. If your model is larger in the compositionโ€”either because youโ€™re honed in with a longer lens or because you place them closer to the cameraโ€”then any movement will be magnified.

Figure 6. Self-Portrait Ghost. Pentax K1000. 3 minutes on Trix 400 film.

Letโ€™s return to Sleepy Hollow (Figure 7) for a few more examples about backgrounds.

I asked our model, Christine, to wear her dark green dress against light grey walls. She stood still for 5 seconds and then walked out of the frame. The total exposure was 10 seconds. Look at the lower portion of the imageโ€”her dress blends into the dark background because the contrast is similar. But the ghost of her pops out in the areas of higher contrast (i.e., her skin and where the dress is against the lighter brick background).

I liked that shot, but Christine isnโ€™t very sharp in it. So for the second attempt, I had her lean her body against the brick wall. This stabilized her form and made her a clearer spirit during half the exposure.

Christine then changed into a lighter outfit that provided further contrast against the background and made her pop even more.

Figure 7. All images shot with a Nikon Z 6 and Nikon Z 14-30mm f/4 lens at 30mm. 10 seconds, f/5.6, ISO 3200. Model was in the scene for half the time, or 5 seconds.

Along the same lines, always be aware of the sky, especially in overcast conditions and in bright urban areas. When the sky is the background, it can be challenging to create a ghost in front of it. Figure 8 provides a more extreme example and is definitely something we need to be aware of to either avoid or embrace. Note how much detail we can see in the white dress against the darker background, but that same detail disappears into a silhouette against the bright sky.

Figure 8. Nikon Z 6 with a Nikon Z 14-30mm lens at 30mm. 13 seconds, f/5.6, ISO 3200. Model was in the scene for 5 seconds.

Experiment with Spectral Movement

Ghost photography can be even more fun when the spirits move within the scene. We gave this a try in Sleepy Hollow by having our spirit rise from the grave (Figure 9). Christine lay down for half of the 10-second exposure and then sat up and stayed still for half. The first shot didnโ€™t work out because of the background interferenceโ€”her ghost was blending too much into the statue behind her. I readjusted my composition and we experimented with the timing of her various movements.

Figure 9. Nikon Z 6 with a Nikon Z 14-30mm lens at 14mm. 10 seconds, f/5.6, ISO 3200. Model was in the scene for 5 seconds.

Another way you can create an eerie sense of movement is by adding โ€œmultiple personality ghosts.โ€ You can do this a few different ways.

Have your spirit stand in two places during the exposure. Experiment with time, but a good starting point for a 10-second exposure is to have the model stand in one spot for 4 seconds, move in 2 seconds, and hold the second position for the remaining 4 seconds.

Another way to do this is with multiple exposures, which you can shoot in a single frame if your camera has a multiple exposure mode.

I had a lot of fun with my grandparents one day with my Mamiya C220 film camera (Figure 10). Once I metered the scene and figured out the exposure, I divided the shutter speed in half and took two shots that would equal the whole exposure. We used this multiple exposure technique to create a ghost of my grandmother surrounding my grandfather.

I then took the multiple-exposure strategy to the next level by creating an image in which you can see through my grandmotherโ€™s hands to her face. I did this by opening the shutter when her hands were over her face, then, while holding her head very still, she lowered her hands. This proved to be a very effective layered image.

Figure 10. Using multiple exposures can be an effective and easy way to create ghosts. Mamiya C220 film camera.

Most modern cameras have a multiple exposure mode that does all the metering for you. You select how many images you want to take, it figures out the overall exposure. The cool thing is that once you take the first shot, you can often see that image on the LCD before taking the second shotโ€”that way you can be very precise with your layered composition.

Freezing Phantoms with Flash

You can also create multiple versions of the same ghost, as well as a more defined ghost, by using a flash to freeze your model. Instead of having them hold still for seconds, you can just pop the flash, have them move to the next position and pop the flash again, or have them walk out of the scene.

The flash creates highlights that will be reflected back and forever etched into the image. You still need to be aware of how a bright background can eat through your ghost, but I find that the flash opens up many creative opportunities for storytelling in a single long exposure.

To start, I generally set my flash to its lowest power and then adjust accordingly. In Sleepy Hollow, for the first exposure (Figure 11) I discussed with Christine the idea of creating multiple ghosts in the same frame, advising that each pose should be different, and that they should be interacting. We did a walk-through of the positioning so she could familiarize herself with the space that she had to work with. I moved around the scene as well to make sure the flash would be evenly fired at the same distance and angle.

Figure 11. Nikon Z 6 with a Nikon Z 14-30mm f/4 lens at 18mm, with a Profoto A1 flash. 20 seconds, f/5.6, ISO 1600.

Figure 11. Nikon Z 6 with a Nikon Z 14-30mm f/4 lens at 18mm, with a Profoto A1 flash. 20 seconds, f/5.6, ISO 1600.

We decided to challenge ourselves with a triple flash ghost shot that added depth to the scene (Figure 12). For this 30-second photograph, we started with the closest position so that I could ensure it was focused and sharp. I popped my Profoto A1 flash at level 5, at a 45-degree angle and 10 feet away. Christine then moved to the predetermined spots in the background, carefully spaced so there was minimal overlap of the ghosts. We adjusted the flash to power 4 and kept it at the same distance and angle for each pose.

Figure 12. It was important to have a more powerful burst of flash on the closer ghost and slightly less in the more distant ghost. This helps us layer the scene better. Nikon Z 6 with a Nikon Z 14-30mm f/4 lens at 16mm, with a Profoto A1 flash. 30 seconds, f/5.6, ISO 1000.

Putting it all together

When working with models and creating ghosts, you need to be a director. Talk through your vision of what you want to convey. You and your model should bounce ideas off each otherโ€”it is definitely a collaborative process! Youโ€™ll need to direct the movement, call out the seconds and, as discussed, be aware of the background. Do you want to create contrast to give more detail to the spirit or less contrast/movement to form something more ethereal?

Letโ€™s put it all together and reconstruct how we created what ended up being our favorite shot of the night. We used time, movement and flash to create a very unique and elegantly eerie spirit!

During the 20-second exposure we started by popping a flash on Christine in the distant position. She then used the remaining time to walk slowly toward the camera and then stopped right in front about 1 or 2 feet away. She held that position for 3 to 4 seconds. It took a few attempts, but Iโ€™m thrilled with what we created (Figure 13โ€”the unlucky ghost number!).

Figure 13. Nikon Z 6 with a Nikon Z 14-30mm f/4 lens at 30mm, with a Profoto A1 flash. 20 seconds, f/4, ISO 1600.

Wrapping Up

As the nights become longer, I hope this inspires you to do a little ghost hunting of your own!

Share your spirits with us in the comments below, on our Facebook page, or by tagging #nationalparksatnight on Instagram.

Note: Want to learn these techniques and more during a hands-on workshop? Our Night Portraiture in Catskill workshop is the perfect match!

Gabriel Biderman is a partner and workshop leader with National Parks at Night. He is a Brooklyn-based fine art and travel photographer, and author of Night Photography: From Snapshots to Great Shots (Peachpit, 2014). During the daytime hours you'll often find Gabe at one of many photo events around the world working for B&H Photoโ€™s road marketing team. See his portfolio and workshop lineup at www.ruinism.com.

UPCOMING WORKSHOPS FROM NATIONAL PARKS AT NIGHT