How I Got the Shot

How I Got the Shot: Moon Over Alabama Hills

Moon Over Alabama Hills. Nikon Z 6 with a Nikon Z 24-70mm f/4 lens, light painted with a Luxli Viola. Two stacked frames shot at 5 minutes, f/8, ISO 200 (foreground) and 10 seconds, f/8, ISO 6400 (sky).

The Location

Alabama Hills National Scenic Area encompasses a range of rock formations to the east of Californiaโ€™s Sierra Nevada Mountains. Itโ€™s a huge draw for people with cameras of all sorts. Television and movie productionsโ€”especially Westernsโ€”have been filmed there since the 1920s. Photographers have been going there since landscapes were a thing to shoot. And night photographers (light painters in particular) love the rocky scenery and the very dark skies.

Mobius Arch, Alabama Hills. A great example of the areaโ€™s fantastical scenery. Canon EOS-1DS with a 16mm lens. 1/90, f/13, ISO 100.

The Moon

For many, the moon is an unwelcome addition to our night sky. Its presence makes nighttime landscapes look like day, overpowers the Milky Way and obscures all but the brightest stars. But while initially the moon may seem like a problem, it can also provide opportunities for other styles of night photography. In addition, embracing moonlight will expand your shooting time to more than just the one moonless week every month.

One aspect of shooting with the moon present is accepting youโ€™ll have fewer stars in the sky. Thatโ€™s OK. You can create star-filled skies later in the month, during a new moon. Brighter moonlit situations give us a chance to put more emphasis on the landscape instead of the sky.

Begin by choosing compelling subjects that you might photograph during the day. For example, Iโ€™ve always been fascinated by the metamorphic rock found throughout the Alabama Hills in the High Sierra. In this image I really wanted to emphasize both the texture and the gentle curves of these magnificent formations. Last monthโ€™s waxing gibbous moon provided exactly this opportunity.

The Ambient Exposure

My goal was to accentuate the foreground shapes and to have the moon render like a starburst. So first (as usual) I began by using ISO 6400 for a series of test shots. This allowed me to fine-tune my composition and to determine my base (ambient) exposure of 10 seconds at f/8.

This exposure was short enough for the moon to remain round and for the stars to render as dots rather than dashes (Figure 1). Also, using a 24mm wide-angle lens allowed me to create a starburst effect without having to stop down too much (the longer a lens is, the more you need to stop down to create the star effect).

In short, 10 seconds, f/8, ISO 6400 was a perfect exposure for the sky, stars and moon.

Figure 1. The relatively short exposure kept the moon round and the stars sharp. A longer exposure would have had the opposite affect: The moon would have become oblong and the stars would have begun to trail.

The Light Painting

Once the ambient exposure was established, I began looking at how the light was illuminating my foreground. The full moon over this small cliff face created the perfect backlighting to accentuate the curves and texture of the foreground rocks. However, it also put the entire cliff face into shadow.

To fix this problem I placed a tripod with a Luxli Viola light panel just off camera-right, about 30 yards in front of me. This placement provided texture-revealing sidelight on the cliff face and helped fill in the foreground shadow (Figure 2).

The next step was to balance the Viola with the moon. I began by setting the panelโ€™s brightness to 25 percent. But โ€ฆ oops! That made the image look fake, as the exposure on the back wall was way too bright. I lowered the setting to 12 and shot again, which provided just the right amount of light to make the scene somewhat more believable.

Figure 2. The sidelight from the Luxli Viola brings out the texture in the cliff face.

The Color Temperature

The next problem to solve was the color. For most night photography (including moonlit scenes) I set my cameraโ€™s white balance to 3800 K. This renders the sky to my tastes. Remember though, white balance is quite subjective. Some folks like night skies to appear more blue, while others like a more neutral sky. There is no right or wrong. You should always consider white balance suggestions as a starting point.

Because I was using a camera white balance setting of 3800 K, I set my Luxliโ€™s color temperature to 3800 K to match. After a couple of more test shots I realized that this setting made the added light a bit warmer than the moonlight that was kissing the foreground. Increasing the Luxliโ€™s color temperature to 5500 K better matched the color of the moonlight, which made the whole scene appear a bit more natural.

The Final Frame

I had shot all my test frames with an ISO of 6400 to shorten the time between tests. But while ISO 6400 was great for the sky and testing, I wanted a higher-quality, lower-ISO exposure for my foreground rocks. For this I turned to the Six-Stop Rule.

The Six-Stop Rule is a shortcut to translate a short, high ISO test exposure into a longer, low ISO exposure. The rule is simple: The amount of seconds it takes to create a good exposure at ISO 6400 equals the number of minutes at ISO 100. For example, 10 seconds, f/8, ISO 6400 equals 10 minutes, f/8, ISO 100. Both of those exposures allow the same amount of light to hit the sensor.

In this case, I didnโ€™t want to wait 10 minutes, so I used an equivalent exposure of 5 minutes, f/8, ISO 200. Using this exposure didnโ€™t change anything about the lighting. Because both the moonlight and the Luxli are constant light sources, lowering the ISO and lengthening the shutter speed provided identical exposures where the light level looked exactly the same. The only difference, of course, was that the longer exposure showed movement in the stars and moon.

Putting it All Together

The final image. Moon Over Alabama Hills. Nikon Z 6 with a Nikon Z 24-70mm f/4 lens, light painted with a Luxli Viola. Two stacked frames shot at 5 minutes, f/8, ISO 200 (foreground) and 10 seconds, f/8, ISO 6400 (sky).

Many times the final image comes together with advance knowledge of how youโ€™ll proceed, while other times the creation process evolves during the process. In this case, a bit of both happened.

I knew I wanted to use the moon as the main light to accentuate the foreground rocks and also to create a moon star and keep the stars sharp. I achieved that through the initial ISO 6400 test images. During those tests, I realized that I needed to add some fill light to the back wall in shadow. So out came the Luxli light panel. Setting the light panel to the same color temperature as my camera produced a warmer light than the moon was providing, so I upped the K setting to 5500.

After lowering the ISO to create a higher-quality rendering of the rocks and wall, the last step was in Photoshop: A simple layer-and-mask blend of the foreground and background.

Tim Cooper is a partner and workshop leader with National Parks at Night. Learn more techniques from his book The Magic of Light Painting, available from Peachpit.

UPCOMING WORKSHOPS FROM NATIONAL PARKS AT NIGHT

How I Got the Shot: Ubehebe Crater at Death Valley National Park

Ubehebe Crater, Death Valley National Park. Nikon D5 with a Nikon 14-24mm f/2.8 lens at 24mm. 11 stitched frames photographed at 10 seconds, f/5.6, ISO 2500.

The Location

Ubehebe Crater could be the most underrated natural feature in Death Valley National Park. Lots of folks know about Badwater Basin, where hexagonal formations rise from the salt flats; and Mesquite Flat Dunes, where sand rises and dips in patterns that lead toward desert-mountain backgrounds; and Racetrack Playa, where rocks appear to sail across the dried, cracked mud.

Figure 1. Look out!

All those things are well-renowned, and they should be. But Iโ€™m continually bemused at how few people know about Ubehebe, a half-mile-wide, 600-foot-deep volcanic crater. Why? Because itโ€™s amazing!

Standing at the edge (carefully, Figure 1) reveals a beautiful, mesmerizing landscape. Standing at the bottom is awe-inspiring, as you look up and marvel at the power of nature to blast such a massive amount of earth over an area of 6 square miles.

Itโ€™s also a fun place to hike, as immediately to the south sit a few more smaller craters. You can hike along the rims or to the bottoms and explore the wonders of geology and wilderness.

However, one thing that Ubehebe Crater is not? Easy to photograph. The main attraction is the main crater, and itโ€™s a pretty massive subject.

The first time I photographed it, in 2017 (Figure 2), I used a Nikon 14-24mm lens at its widest zoom, which was OK, but I could barely fit the whole crater in the frame. Moreover, at that wide a focal length you really need foreground material to help create a sense of depth in the composition, and the crater rim offers very little of that.

In 2018 I got to try shooting the crater with the rectilinear Irix 11mm lens (Figure 3). That allowed me to get the whole crater into a 35mm frame, and some wild clouds helped add a special dynamic to the scene, but I still wasnโ€™t thrilled with the photo. I visited again in 2019, and didnโ€™t even bother shooting. I was completely out of ideas for how to make the scene work in a photograph.

Figure 2. Nikon D3s with a Nikon 14-24mm f/2.8 lens. 1/1250, f/8, ISO 400.

Figure 3. Nikon D5 with an Irix 11mm f/4 lens. Three blended exposures of 1/640, 1/1250 and 1/2500, at f/8, ISO 100.

Another challenge to photographing the crater is that its sharp angle of decline prevents sunlight from fully illuminating the interior unless the sun is relatively high in the sky. So on a bright day, you need to choose between harsh light at midday or big shadows earlier or later. You might think that overcast conditions are the answer, but Iโ€™ve tried that too. Flat light wipes out all depth and diminishes the warm-toned hues on the eastern flank that are such a crucial part of the craterโ€™s aesthetics.

Honestly, as much as I love Ubehebe Crater, by early 2019 Iโ€™d just about given up trying to make a photograph of it that I like.

The Aha Moment

Then in February 2020 I was back at Death Valley for National Parks at Nightโ€™s very first Alumni Excursion, a 5-night, 6-day photography jaunt through this amazing place. Toward the end of the workshop, we made a day and night trip to Racetrack Playa, and on the way we stopped at Ubehebe Crater.

I was leading this workshop with Lance Keimig and Matt Hill, and Matt had never been to the crater before. As most people do, he loved it. And he said, โ€œOn the way back tonight itโ€™d be awesome to shoot a moonlit pano of this.โ€

Aha! That was the answer. I knew it right away. I had to get this image.

So, we scouted. Matt went off to explore his idea for the photograph, and I went off to explore mine. I hiked along the northern rim to find an angle where I could get a good vantage point over the crater with the snowy peaks of Hunter Mountain in the background. I made a quick auto-pano using my cell phone, just to make sure the composition would work the way I wanted (Figure 4). Then I checked PhotoPills to confirm a suspicion: That evening, I could shoot the full moon drifting through background of the scene. That was my shot. It was scouted and ready to be executed hours later, in the dark of the California desert.

Figure 4. A daylight test pano from my scouted spot, using my Google Pixel 3a.

The Shoot

Unfortunately, the Racetrack is hard to leave, and we stayed late. By the time we returned to Ubehebe, the moon had drifted way out of the scene. But it was still high, and delicately sidelighting the crater, and that was beautiful.

The hour was lateโ€”well after midnight on what had been a long day at the end of an adventure-filled weekโ€”and I was exhausted. But I was also determined. I was getting this image.

With my eyes half closed, I carried my tripod, Nikon D5 and two lenses one-quarter mile to my spot. I set up, tested each lens, and decided the Nikon 14-24mm (zoomed all the way to 24mm) was my best option for creating the image I had in my mind.

The first key to shooting a pano is to level the entire setup. I own a Gitzo GSLVLS Leveling head, but unfortunately didnโ€™t have it with me. So I needed to level manually. That required three steps:

  1. leveling my tripod legs by using the bubble level on the top as a guide (Figure 5, left, bottom circle)

  2. leveling my ball head by using its bubble level the same as above (Figure 5, left, top circle)

  3. using the in-camera Virtual Horizon to ensure that all the leveling was correct by panning the setup left to right and back again and watching to see that the camera stayed level across the scene (Figure 5, right)

Figure 5. Perfectly level in every way.

I fired off a couple of test photos to nail down an exposure. The NPF Rule told me I could shoot as long as 10 seconds before the stars began to trail. That was easy under moonlight, as I could achieve that shutter speed at ISO 640 with the lens wide open. However, I unconditionally trust the ISOs of the D5, so I pushed to ISO 2500, which allowed me to close the aperture to f/5.6 and really take advantage of the best sharpness levels of the lens.

I was finally ready to shoot. I started with the camera panned far to the left, way past where I needed it for the final composition, to give myself flexibility to crop in later. I shot the first frame. Using the engraved degree markings on the bottom of my Really Right Stuff BH-55 ball head, I rotated the camera 15 degrees to the right, then shot again. (Thatโ€™s really more overlap than I needed, but I always prefer to have more than less.) I repeated this nine times, until I was shooting far right of my composition, for a total of 11 frames.

The Post-Production

The only change I wanted to make before assembling the pano was to apply lens corrections. This is best practice when making panos (particularly at night), so that any natural vignetting of the lens is removed. Otherwise, the color and brightness of the sky can fluctuate across the final panorama.

In Lightroom, I selected all 11 images in Grid view (Figure 6), then clicked to the Develop module. At the bottom right, I toggled the switch next to the Sync button to enable Auto Sync (Figure 7). Then I opened the Lens Corrections panel, then checked the boxes to turn on Remove Chromatic Aberration and Enable Profile Corrections. Then I went back to the bottom right and turned off Auto Sync.

Figure 6.

Figure 7.

To start the stitch, with the 11 frames still selected, in the menu I chose Photo > Photo Merge > Merge to Panorama. In the resulting dialog (Figure 8), I selected Spherical for the Projection, because it created the look I had in mind more closely than Cylindrical. I choose not to use Boundary Warp, Fill Edges, Auto Crop or Auto Settings, because I prefer to perform those tasks manually and deliberately. I did, however, click on Create Stack, because I like my multi-frame images to be neatly organized in the Lightroom catalog.

Figure 8.

I clicked Merge, and Lightroom did a great job stitching the 11 frames.

I switched to the Basic panel to apply some basic edits to Whites and Clarity, to make the overall image โ€œpopโ€ a little, then I manually made my crop to hone in on the elements I felt were most important to the composition (Figure 9).

Figure 9.

I felt the sky and stars needed even more punch, so I used the Graduated Filter tool to create a mask over the top half of the frame. I wanted the changes to affect only the sky, and not the mountains, so I enabled Range Mask and chose Color. Using the Color Range Selector (the eyedropper) to sample the blue sky, then used the Amount slider to tweak the selection. When I was happy with my mask (Figure 10), I made minor adjustments to Contrast, Highlights, Shadows, Blacks, Texture, Clarity and Sharpnessโ€”all to add just a little extra โ€œoomphโ€ to the sky, to make it appear in the image how it looked to me in person.

Figure 10.

Because the moon was off camera-right, the right side of the sky was noticeably brighter. To tone that down a bit, I created another mask in the same way as above, but instead of the top of the frame, I targeted the right (Figure 11). I then brought up Dehaze a bit to increase the local contrast of that portion of the frame, making it appear a little darker, and massaged the mask a bit to ensure a transition that looks natural.

Figure 11.

Wrapping Up

The final image. Ubehebe Crater, Death Valley National Park. Nikon D5 with a Nikon 14-24mm lens at 24mm. 11 stitched frames photographed at 10 seconds, f/5.6, ISO 2500.

Thatโ€™s how I finally, after four tries, made an image of Ubehebe Crater that Iโ€™m happy with.

The 3-year process from first visit to final image reinforced three ideas:

  1. Revisiting locations almost always leads to making better photographs.

  2. ๏ปฟPhotographing at night almost always allows for a unique way of photographing a scene.

  3. Creative breakthroughs can come from listening to what others think. I love teamwork and collaboration! (Thank you, Matt!)

Am I now done with Ubehebe? No way! On my hike back to the car that night, I thought of another idea, and Iโ€™m confident it will work. Stay tuned. Some night Iโ€™ll shoot that idea too.

Chris Nicholson is a partner and workshop leader with National Parks at Night, and author of Photographing National Parks (Sidelight Books, 2015). Learn more about national parks as photography destinations, subscribe to Chris' free e-newsletter, and more at www.PhotographingNationalParks.com.

UPCOMING WORKSHOPS FROM NATIONAL PARKS AT NIGHT

How I Got the Shot: Time-Lapse at the Owens Valley Radio Observatory

One of my favorite experiences last year was the Eastern Sierra workshop we ran in California with Rocky Mountain School of Photography. What made this one so extraordinary is that it offered a variety of subjects and ways to interpret the night. Most of us were excited about the surreal โ€œrockscapesโ€ of the Alabama Hills or the ghost town train depot at Laws. But for me? I couldnโ€™t wait to photograph the Owens Valley Radio Observatory (OVRO) in Bishop.

The Location

The Owens Valley Radio Observatory. Nikon Z 6 with a Nikon Z 24-70mm f/4 lens. 15 seconds, f/5.6, ISO 1600.

Iโ€™ve been to a few observatories, but to get a close-up look at these huge telescopes was a night photographerโ€™s dream come true.

We had only one night scheduled at OVRO, and I had so many ideas I wanted to explore. Letโ€™s just say I was stressfully excited! Two images I wanted to create were a time-lapse and a 2-hour-plus star trail shot of the telescopes. Unfortunately, as soon as I arrived I noticed that the cloud cover would prevent any long star trails from happening.

However, clouds can work very nicely in a time-lapse, as they are another moving element to capture as part of the scene. After all, time-lapses are all about movement.

Then I saw that the largest of the telescopesโ€”a 40-meter beautyโ€”was actively scanning the skies. Perfect. More movement!

The Shoot

I set up my Nikon Z 6 with a Z 24-70mm f/4 lens a couple of hundred yards away, so that I could include the sky patterns as well as the moving telescope.

However, in my excitement, I made a couple of critical errors with this first attempt. First, I defaulted to my typical vertical camera orientation, which worked for the single frame, but for time-lapse (or any video) you really want horizontal (unless youโ€™re going to view it only on a phone).

Second, I was in a very โ€œsingle frameโ€ mindset instead of thinking about the many frames it takes to create a time-lapse. My exposures were 2 minutes, f/5.6, ISO 100. The 2 minutes was the issue. With time-lapses, you need a lot of single frames to make the โ€œmovie,โ€ which means you generally want shorter (and therefore more) exposures. I didnโ€™t do the time-lapse math prior to setting up my shot.

When creating a time-lapse, you need to work backward a bit. Before shooing, think about how long you want the video to be. For instance, if I wanted to make a 15-second time-lapse using a โ€œnormalโ€ video playback of 30 frames per second, then I would have needed 450 frames. With 2-minute exposures, that would take 15 hours of shooting! Shorter exposures (say, from 10 to 30 seconds) are generally better, especially if you will be at a location for only a few hours.

Instead, I ended up with 91 vertical 2-minute images. I assembled them quickly in Photoshop and used a rate of 12.5 frames per second, which gave me a decent 7-second time-lapse that you can see in Figure 1.

Figure 1. My first attempt.

I do like that the longer exposures worked well with the lesser frame rate to slow things down a bitโ€”that really lets you see the motion of the telescope, clouds and car trails.

The Reshoot

As luck would have it, we had another opportunity to photograph at OVRO on this trip. Reshoots are amazing! Given this second chance, I wanted to learn from my mistakes and do a better job.

First, I had to figure out the best horizontal composition. The skies were clear and full of stars. Without the clouds moving through the scene, I composed for a closer look at the main actor, the 40-meter telescope.

Next, I needed to figure out a shorter exposure. The moon was out, so a shutter speed of 8 seconds was definitely attainable. It would take about 800 shots in 2 hours to capture the assets needed to create a 30-second time-lapse. If you need help figuring out the math for a time-lapse, our savvy friends at PhotoPills have a pill for that (Figure 2).

Figure 2. PhotoPills has a calculator for seeing how many frames are needed to create time-lapses of different lengths.

My final exposure was 8 seconds, f/5.6, ISO 1600. I set my Z 6 to Bulb mode, and I set up my Vello Shutterboss II with a 1-second interval between shots. I let it rip for a little over 2 hours, which gave me 835 exposures to work with.

The Post-Production

My video editing skills are definitely basicโ€”Iโ€™m really a still photographer, not a videographer. Fortunately in 2017 Adobe added a time-lapse feature to Photoshop, which is software that Iโ€™m very comfortable using.

Hereโ€™s what I did:

1. I exported my selects from Lightroom as JPGs, making sure my filenames were sequentially numberedโ€”i.e., OVRO_1, OVRO_2, OVRO_3, etc. (There should be no breaks in the numbering.) Under Image Sizing, you want to check the Resize to Fit box and enter either 1920 pixels wide for an HD video or 3,840 pixels wide for 4K. I chose the latter.

2. In the Photoshop menu, I chose File > Open, which opens the dialog we use to get things started (Figure 3). I navigated to the folder of time-lapse JPGs and selected the first one. I checked the Image Sequence box, then pressed Open.๏ปฟ

Figure 3.

3. For a frame rate, 30 is considered best practice for digital video. However, you can choose a lower or higher frame rate to slow things down or speed things up. Itโ€™s easy to experiment and cook to taste. I chose 24 for this time-lapse.

4. The files were quickly put together as one video layer in Photoshop. I clicked on Window > Timeline to open the timeline bar in Photoshop (Figure 4).

Figure 4.

5. I pressed the space bar on my keyboard to watch the time-lapse play slowly. Typically only one play is required to buffer the video.

6. You can do basic editing like adding music, cross-fades, etc., but I didnโ€™t add any visual bells and whistles, preferring to keep this time-lapse simple.

7. Exporting requires a few key steps. I selected File > Export > Render Video. The Render Video window (Figure 5) is pretty self-explanatory. Name your file, then choose where to save it. You can select a settings preset to suit your needs. The presets are helpful for automatically resizing your video to fit the various formats of YouTube, Vimeo, and Android and Apple Devices. I used Adobe Media Encoder.

Figure 5.

Thatโ€™s it. A quick and easy way for me to assemble a time-lapse.

As you can see with this second one, the improved frame rate created smoother and more realistic movements within the video.

Figure 6. The final time-lapse.

Wrapping Up

A dark-sky time-lapse is an amazing way to seize the night. I was thrilled with the experience and felt that the OVRO was a perfect subject to really show the passing of time and the search for life beyond the stars!

Like I mentioned before, Iโ€™m not a seasoned video guy, so I used Photoshop to tackle this, as itโ€™s software that Iโ€™m already comfortable with. But there are other options out there. One in particular Iโ€™m excited to delve into is LR/Timelapse, partly because it eliminates some of the steps above by allowing you to go from Lightroom directly into the rendering software. Stayed tuned to our blog for more on that later this year.

Gabriel Biderman is a partner and workshop leader with National Parks at Night. He is a Brooklyn-based fine art and travel photographer, and author of Night Photography: From Snapshots to Great Shots (Peachpit, 2014). During the daytime hours you'll often find Gabe at one of many photo events around the world working for B&H Photoโ€™s road marketing team. See his portfolio and workshop lineup at www.ruinism.com.

UPCOMING WORKSHOPS FROM NATIONAL PARKS AT NIGHT

How I Got the Shot: Star Trails and Tufa Spires at Trona Pinnacles

Star Trails and Tufa Spires, Trona Pinnacles, California. Nikon D5 with a Nikon 24-70mm f/2.8 lens, light painted with a Coast HP7R flashlight with 1/2 CTO and -1/8 green gels. 20 minutes, f/2.8, ISO 100.

Iโ€™ll admitโ€”Trona Pinnacles National Natural Landmark was not in my crosshairs. I was not aiming to photograph it, nor even to visit. I really had never even thought about the place. But while planning a Death Valley workshop with my friend Susan Magnano last year, she asked if afterward Iโ€™d be interested in shooting at Trona with her for a couple of nights. Iโ€™m always happy to spend time with Susan (if you knew her, you would be too), so I said yes.

And gosh am I glad I did.

The Place

Trona Pinnacles is a 3,800-acre piece of BLM land thatโ€™s accessed via a 5-mile dirt road in the Southern California region of the Mojave Desert. Not far from Death Valley National Park, not far from Alabama Hills, Trona features one of the most surreal landscapes of the whole Owens Valley.

The primary photography targets are the 500-plus tufa spires that rise as much as 140 feet from a dry bed in the Searles Lake basin. Standing amid them, you could be forgiven for thinking youโ€™re on another planetโ€”the area looks so much like a foreign world that itโ€™s been used on numerous occasions to depict exactly that. If youโ€™ve watched sci-fi films and TV shows such as Battlestar Gallactica, Lost in Space and Planet of the Apes, then youโ€™ve seen Trona Pinnacles.

Itโ€™s a great place for photography. The formations can be mixed and matched and juxtaposed to create endless possibilities for compositions. The groups of pinnacles are far enough apart to make for a relatively expansive park, yet close enough to make walking around relatively easy, and the landscape is open enough to provide plenty of space to move around and create angles for light painting.

Star Circles over Trona Pinnacles, California. Nikon D5 with a Nikon 24-70mm f/2.8 lens. 31 minutes, f/4, ISO 100.

The Scout

On our first night of shooting, I mostly focused on the grand landscapeโ€”the pinnacles as a foreground for big-sky compositions. On our second night, I honed in on the rock formations as primary elements of more intimate compositions. The image at hand is one of those, and was the second-to-last that I made on the trip.

During our daytime scouting, this was exactly the kind of composition Iโ€™d been looking for: a group of three pinnacles that juxtaposed nicely to form a triangle effect. My first preference was to find a triad in front of where the Milky Way or North Star would be, but this was the group I liked the best in terms of the shape they combined to create.

With the afternoon sun shining on the landscape, I walked around the pinnacles to find the best spot for the tripod, and made a rock note about where that spot was so I could find it hours later at night. (Whatโ€™s a rock note? I placed three golf ball-size rocks next to the tripod feet, kind of like I was marking my ball on the green. They were pretty easy to find later, and I knew exactly where to set up.)

Then I strolled around the scene again, envisioning the angles I could light paint fromโ€”not only where the light would look the best, but also where I could safely walk in the dark.

The Shoot

After first shooting night scenes in other places weโ€™d scouted, Susan and I returned to this spot at about 12:45 a.m. The moon had set a few hours earlier, so aside from a little of light pollution from the community of Trona to the north and the city of Ridgecrest to the west, we were working in pretty dark conditions.

Figure 1. The base exposure before light painting: 15 seconds, f/2.8, ISO 8000.

Figure 1. The base exposure before light painting: 15 seconds, f/2.8, ISO 8000.

I set up my tripod, mounted my Nikon D5 and 24-70mm f/2.8 lens, and quickly found the composition Iโ€™d visualized earlier. I shined a Coast HP7R flashlight on the front spire, which was plenty of light for the D5โ€™s autofocus to lock onto. Weโ€™d been shooting for a while, so I already knew what the base exposure would be: 15 seconds, f/2.8, ISO 8000. I fired a test shot (Figure 1) to make sure everything looked right.

I knew the spot I wanted to light paint from, but the one thing I hadnโ€™t been able to test in daytime was the light itself. Now that it was dark, I could start doing that.

When light painting by myself (Susan was a few hundred yards away working on her own photograph), I like to use a wireless shutter triggerโ€”specifically, the Vello FreeWave Micro. This allows me to get into position before firing the camera, rather than pressing the shutter button and running into the landscape to start lighting. (Another option is to use a timer, but I sometimes find that from a distance I donโ€™t hear the shutter open. I also might not be in position when the camera fires, or conversely might be standing around waiting for it to fire. The wireless release solves all those issues for me.)

I made a few test exposures, adjusting the lighting strategy with each (Figure 2). Iโ€™d fire, light the pinnacles, return to the camera to see the results, then get into position and start again. (This is a great way to stay in shape.)

My concern in this particular composition was lighting each spire about equally, but with the front-and-center one just a little brighter. They look close to together in the image, but they were actually far enough apart, and at different enough distances from the light source, that each required a different amount of light. For each formation, I just counted how long I was lighting itโ€”perhaps 2 seconds for the first, 3 seconds for the second, 4 seconds for the third. (I donโ€™t recall the exact amount of light I used for eachโ€”the concept is more important than the specific number.)

Figure 2. Different light painting trials (all of them failuresโ€”albeit positive failures, because they led to something that worked).

Once I got the timing down, I tried changing the color temperature of the light. For the initial test shots I was using my HP7R with a gel combination of 1/2 CTO and -1/8 green (see Timโ€™s post โ€œLevel Up With Light Painting: Correcting the Color of Your Flashlightโ€). Just to be sure thatโ€™s what I liked best, I also tried a few without the color correction, opting for the naturally cool temperature of the LED flashlight (Figure 3).

Figure 3. Testing a cooler color temperature.

I decided I liked the warm look better (Figure 4), as it nicely complemented the warm tones of the clouds reflecting the street lights of Ridgecrest.

Figure 4. The light painting approach I settled onโ€”or so I thought.

Going Long

The next step was to adapt the lighting strategy for a long exposure. I wanted to shoot for 8 minutes, which with a focal length of 31mm and facing west I thought would give me star trails long enough to be compositionally relevant. To get my exposure from 15 seconds to 8 minutes, I dropped the ISO from 8000 to 200. (The 1/3 stop less of exposure was to compensate for the light reflecting off the clouds, which had grown a little denser.)

Figure 5. To test the light painting for the long exposure, I kept the shutter open just long enough to test what I was adding with my flashlight. The idea was to keep the test short by evaluating only that one pieceโ€”I didnโ€™t care if the background went to black.

At the new, less sensitive exposure, clearly a few seconds of light would not have been enough to illuminate the foreground. But how much light was right? I obviously didnโ€™t want to use an 8-minute exposure to find out, especially if I needed two or three tries, which would have resulted in 16 or 24 minutes of testing. Thatโ€™s not time spent well.

The good news is that for a test shot, I donโ€™t need to care about the backgroundโ€”just the light painting. So I opened my shutter, tried the light, then closed the shutter. The background was nearly black, but I could see if the light painting was correct. Lucky me, it was! (Figure 5. I hardly ever get this right on the first try.)

At this point I felt ready to fire the long exposure. I turned on Long Exposure Noise Reduction, opened the shutter, applied my tested light painting, and waited out the rest of the 16 minutes (8 minutes of shutter time plus 8 minutes of LENR).

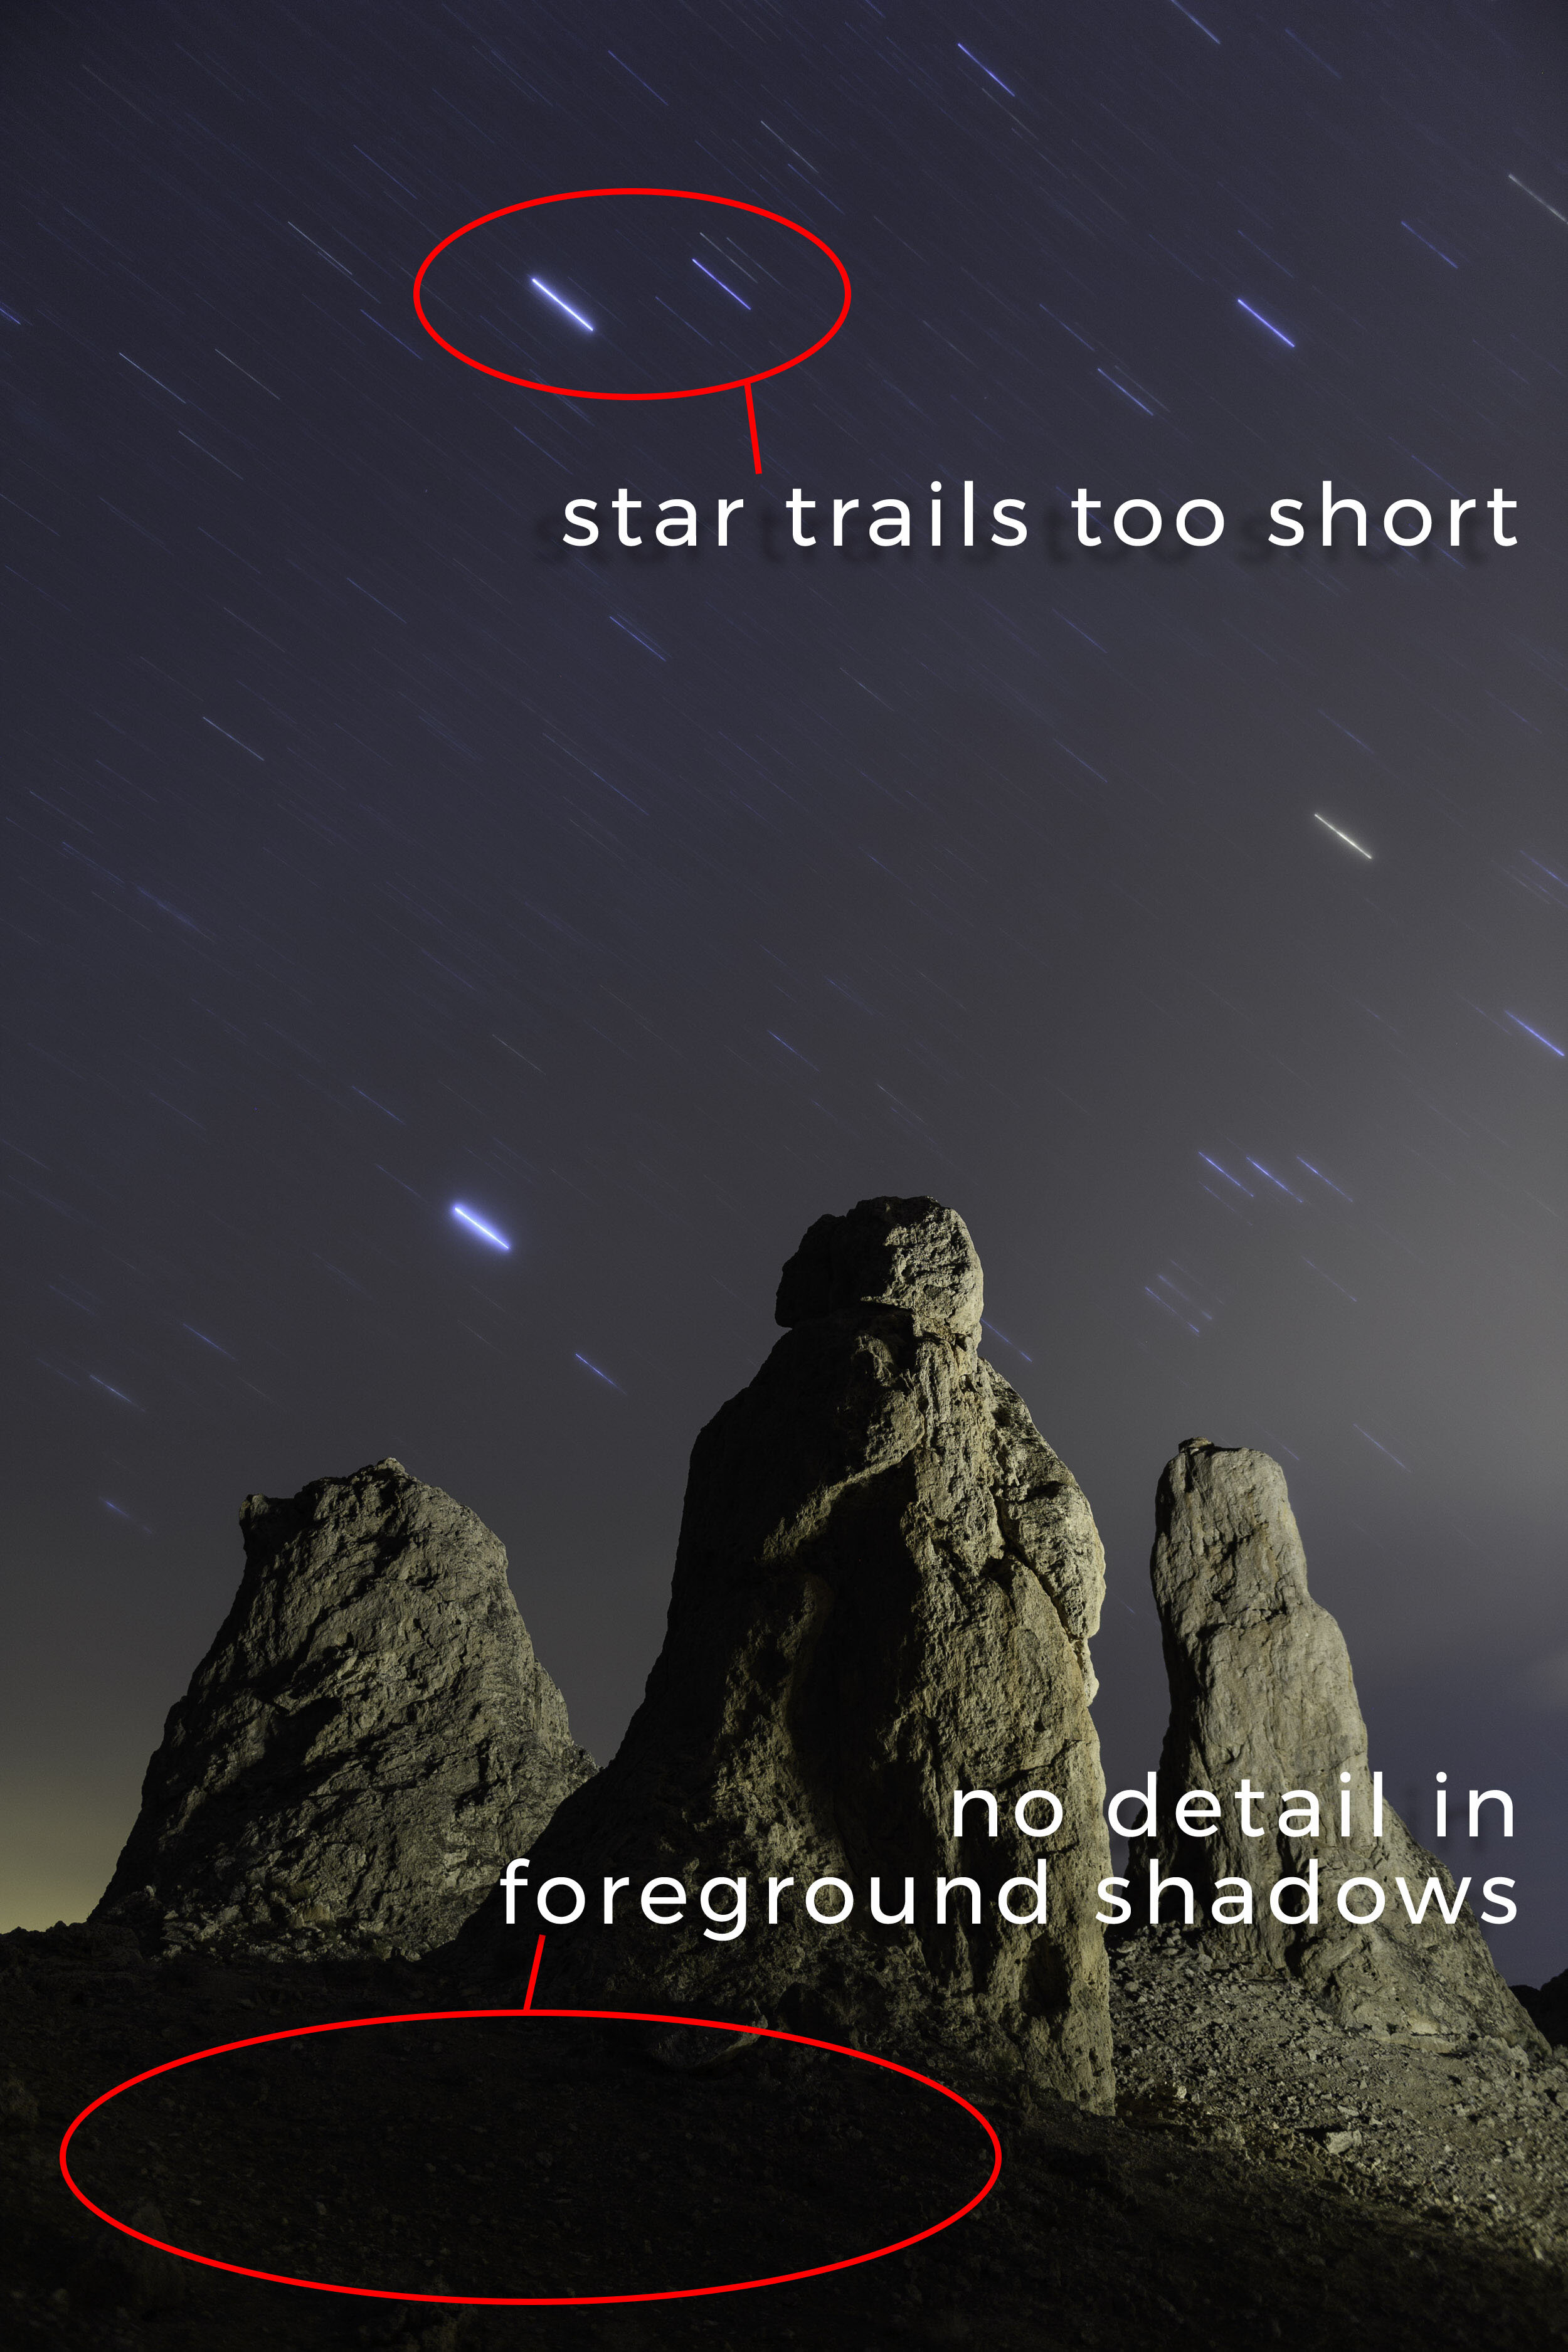
Once the camera was finished cooking, I looked at the result on the LCD (Figure 6). The exposure was right, as was the light painting. Alas, the stars were too short. Another issue I noticed is that the ground in front of the pinnacles was completely black, which I didn't like.

Figure 6. Problems to solve for the final exposure. 8 minutes, f/2.8, ISO 200.

Figure 6. Problems to solve for the final exposure. 8 minutes, f/2.8, ISO 200.

I didnโ€™t want to spend another half hour on a photo I'd thought was almost done, but I preferred that idea to investing all that time and not getting the image right. So I went at it again.

I turned off LENR (so as not to unnecessarily double the test-exposure time), dropped the ISO to 100 and started re-testing the light painting. First I shined some light on the ground, adding just enough to reveal a bit of detailโ€”which took me three tries to get right. Then I re-tested the light on the formations (compensating for the lower ISO), combining it with the foreground light to make sure everything would look good in the final, even longer long exposure (Figure 7).

Figure 7. Testing some light to draw out detail in the foreground shadows. The first take was too much light, the second just about right, and the third combined the new foreground light painting with the light on the spires.

Once I was (relatively) confident the painting approach was sound, I turned on LENR again, opened the shutter, set a timer for 16 minutes, light painted, strolled around gazing at amazing night skies for 12 minutes, then closed the shutter. When the LENR finished, I finally had my shot (Figure 8).

The Final Image

Taking the time in the field to work out the kinks meant that the final image required very little post-processingโ€”just some basic tweaks in Lightroomโ€™s Basic panel to optimize contrast and color.

Figure 8. The final image with 20-minute star trails and all the light painting.

Want to shoot this great space with us in 2020? We have one ticket left for our Trona Pinnacles & Alabama Hills workshop. Sign up today!

Chris Nicholson is a partner and workshop leader with National Parks at Night, and author of Photographing National Parks (Sidelight Books, 2015). Learn more about national parks as photography destinations, subscribe to Chris' free e-newsletter, and more at www.PhotographingNationalParks.com.

UPCOMING WORKSHOPS FROM NATIONAL PARKS AT NIGHT

How I Got the Shot: Dueling Dinos in Borrego Springs

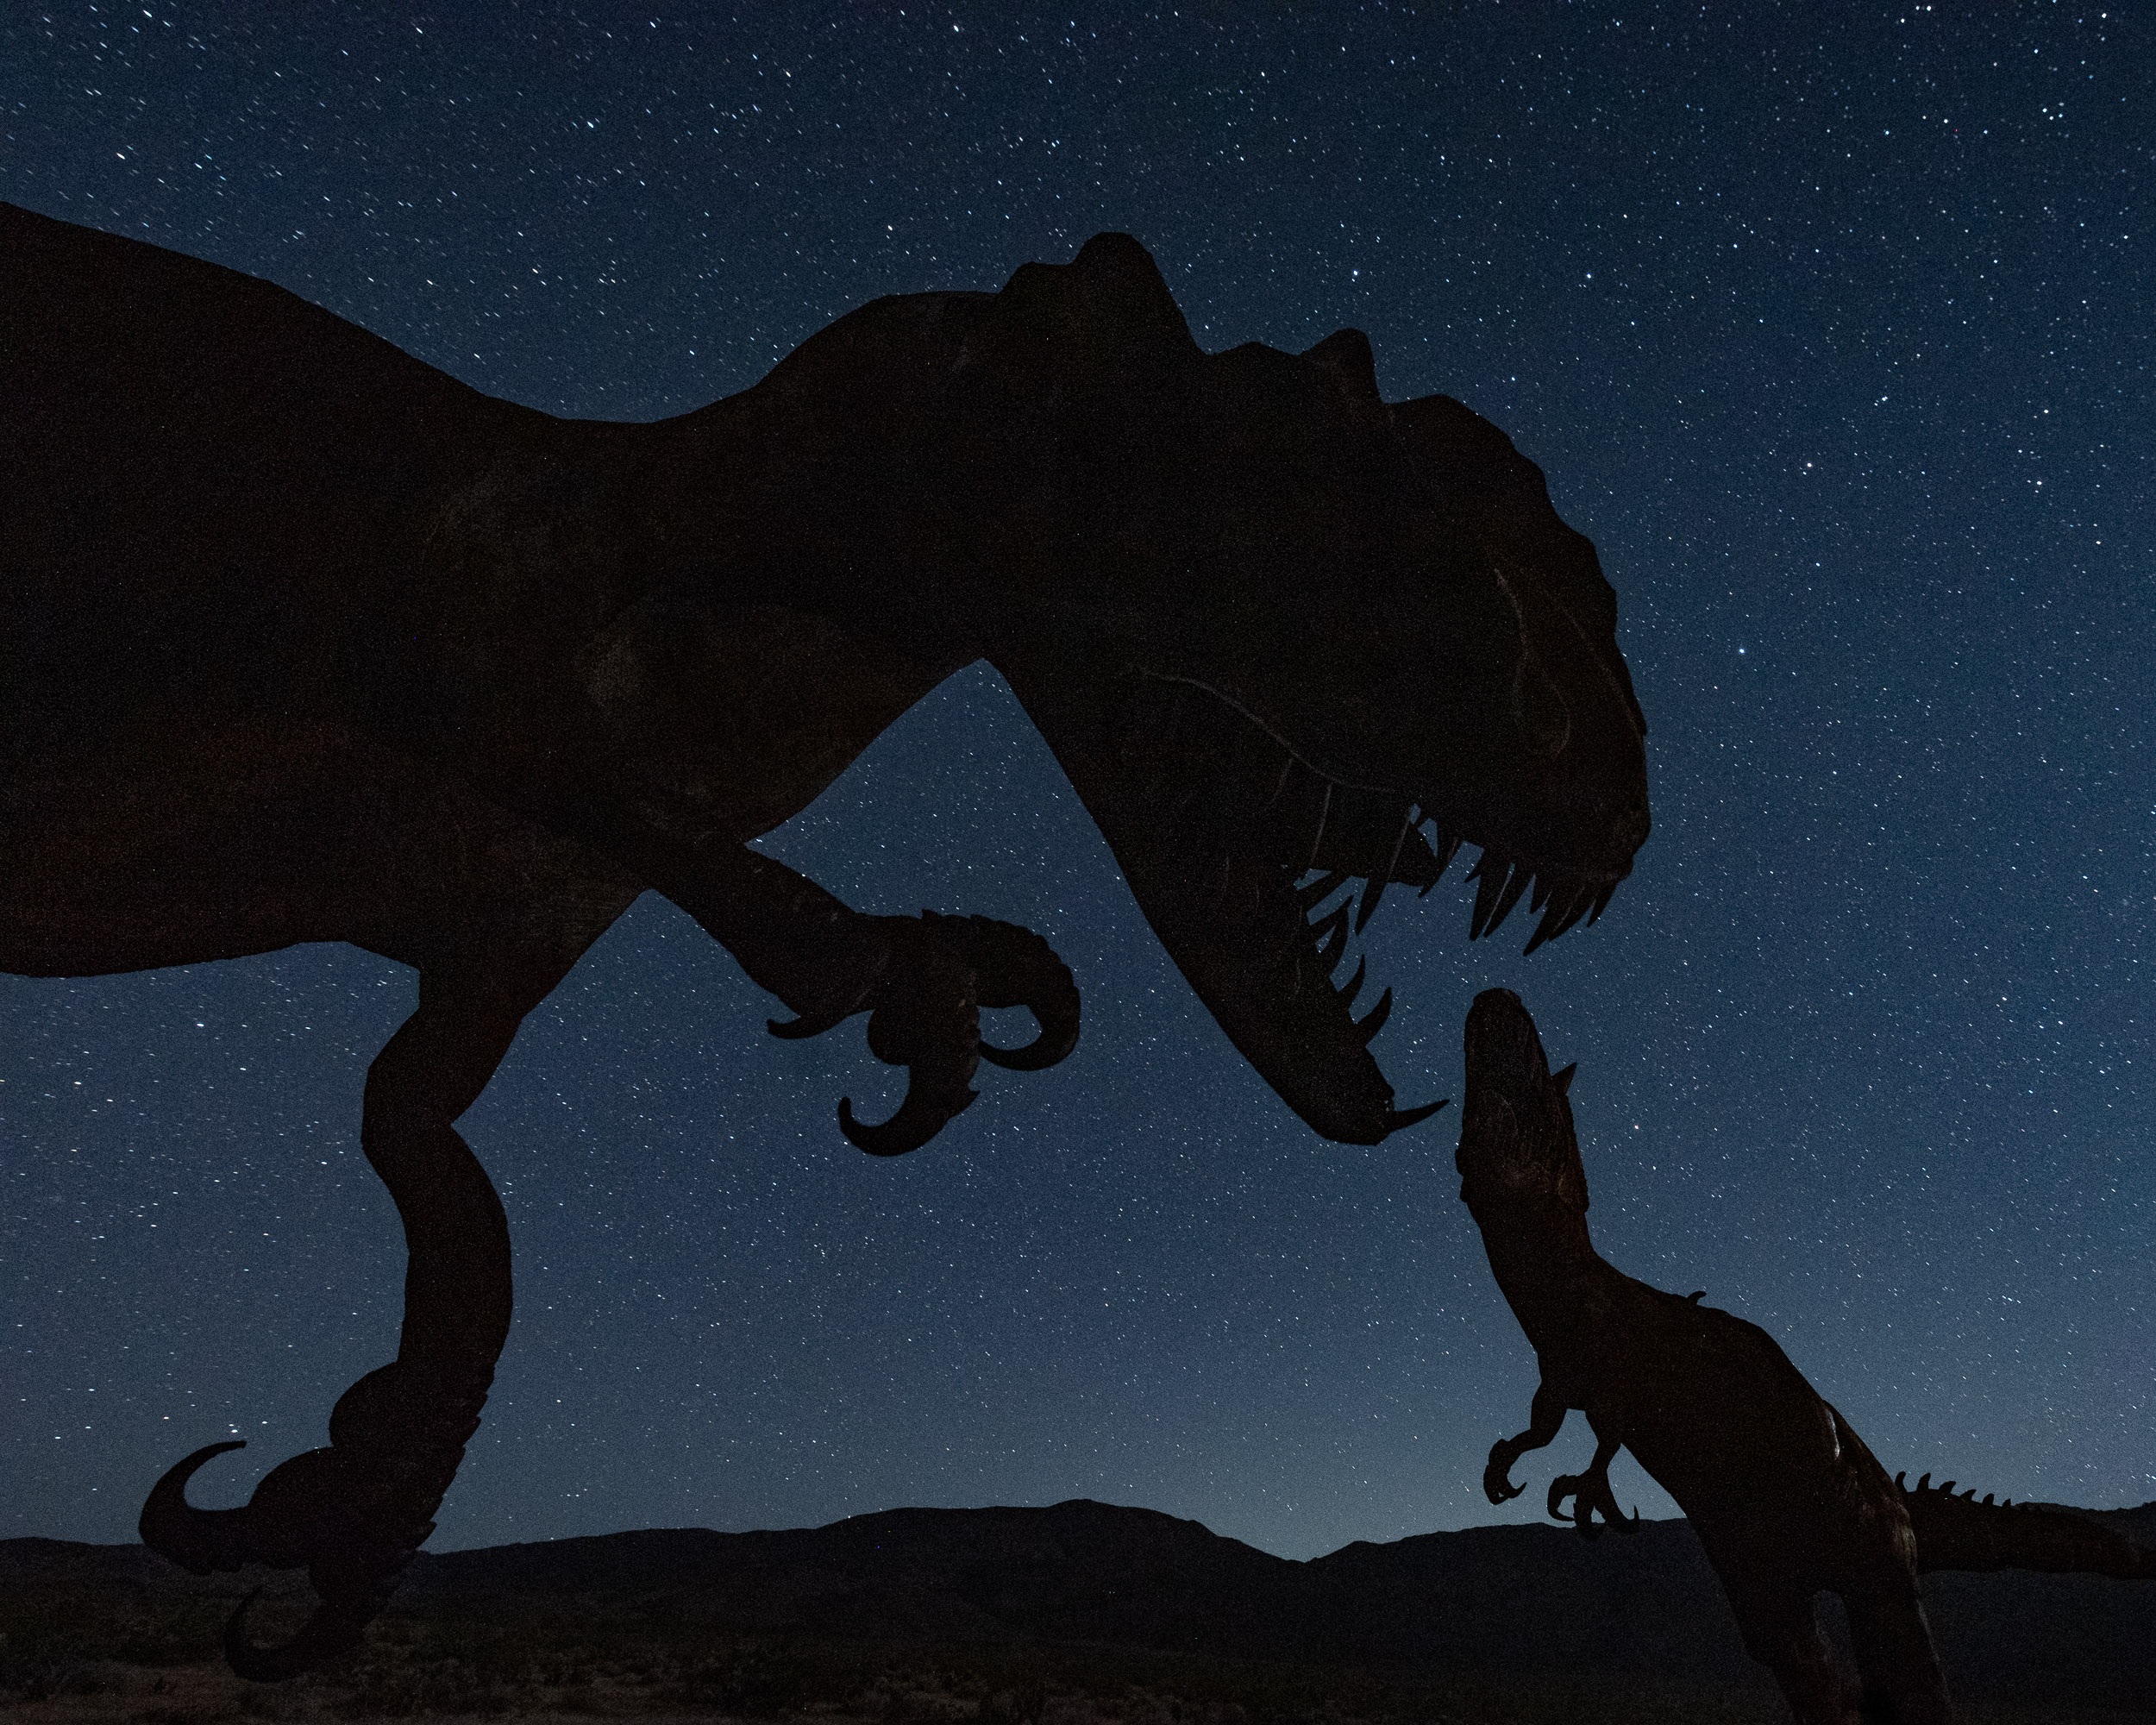
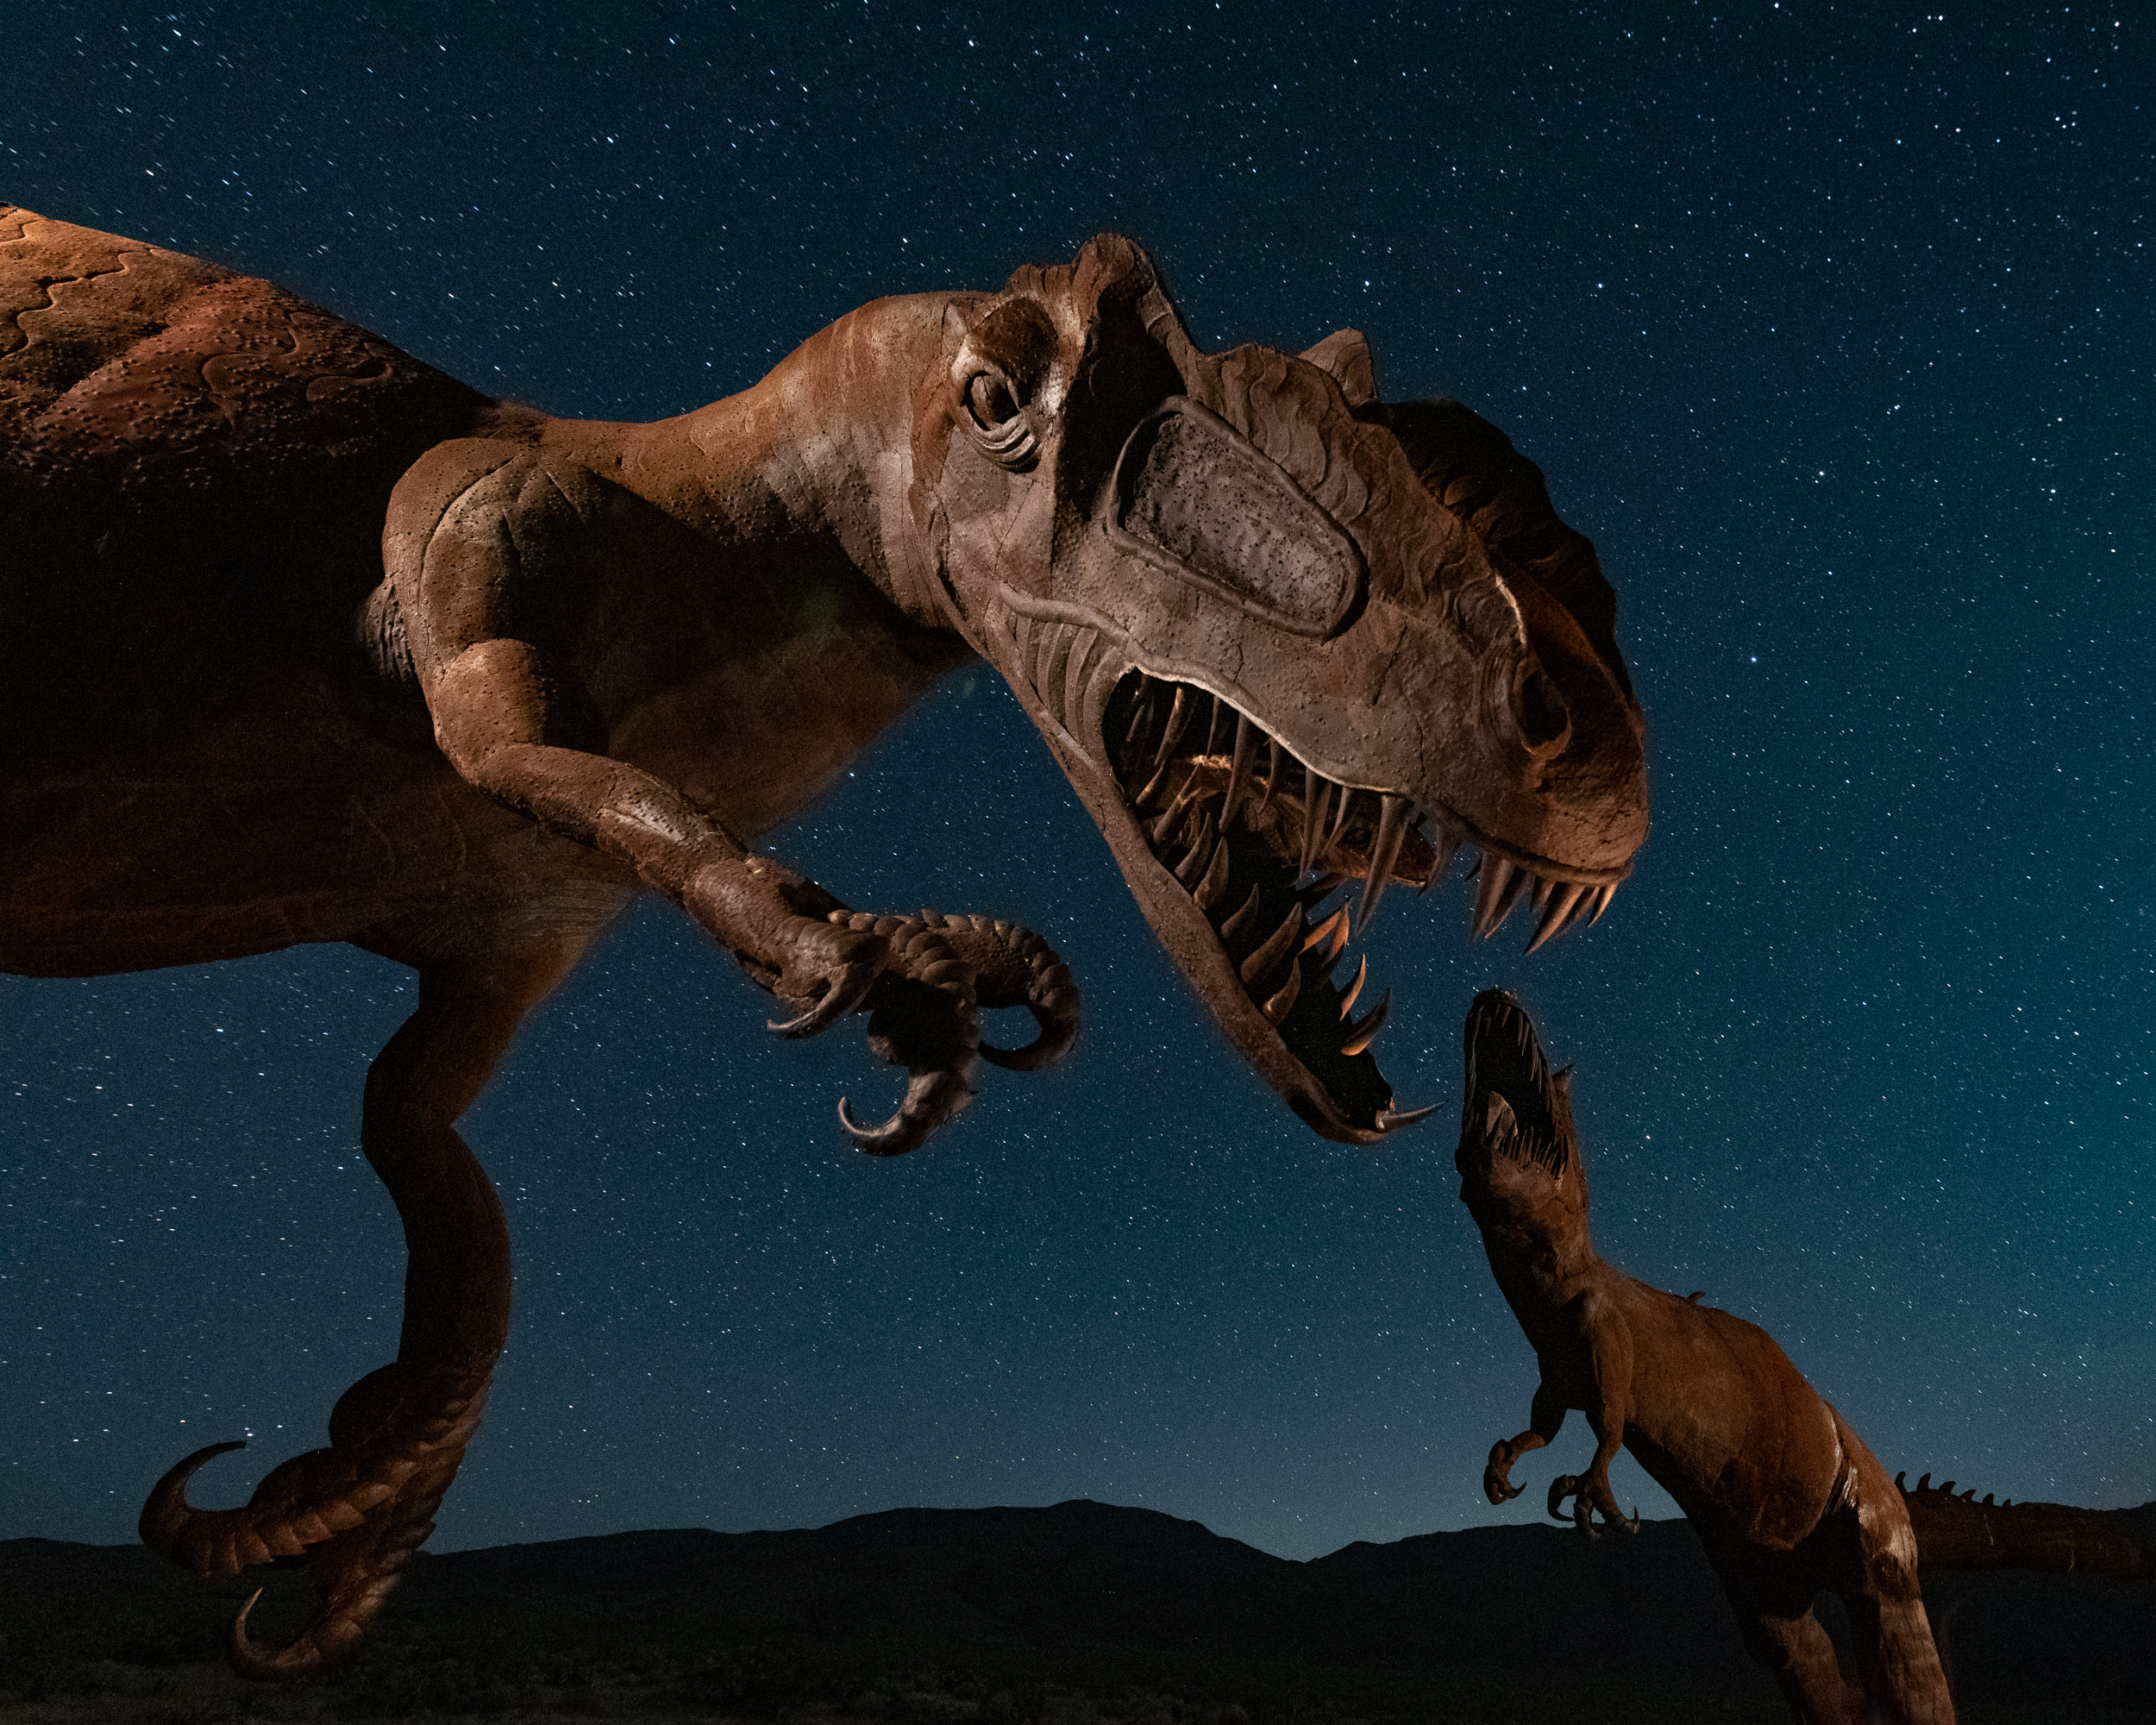
Dueling Dinosaurs, Borrego Springs, California. Nikon D750 with an Irix 15mm f/2.4 lens, lit with a Luxli Viola and Maglite Mini. 25 seconds, f/4.5, ISO 4000.

The Location

Ricardo Brecedaโ€™s metal sculptures in Borrego Springs, California, are intense and dramatic with or without light painting. They are incredibly fun to shoot. The 130 sculptures are spread out over about 8 miles of desert, but two of my favorites are a pair of giant dinosaurs that stand together in eternal battle.

The relationship between these two makes for some great composition options. The two dinosaurs are about the same size and roughly 40 or 50 feet apart, although they donโ€™t appear that way in these images. I set up the camera to make it look like the near dinosaur was about to bite off the head of the more distant one.

You can find Ricardoโ€™s two dinosaurs right here.

The Exposure

I was collaborating with Cutler Connaughton, one of our workshop participants when we partnered with Atlas Obscura this past May. We placed our cameras very close together, as there was very limited space to get the alignment just right.

After determining the composition, we focused and decided on the ambient exposure. I was using an Irix 15mm f/2.4 lens, which I can usually shoot at f/2.8 and get incredibly sharp results. But in this case I needed to stop down to f/4.5 for more depth of field. The 400 Rule told me that my longest usable shutter speed for star points with the 15mm was 25 seconds, so I set the ISO accordingly to get an adequate background exposure. Final exposure: 25 seconds, f/4.5, ISO 4000.

This is the final composition without any added light. I thought that it worked as a silhouette, but knew it could be improved with a suggestion of detail. I donโ€™t want to reveal everything with my lightingโ€”I want the viewer to be left with questions. If you have all of the answers with a quick glance, thereโ€™s no need to keep looking at the image, and I want to keep eyes on the picture as long as possible. Nikon D750 with an Irix 15mm f/2.4 lens. 25 seconds, f/4.5, ISO 4000.

The Lighting

This exposure left the dinosaurs completely silhouetted. We needed to add light.

We turned on a Luxli Viola and set it to 10 percent power and 3000 K, and mounted it on a hand-held Elinchrom boom arm. I wanted to use a warm color balance to bring out the rust color of the steel sculptures, which would contrast nicely with the cool natural light.

Ten percent brightness provided just enough intensity to accomplish what we needed during the exposure, while still providing a good amount of control over the added light. Turning up the power of the Luxli would have gotten the job done in less time, but would have been less forgiving if my positioning wasnโ€™t perfect while painting. Every decision I make when creating an image is a compromise, balancing the various elements required to make the shot work.

The Shoot

Cutler triggered both cameras, while I experimented with the lights.

We made a total of 47 exposures of this setup! Refining the composition took five frames, as we had to have our cameras nearly touching and the tripod legs overlapping to make it work. The rest of the exposures involved making slight modifications in the lighting. Itโ€™s not unusual for me to make six to 10 variations to get an image just right, but this one required a lot of perseverance.

The sequence of 47 exposures that Cutler and I made together. The final version actually occurred about two-thirds of the way through the sequence, but we kept at it because we werenโ€™t confident that we had what we were after.

The lighting involved four steps from four different positions, and three of the four steps were done with a single light source during the 25-second exposure. I could have set up multiple lights in fixed positions or lit each part of the scene in separate exposures, but I needed the exercise! I ran from one spot to the next over and over again, reviewing the results with Cutler and making mental notes each time for the next exposure.

The first light position was about two feet behind and over the right shoulder of the foreground dinosaur. This is the main light in the image, and even slight variations in position altered the overall appearance dramatically. The light was about 10 feet off the ground, which is why I was using the boom arm.

โ€œI couldnโ€™t tell you how much light was added from each position, but I had good control over the process, and thatโ€™s whatโ€™s important.โ€

The second light position was just out of the frame from camera-right, and slightly behind the foreground dinosaur. The purpose here was to backlight the teeth of the beast to emphasize its ferociousness.

For the third position, I ran further to the right and behind the second dinosaur to light that one. I wanted to show texture as well as detail, so it was important to light from an oblique angle.

Cutler took care of the last detail (from the fourth position), which was to light the left claw of the foreground dinosaur with an incandescent Maglite Mini flashlight, just enough to separate it from the background. The color balance of the Maglite Mini is a little warmer than the Luxli, but against the monochromatic rusted steel, this isnโ€™t noticeable. If Cutler had been using an LED light, the color difference would have been obvious. The mini-Mag was a good choice for this task also because it was both dim and focusable.

I recommend that people count seconds in their head when they light paint to get a repeatable and consistent effect in the image. Iโ€™ve been doing this for so long that I work by what feels right rather than actually timing the light in each position. For this image, I couldnโ€™t tell you how much light was added from each position, but I had good control over the process, and thatโ€™s whatโ€™s important.

The final image, before and after being lit as described in the text. Nikon D750 with an Irix 15mm f/2.4 lens. 25 seconds, f/4.5, ISO 4000.

Location Lighting  vs. Light Painting

Other photographers might have approached this scene differently. Most would probably not have run around tripping over rocks and waving a light on a stick in the dark, but thatโ€™s just the way I roll.

Using fixed-position lights on stands would certainly lead to more consistent results, and most likely fewer overall exposures to get to the end result. To me though, that is simply location lighting, and not light painting. The difference is more than just semanticsโ€“โ€“light painting is an active process that requires a different skill set than location lighting. Both are valid approaches, but the former is what makes my creative juices flow.

The line between light painting and location lighting has blurred in recent years. The term Low-level Landscape Lighting (LLL) has come to be used to describe static lighting in astro-landscape photography (ALP). This is partly out of necessity, and partly due to the development of new technologies such as the Luxli panel light.

When working at the high ISOs required for star points in ALP, itโ€™s difficult to light from multiple positions during a brief 15- to 30-second exposure. With short exposures at high ISOs, itโ€™s also hard to control traditional light painting tools like the venerable Coast flashlights, because they are just too bright for such a sensitive sensor. The amount of time required to adequately illuminate most subjects with a bright light at ALP settings is just a fraction of a second.

This is an outtake, initially overlooked because I was excited about the original concept. This one was made at the very end of the sequenceโ€”it was actually the last shot of the night. After I felt like I had finally nailed the shot we were originally going for, I decided to try a couple of other ideas just to see what would happen. Which one do you like better? Nikon D750 with an Irix 15mm f/2.4 lens. 25 seconds, f/4.5, ISO 4000.

Final Thoughts

I always tell our workshop participants that there is no wrong or right way to do things in night photography. Thatโ€™s what makes this such a great mediumโ€“โ€“itโ€™s incredibly flexible and adaptable to different visions. I donโ€™t try to teach people to do what I do, but how to develop their own techniques and methods to make images that get them excited.

The bottom line is that it doesnโ€™t matter if you do long or short exposures at low or high ISOs, or light with flashlights, strobes or an army of Luxli lights. What does matter is that photographers find a way of working that leads them to grow and that leads them to images that excite them.

Lance Keimig is a partner and workshop leader with National Parks at Night. He has been photographing at night for 30 years, and is the author of Night Photography and Light Painting: Finding Your Way in the Dark (Focal Press, 2015). Learn more about his images and workshops at www.thenightskye.com.

UPCOMING WORKSHOPS FROM NATIONAL PARKS AT NIGHT