moonlight

How I Got the Shot: Moon Over Alabama Hills

Moon Over Alabama Hills. Nikon Z 6 with a Nikon Z 24-70mm f/4 lens, light painted with a Luxli Viola. Two stacked frames shot at 5 minutes, f/8, ISO 200 (foreground) and 10 seconds, f/8, ISO 6400 (sky).

The Location

Alabama Hills National Scenic Area encompasses a range of rock formations to the east of California’s Sierra Nevada Mountains. It’s a huge draw for people with cameras of all sorts. Television and movie productions—especially Westerns—have been filmed there since the 1920s. Photographers have been going there since landscapes were a thing to shoot. And night photographers (light painters in particular) love the rocky scenery and the very dark skies.

Mobius Arch, Alabama Hills. A great example of the area’s fantastical scenery. Canon EOS-1DS with a 16mm lens. 1/90, f/13, ISO 100.

The Moon

For many, the moon is an unwelcome addition to our night sky. Its presence makes nighttime landscapes look like day, overpowers the Milky Way and obscures all but the brightest stars. But while initially the moon may seem like a problem, it can also provide opportunities for other styles of night photography. In addition, embracing moonlight will expand your shooting time to more than just the one moonless week every month.

One aspect of shooting with the moon present is accepting you’ll have fewer stars in the sky. That’s OK. You can create star-filled skies later in the month, during a new moon. Brighter moonlit situations give us a chance to put more emphasis on the landscape instead of the sky.

Begin by choosing compelling subjects that you might photograph during the day. For example, I’ve always been fascinated by the metamorphic rock found throughout the Alabama Hills in the High Sierra. In this image I really wanted to emphasize both the texture and the gentle curves of these magnificent formations. Last month’s waxing gibbous moon provided exactly this opportunity.

The Ambient Exposure

My goal was to accentuate the foreground shapes and to have the moon render like a starburst. So first (as usual) I began by using ISO 6400 for a series of test shots. This allowed me to fine-tune my composition and to determine my base (ambient) exposure of 10 seconds at f/8.

This exposure was short enough for the moon to remain round and for the stars to render as dots rather than dashes (Figure 1). Also, using a 24mm wide-angle lens allowed me to create a starburst effect without having to stop down too much (the longer a lens is, the more you need to stop down to create the star effect).

In short, 10 seconds, f/8, ISO 6400 was a perfect exposure for the sky, stars and moon.

Figure 1. The relatively short exposure kept the moon round and the stars sharp. A longer exposure would have had the opposite affect: The moon would have become oblong and the stars would have begun to trail.

The Light Painting

Once the ambient exposure was established, I began looking at how the light was illuminating my foreground. The full moon over this small cliff face created the perfect backlighting to accentuate the curves and texture of the foreground rocks. However, it also put the entire cliff face into shadow.

To fix this problem I placed a tripod with a Luxli Viola light panel just off camera-right, about 30 yards in front of me. This placement provided texture-revealing sidelight on the cliff face and helped fill in the foreground shadow (Figure 2).

The next step was to balance the Viola with the moon. I began by setting the panel’s brightness to 25 percent. But … oops! That made the image look fake, as the exposure on the back wall was way too bright. I lowered the setting to 12 and shot again, which provided just the right amount of light to make the scene somewhat more believable.

Figure 2. The sidelight from the Luxli Viola brings out the texture in the cliff face.

The Color Temperature

The next problem to solve was the color. For most night photography (including moonlit scenes) I set my camera’s white balance to 3800 K. This renders the sky to my tastes. Remember though, white balance is quite subjective. Some folks like night skies to appear more blue, while others like a more neutral sky. There is no right or wrong. You should always consider white balance suggestions as a starting point.

Because I was using a camera white balance setting of 3800 K, I set my Luxli’s color temperature to 3800 K to match. After a couple of more test shots I realized that this setting made the added light a bit warmer than the moonlight that was kissing the foreground. Increasing the Luxli’s color temperature to 5500 K better matched the color of the moonlight, which made the whole scene appear a bit more natural.

The Final Frame

I had shot all my test frames with an ISO of 6400 to shorten the time between tests. But while ISO 6400 was great for the sky and testing, I wanted a higher-quality, lower-ISO exposure for my foreground rocks. For this I turned to the Six-Stop Rule.

The Six-Stop Rule is a shortcut to translate a short, high ISO test exposure into a longer, low ISO exposure. The rule is simple: The amount of seconds it takes to create a good exposure at ISO 6400 equals the number of minutes at ISO 100. For example, 10 seconds, f/8, ISO 6400 equals 10 minutes, f/8, ISO 100. Both of those exposures allow the same amount of light to hit the sensor.

In this case, I didn’t want to wait 10 minutes, so I used an equivalent exposure of 5 minutes, f/8, ISO 200. Using this exposure didn’t change anything about the lighting. Because both the moonlight and the Luxli are constant light sources, lowering the ISO and lengthening the shutter speed provided identical exposures where the light level looked exactly the same. The only difference, of course, was that the longer exposure showed movement in the stars and moon.

Putting it All Together

The final image. Moon Over Alabama Hills. Nikon Z 6 with a Nikon Z 24-70mm f/4 lens, light painted with a Luxli Viola. Two stacked frames shot at 5 minutes, f/8, ISO 200 (foreground) and 10 seconds, f/8, ISO 6400 (sky).

Many times the final image comes together with advance knowledge of how you’ll proceed, while other times the creation process evolves during the process. In this case, a bit of both happened.

I knew I wanted to use the moon as the main light to accentuate the foreground rocks and also to create a moon star and keep the stars sharp. I achieved that through the initial ISO 6400 test images. During those tests, I realized that I needed to add some fill light to the back wall in shadow. So out came the Luxli light panel. Setting the light panel to the same color temperature as my camera produced a warmer light than the moon was providing, so I upped the K setting to 5500.

After lowering the ISO to create a higher-quality rendering of the rocks and wall, the last step was in Photoshop: A simple layer-and-mask blend of the foreground and background.

Tim Cooper is a partner and workshop leader with National Parks at Night. Learn more techniques from his book The Magic of Light Painting, available from Peachpit.

UPCOMING WORKSHOPS FROM NATIONAL PARKS AT NIGHT

(No, We’re Not Crazy) Why You Should Use a Circular Polarizer at Night

I had another “What if?” moment, dear readers.

It was this: What if I use a circular polarizer at night?

My mind boggled. It balked. It basically said, “There are tons of reasons you should not even consider doing that.”

Such as:

  • You’ll lose up to 1.5 stops of light! My precious light …

  • It’s going to be hard to see the effect through the lens.

  • A polarizer is another thing to carry and/or take care of. (Have you seen my backpack? I call it the “kitchen sink.”)

  • Your sensor will capture fewer stars—perhaps?

  • You may be disappointed.

So What?

Despite all those naysaying, braying voices in my head, I set about scraping out some moments during our Rocky Mountain National Park workshop to run some experiments.

Why? Well, I know polarizers have these positive traits:

  • minimized reflections, making water easier to see through

  • more vibrant colors and deeper saturation

  • reduced highlights, which puts more of the exposure inside the dynamic range of my camera

  • eliminating or reducing off-axis light

That last one was really exciting to me, as we would have lots of moon at Rocky Mountain, as well as at our workshop immediately afterward at Chaco Culture National Historical Park.

Maybe, just maybe, I could make a polarizer do something useful—or even something amazing.

Note: Since my polarizer was a screw-in 95mm, I did not go through the hassle of removing it during tests. I simply set it to minimum effect for the “before” images and maximum effect for the “after” images.

Testing My Hypothesis on Star Trails

So I set out to test my hunch that it would work. After all, it’s just science, right?

On our final day of the workshop, we embarked on an add-on adventure with five attendees, during which we hiked with our gear almost 2 miles (one way) with 650 feet of elevation gain at over 8,000 feet of altitude. It was challenging, but we did it.

Our first shoot location, Emerald Lake, had a moon shadow slipping around to the right. The moon was at my left shoulder—ideal conditions to make a polarizer work.

Tip: Polarizers work best when used perpendicular to the light source (90 degrees). So keep the moon (or sun, if you are so inclined), on your right or left shoulder.

I set the polarizer to minimum effect:

Nikon D850, Zeiss 15mm Distagon f/2.8. 30 sec, f/2.8, ISO 6400.

Exactly what I’d expected. Not a lot of stars. So I turned off my camera, peeped through the viewfinder, turned the polarizer and found the area of deepest effect:

Nikon D850, Zeiss 15mm Distagon f/2.8. 30 seconds, f/2.8, ISO 6400.

I was so excited (and it was so cold) that I settled into a sequence of eight 7.5-minute exposures, totaling one hour:

Nikon D850, Zeiss 15mm Distagon f/2.8. Eight frames at 7.5 minutes, f/2.8, ISO 6400.

Booyah. Many stars, despite shooting with broad moonlight. It worked!

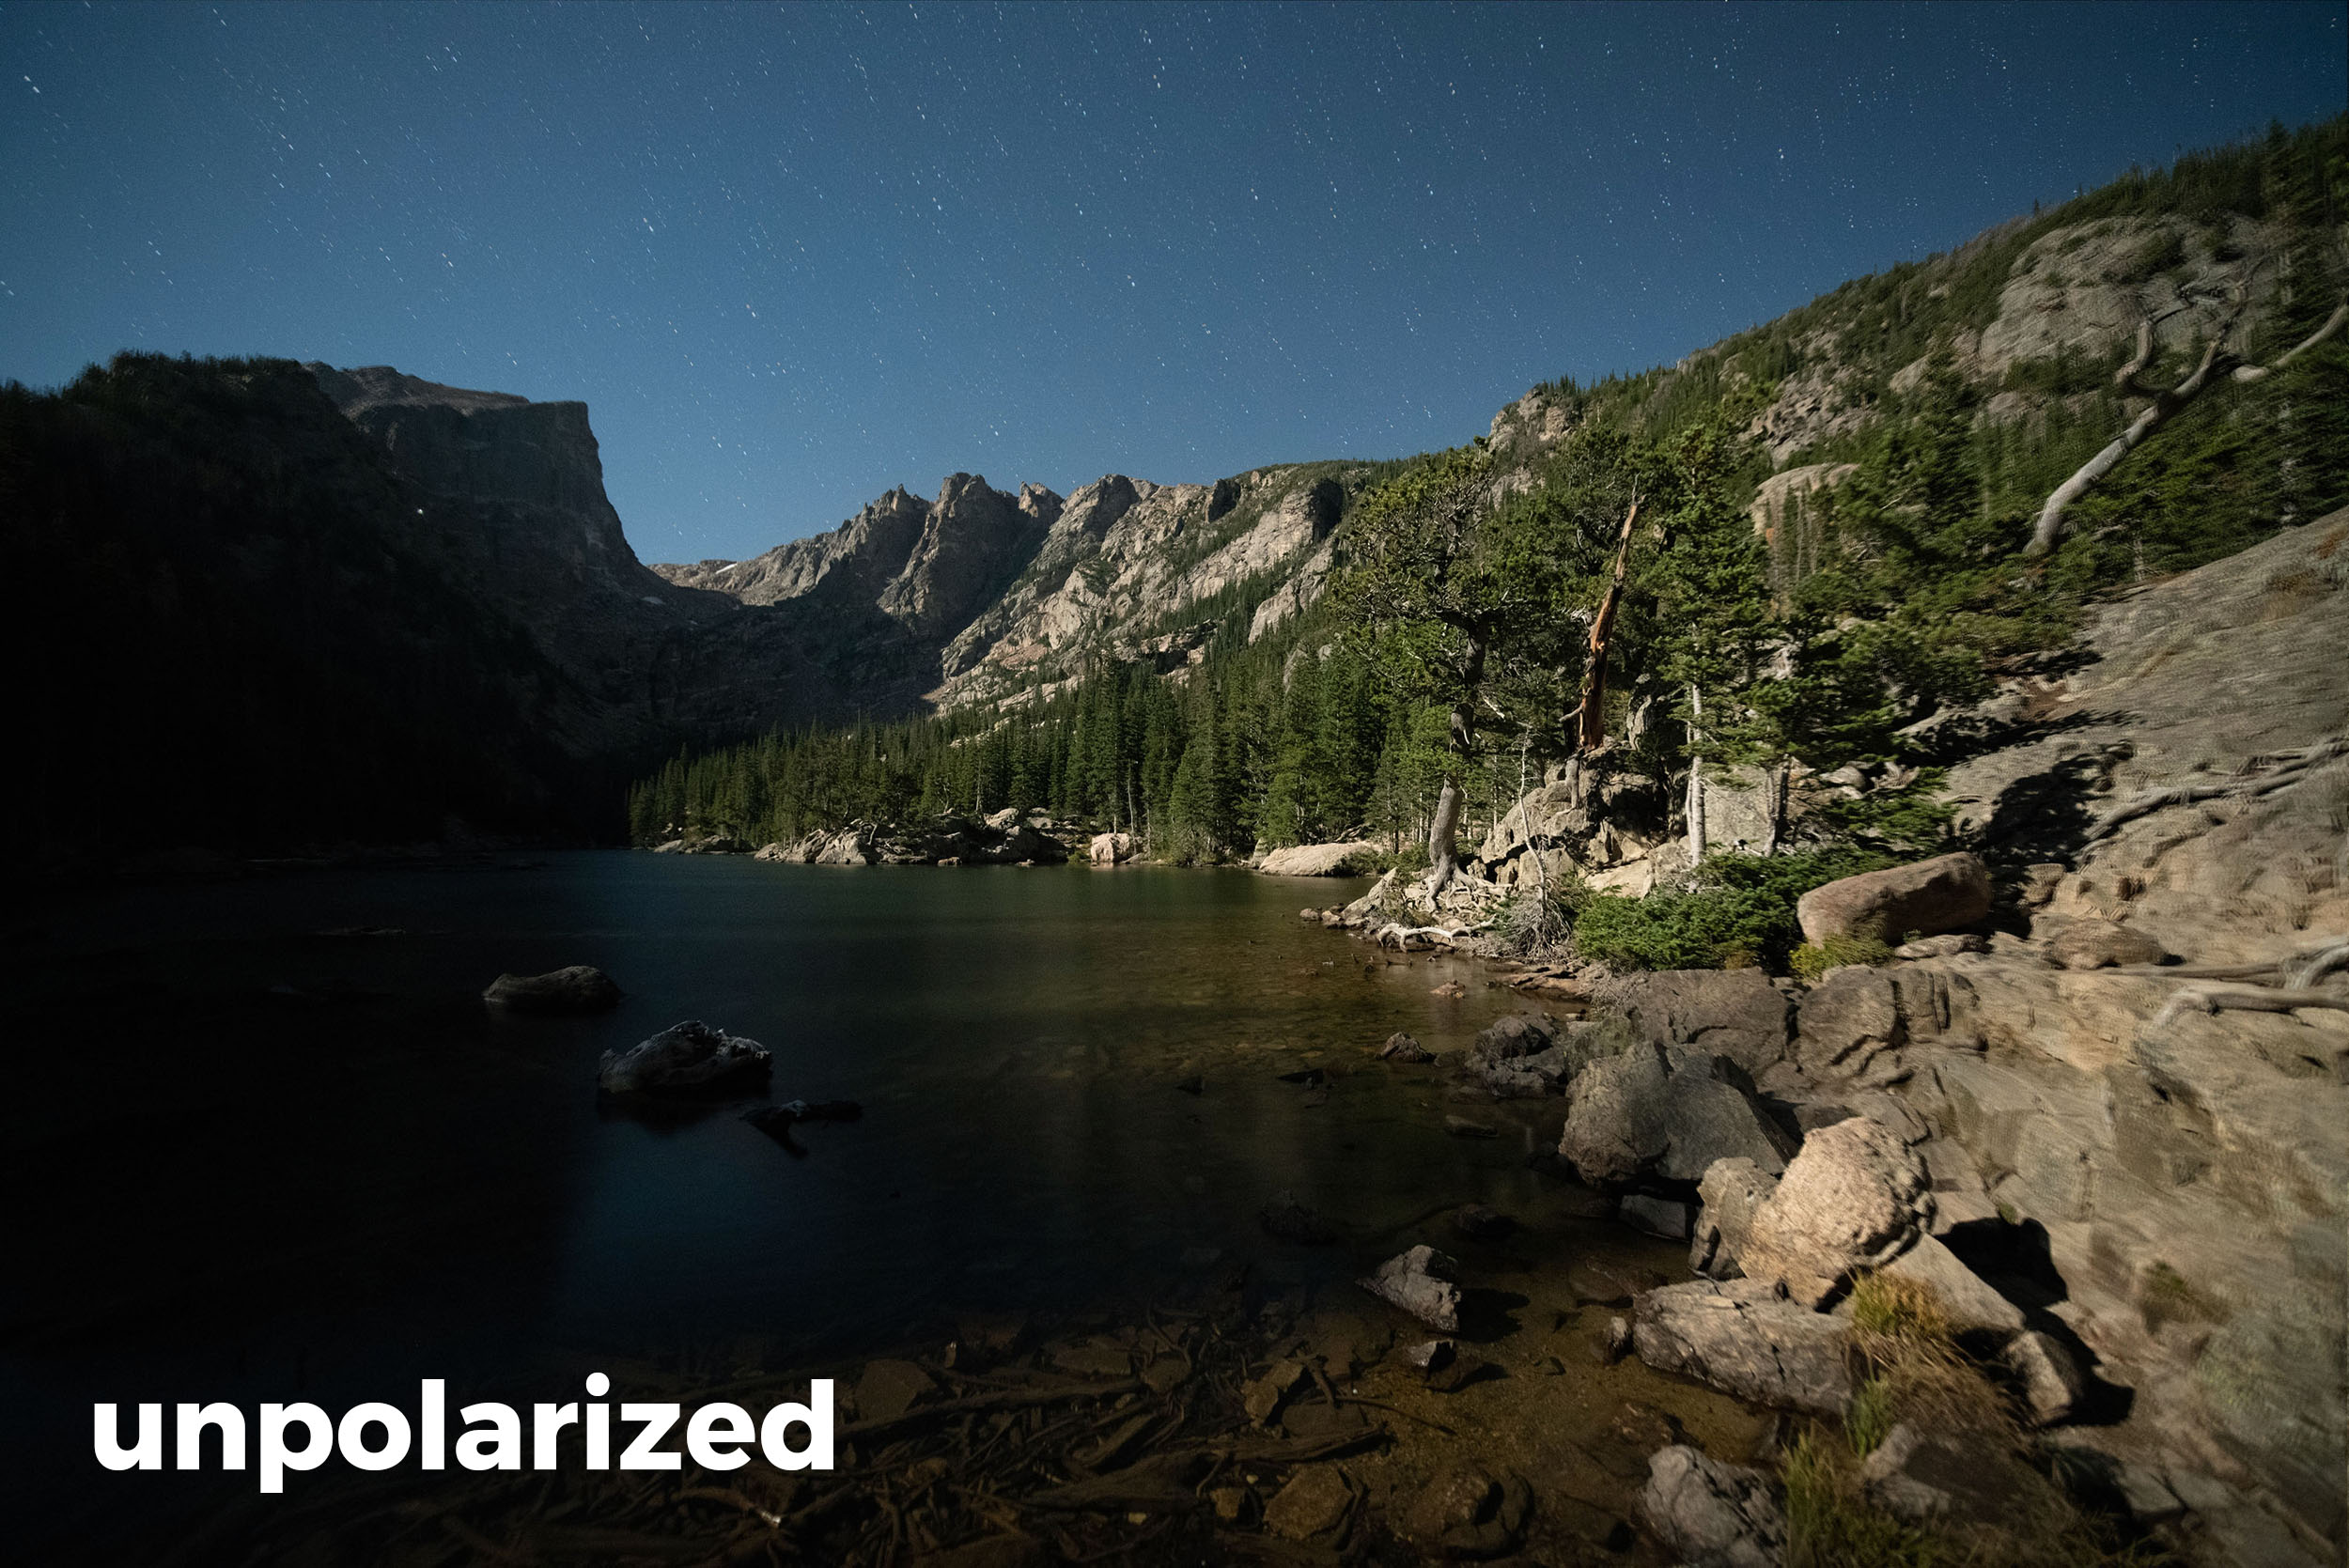
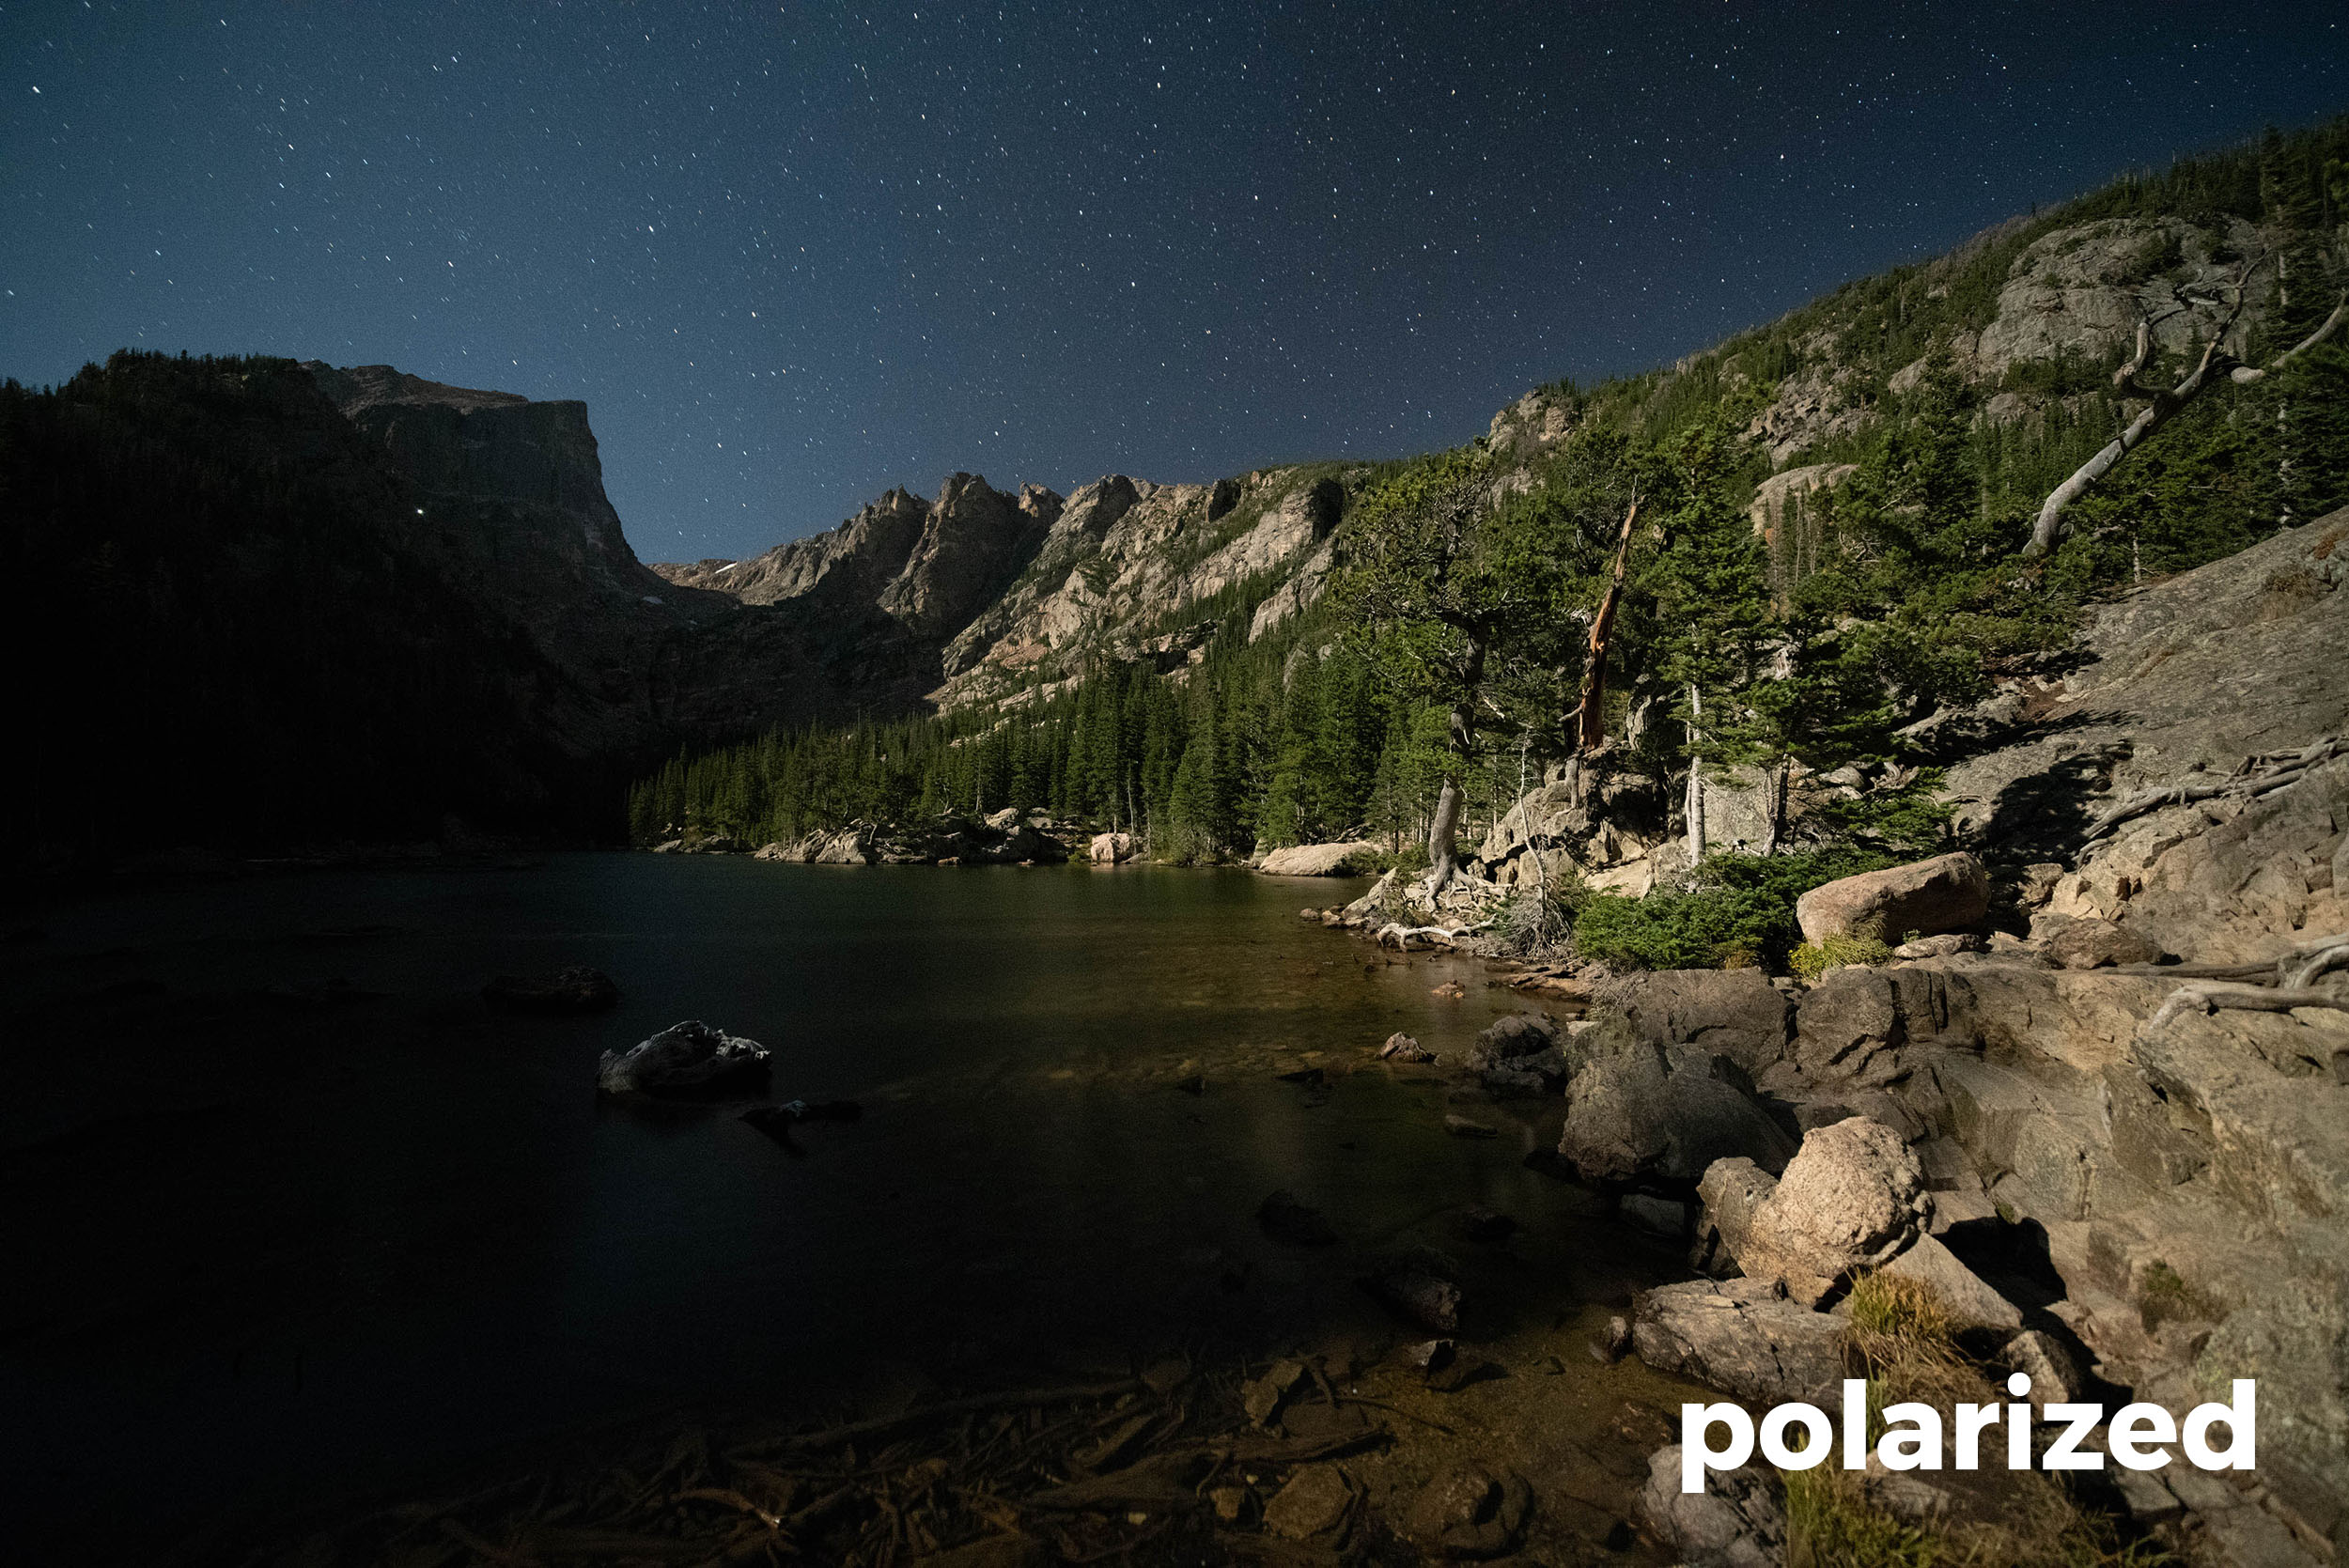
As we started hiking back down, we stopped at Dream Lake. I wandered to the south end of the lake with a student and set up another test, this time with stiller water. (There had been crazy wind up at Emerald Lake.) I ran two high ISO tests at 15 seconds, f/2.8, ISO 6400:

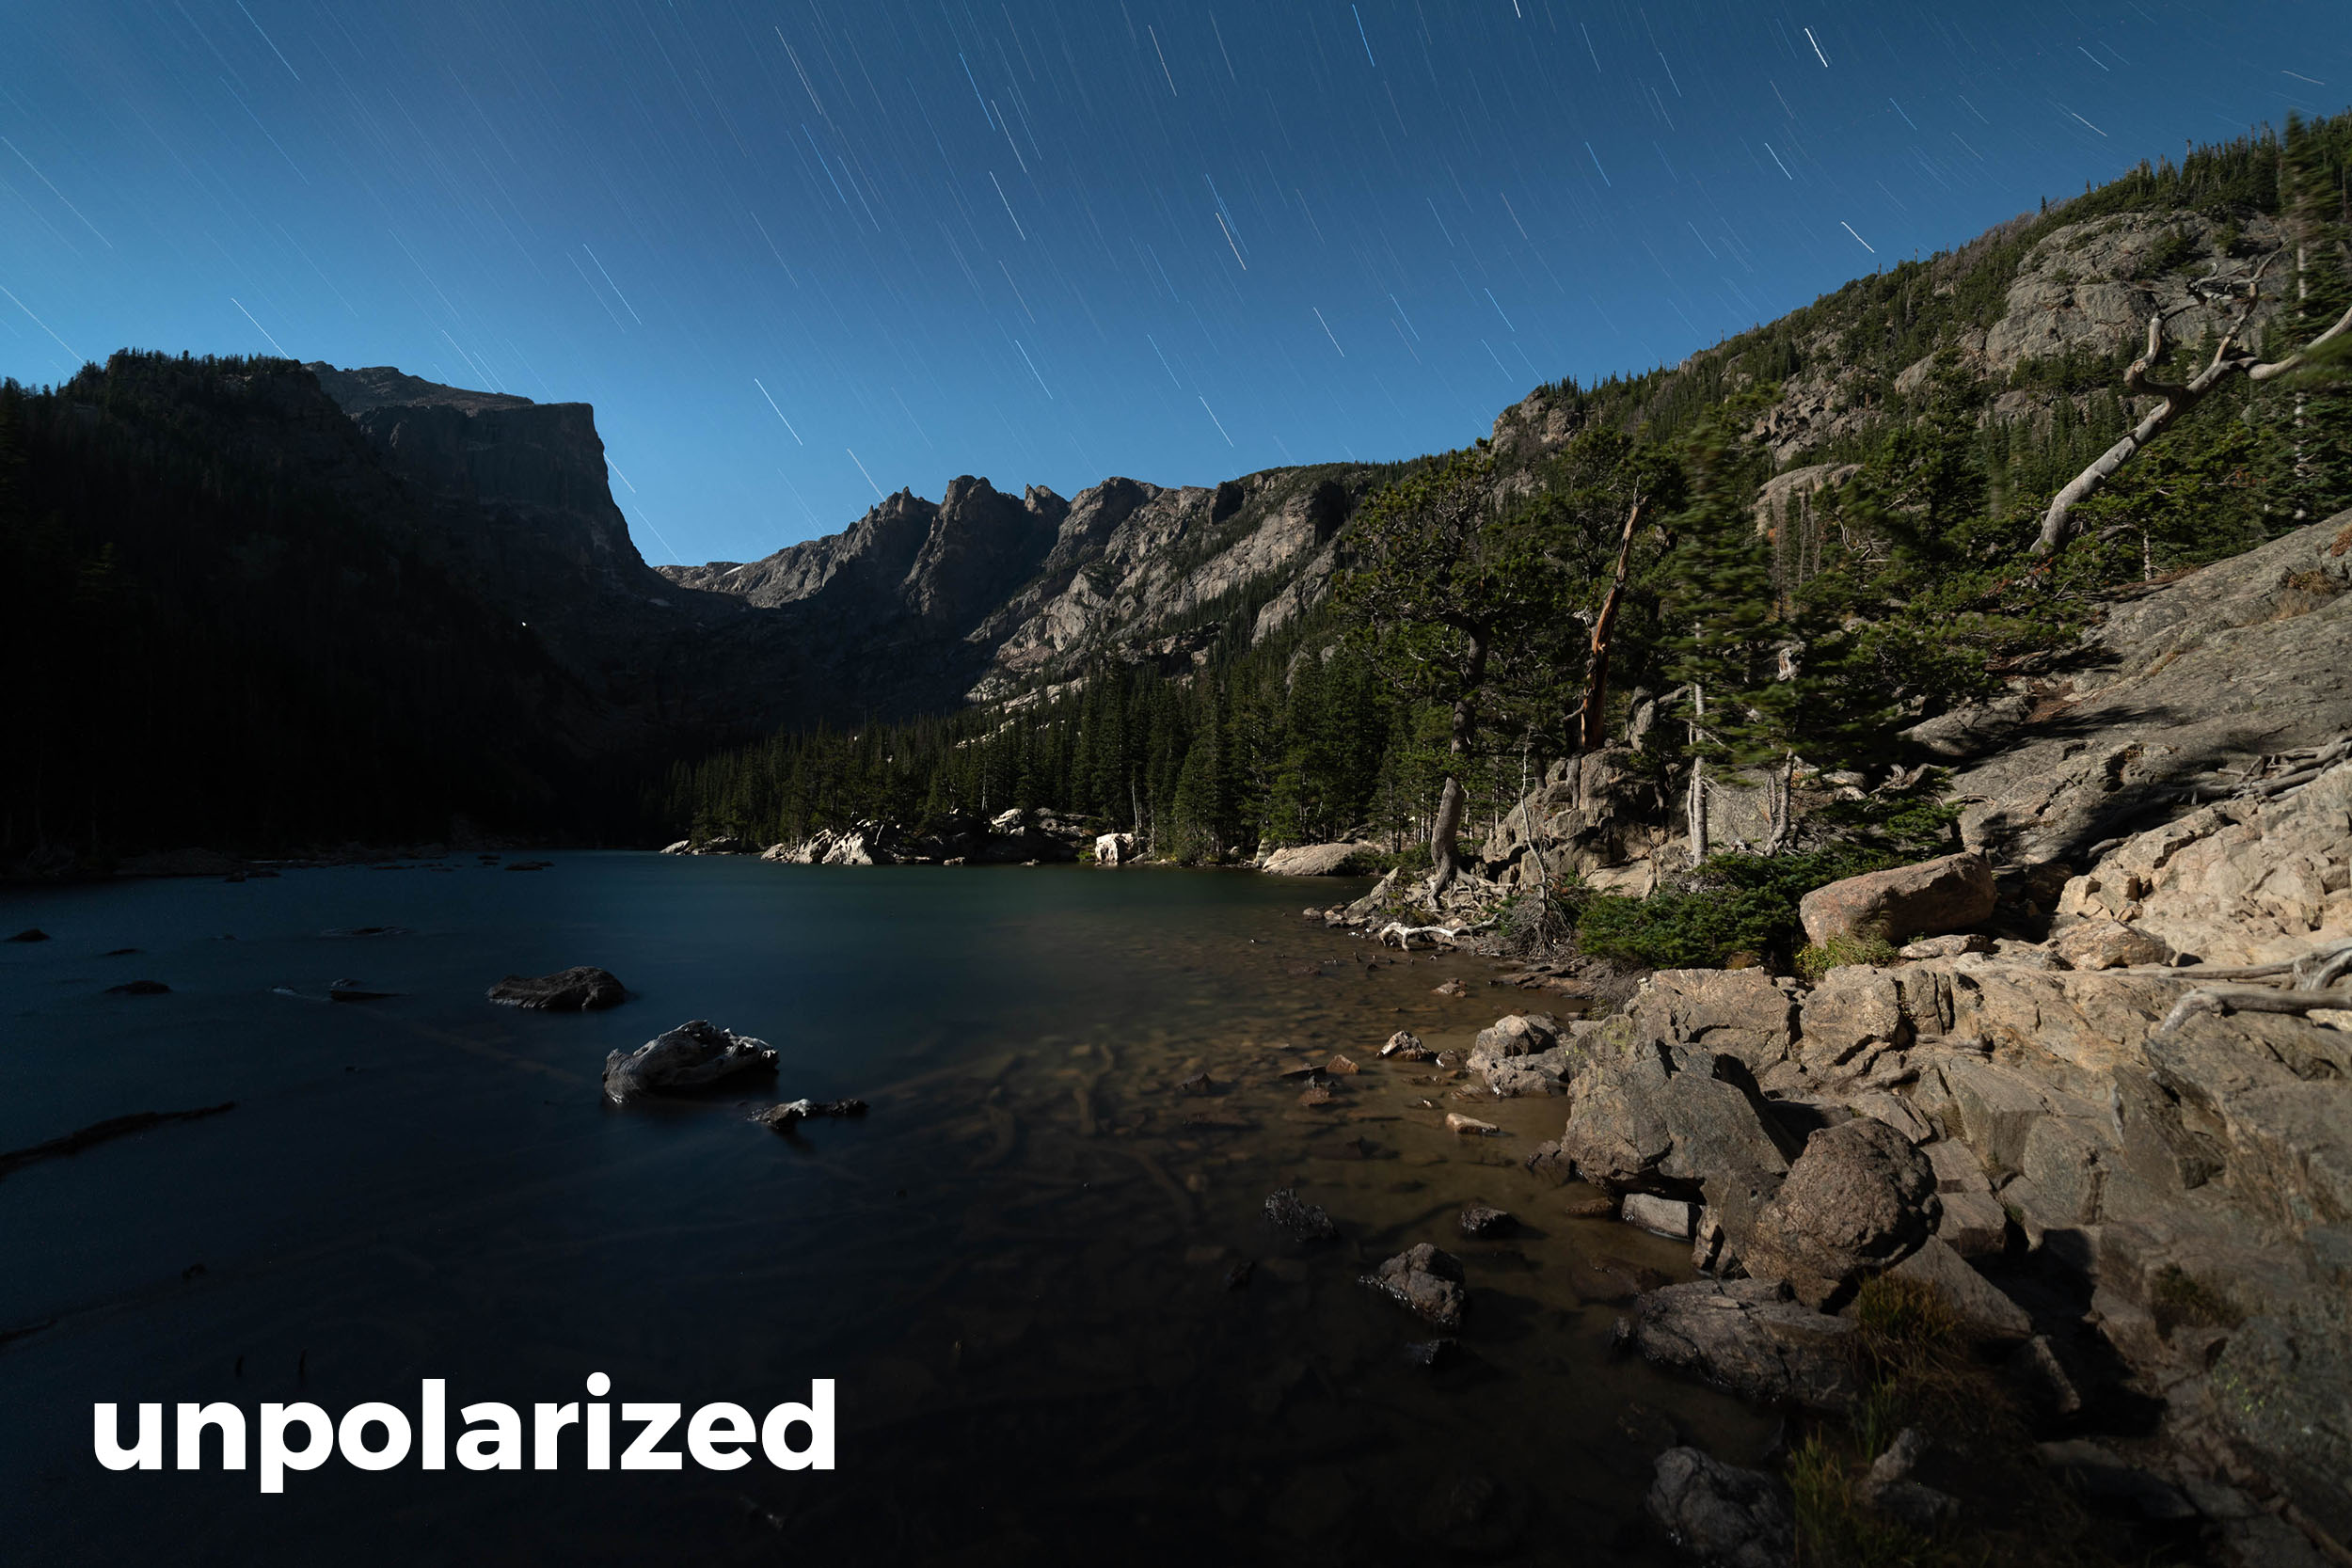
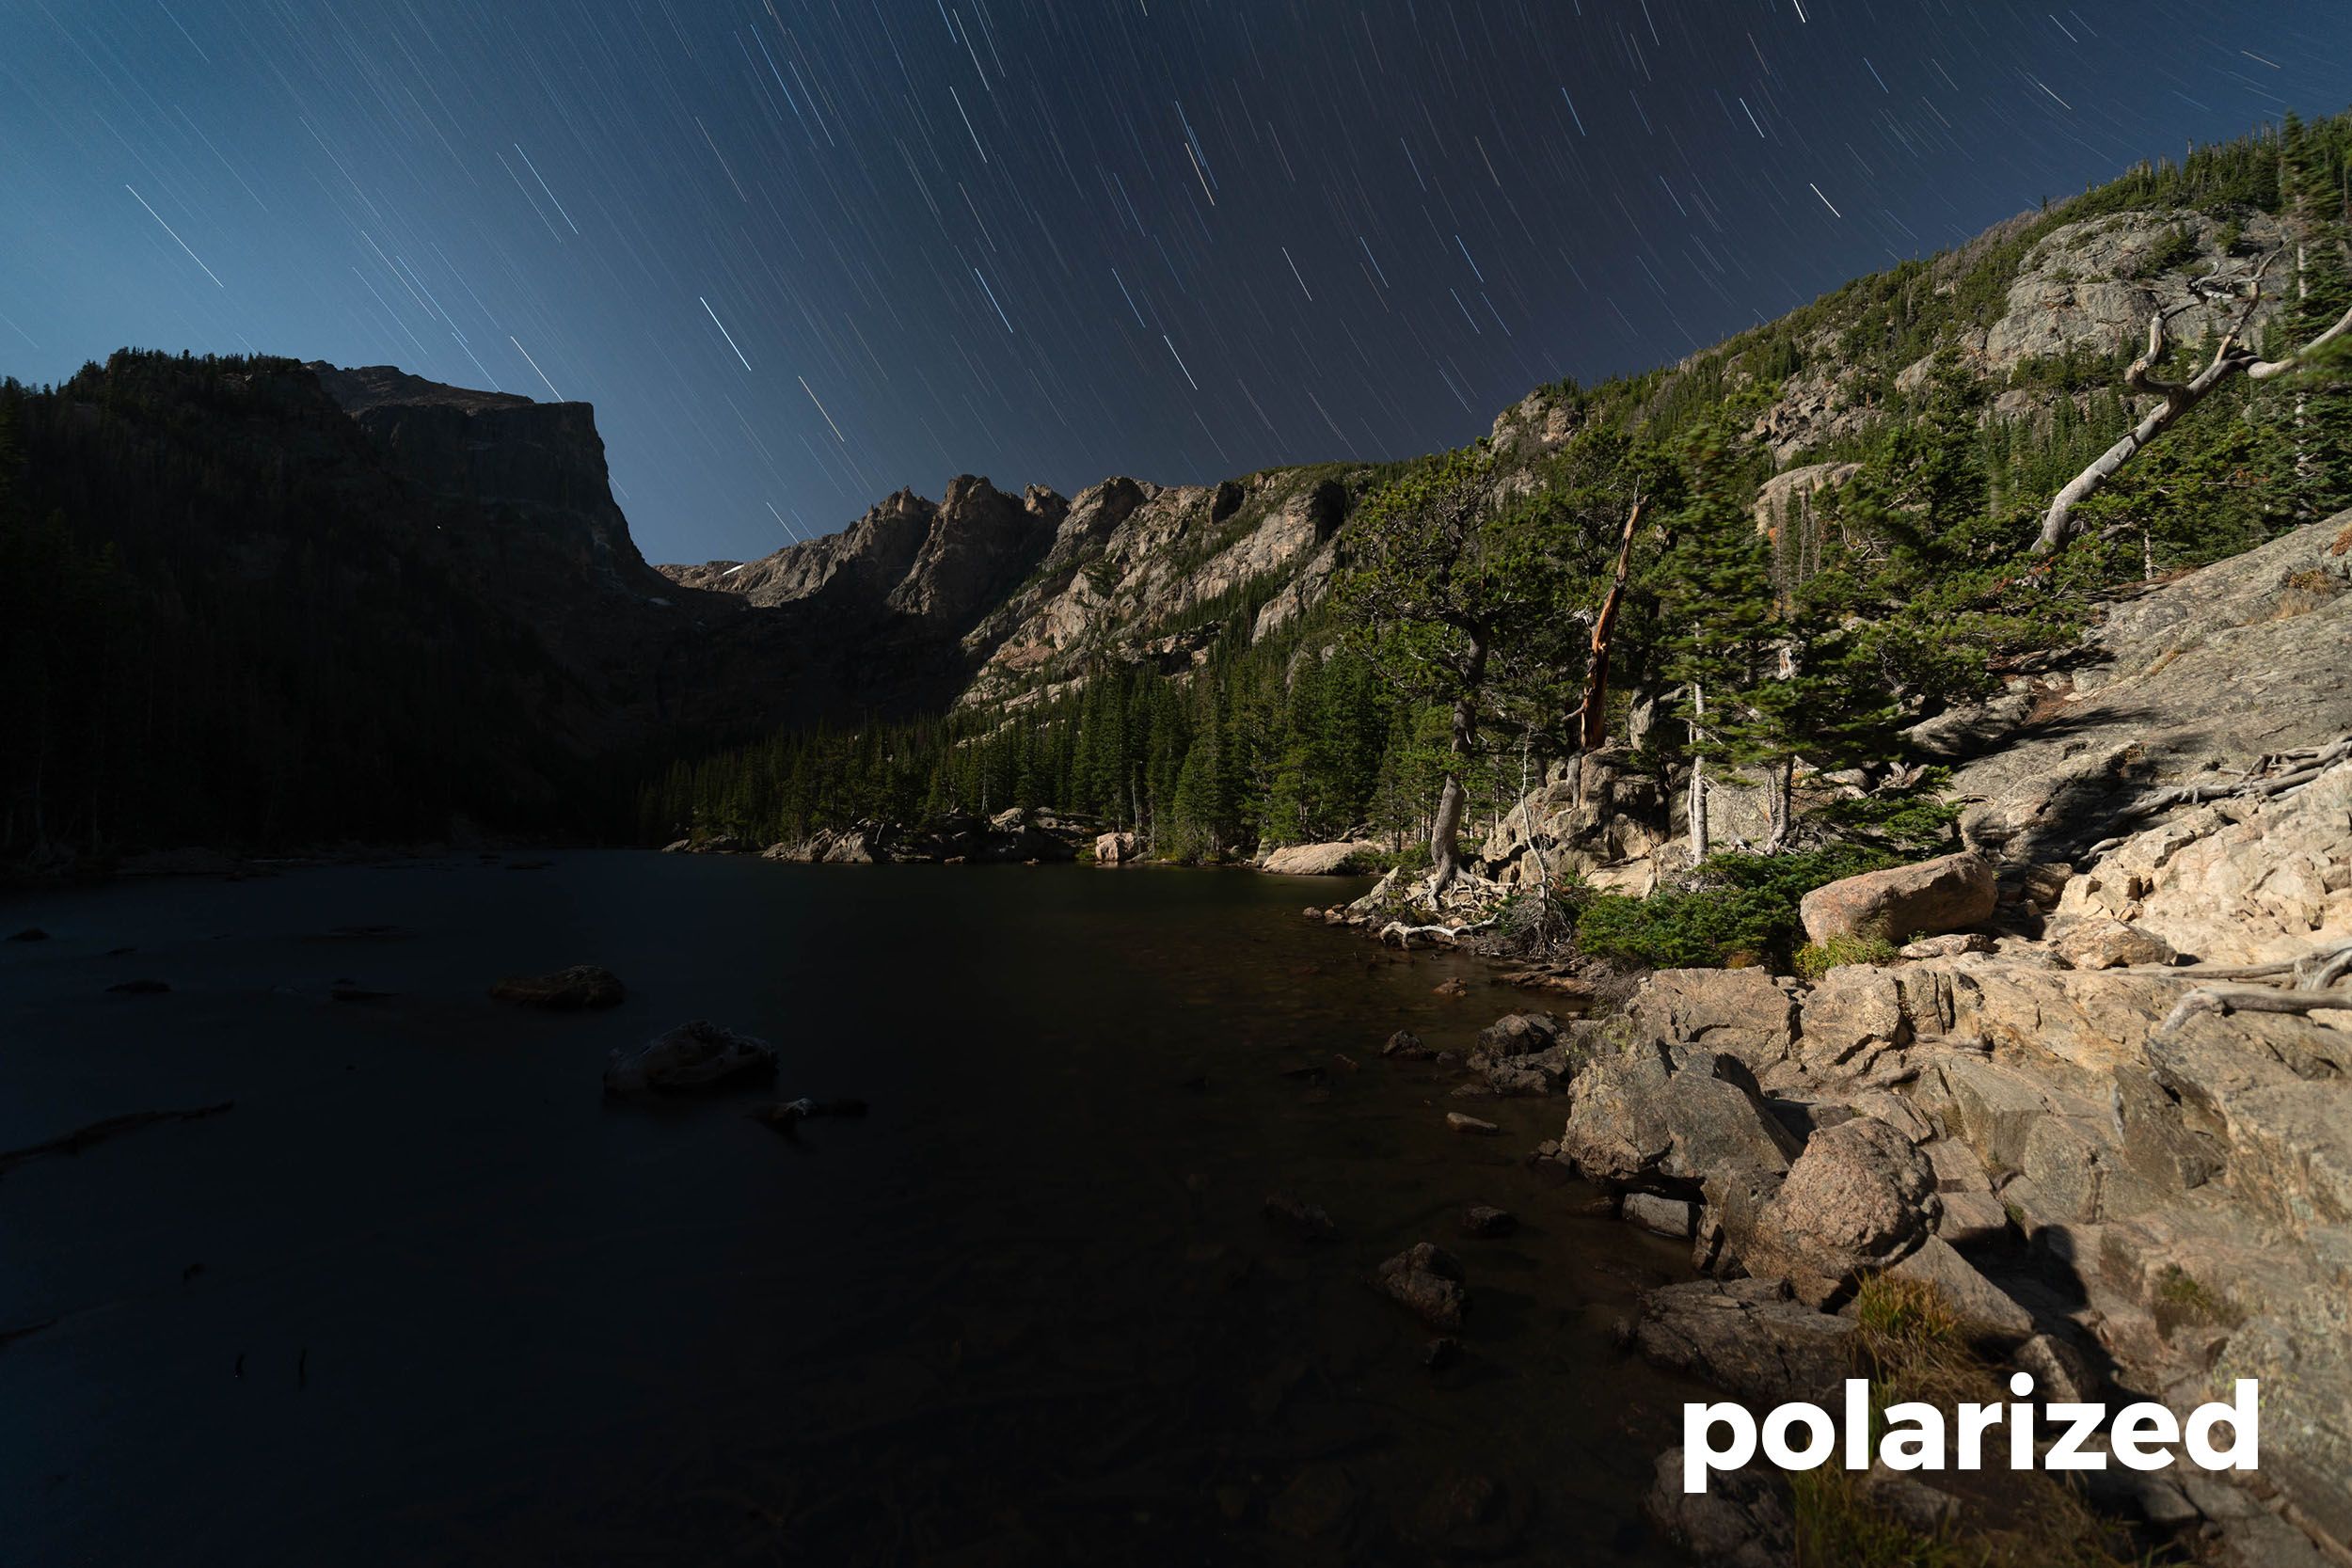
I loved what was happening so much that I wanted to grab two 15-minute exposures to compare:

(I wish I’d done the “without” photo first, because the moon came out more during that exposure.)

So, then I had another “What if?” moment during editing. What if I used the water from the zero-polarizer shot and masked it in to the yes-polarizer shot?

Nikon D850, Zeiss 15mm Distagon f/2.8. 15 minutes, f/2.8, ISO 100. Maximum polarization (in the sky portion).

Again, a wonderful solution for pulling out more stars and deeper, darker skies. Plus, if you shoot both, you can choose the best of each and blend them together. That’s powerful stuff.

And then the Rocky Mountain workshop was over. … But I had another workshop (with Lance) in two days, so Chris and I hustled down to Chaco Culture. And during the second-to-last night, I had a couple of moments here and there to test again.

Facing north, I wanted to test how many stars I could capture at f/13 for a star trail rip.

Test shot No. 1. Nikon D750, Zeiss 15mm Distagon f/2.8. 25 seconds, f/11, ISO 3200. Maximum polarization.

Test Shot No. 2, with a different polarizer orientation: Nikon D750, Zeiss 15mm Distagon f/2.8. 25 seconds, f/11, ISO 3200. Three-quarter polarization.

I felt it had better skies. I wanted a touch darker, so I dropped to f/13 and I committed to a one-hour shot with Long Exposure Noise Reduction turned on.

I admit, I had to do some post work to pull out the stars on the skies, but they’re there!

Nikon D750, Zeiss 15mm Distagon f/2.8. 1 hour, f/13, ISO 50. Three-quarter polarization.

I think next time I’ll shoot such a photo at f/8 to see a touch more stars. But it’s not the normal, cluttered sky we get without polarization and a much wider aperture. And the sky in the background is darker—much darker—which is something we don’t generally see when shooting in moonlight.

But what about the Milky Way?

Well, what about the Milky Way? It’s a silly question, right? You can’t shoot the Milky Way on a moonlit night.

Or … ?

This last test, if successful, would be the coup de grace, on my circular polarizer experiments. Can I extract a Milky Way from moonlit skies? It was an idea raised by Jason, a Rocky Mountain attendee who was on that hike with us the week before. And now I could try it out.

Now in New Mexico, we were shooting at Pueblo Bonito, the park’s showpiece ancient structure, which features over 600 rooms plus multiple kivas of fascinatingly intricate architecture.

There was a 25-minute window of darkness between the end of twilight and moonrise. We hustled to nail the Milky Way during that window, but I suspected I had an advantage with a circular polarizer and hoped I could make it appear even after moonrise.

As soon as the moon rose, people started repositioning to re-frame to make the Milky Way less important. They couldn’t see it. But … maybe I could?

First shot, with minimum polarization:

Nikon D750, Zeiss 15mm Distagon f/2.8. 25 seconds, f/2.8, ISO 6400. Minimum polarization.

And then...

Nikon D750, Zeiss 15mm Distagon f/2.8. 25 seconds, f/2.8, ISO 6400. Maximum polarization.

Double booya. Ignoring the fact that someone did light painting in the foreground for this shot, check out that Milky Way! This is not a composite. It’s one frame, with some Lightroom adjustments.

You may notice that the area of sky around the Milky Way is darkest. That’s not from a local adjustment in post, but rather that’s where the circular polarizer’s effect happens. I strategically placed the effect right along the axis of the Milky Way. The polarization occurs only in that area (rather than the whole sky) because I am using a superwide lens and the effect covers a limited angle.

Anyway, back to the exciting part. I was able to shoot a clear Milky Way sky with a full moon lighting the landscape. My whoops of pleasure resonated from the canyon walls. I let out massive yawps of glee.

Folks, a revolution has arrived. You can put one more big gun in your bag to make your night skies sing. You can use a polarizer to photograph the Milky Way in moonlight.

When Does a Circular Polarizer Not work?

One caveat: When using ultrawide-angle lenses (like my Zeiss 15mm Distagon), you will discover that the area affected by polarization can be narrower than you want.

Check this out—I adjusted the polarizer all around to find a sweet spot, but didn’t find one: (

I also experienced some flare when the moon was at the edge of my ultrawide lens in the above.

So to avoid these two things that I found disadvantageous, I switched lenses to my 35mm, went vertical with a lens hood, and made a pano stitch (without a polarizer), and am very happy.

Note: Polarizing with pano stitches is rarely successful.

Nikon D850, Sigma 35mm f/1.4 Art. Ten frames at 10 seconds, f/5, ISO 6400. No polarizing filter.

So watch your images to be sure the effect is one you want to commit to, but give it a shot.

Wrapping Up

A circular polarizer is definitely worth putting in your toolkit for night photography. ’Nuff said.

And I can’t wait to see what you do with this! Please test for yourself and post your results in the Comments section here or on our Facebook page. We’d love to see what amazing things you make.

Gear

For you gear geeks: I used the Benro Master Slim Circular Polarizing screw-in filter on my Zeiss 15mm Distagon.

In case your superwide lens doesn’t accept a screw-in, know that many manufacturers, Benro Filters included, now make 100mm and 150mm square filter holders that allow for a circular polarizer to be mounted, as well as neutral density and graduated neutral density filters. It’s an amazing photography world we live in these days.

Matt Hill is a partner and workshop leader with National Parks at Night. See more about his photography, art, workshops and writing at MattHillArt.com. Follow Matt on Twitter Instagram Facebook.

UPCOMING WORKSHOPS FROM NATIONAL PARKS AT NIGHT

Light Painting in Moonlight—Using the Moon as Key Light, or Using it as Fill

Many moons, many opportunities

One of the great things about night photography is the variety of lighting situations we have throughout each month, from complete darkness (around the new moon) to extremely bright conditions (around the full moon).

Photographing around the new moon is great for capturing skies chock full of stars. The skies have little or no light, which allows us to shoot with wide-open apertures that allow even the dimmest stars to be seen. This is also a great moon phase for capturing the Milky Way or shooting long star trails.

New moon. Stitched panorama. Fuji X-T2 with 10-24mm f/4 lens at 16mm. 30 seconds, f/4, ISO 6400.

The rest of the month, however, is marked by some amount of moonlight. These moon phases provide the night photographer with endless opportunities for light painting.

Quarter moon (sometimes referred to as half moon). Fuji X-T2 with 16mm f/1.4 lens. 4 minutes, f/5.6, ISO 100.

Full moon. Nikon D4s with a 24mm f/2.8 lens. 3 minutes, f/8, ISO 100.

Can you light paint under new moons? Sure. But you do have to provide all of the lighting. Illuminating the entire foreground of a scene can be quite challenging. Sticking to smaller, more manageable subjects will ensure a better chance of success.

When the moon is up (and is more than just a sliver), it bathes the earth in a faint, soft light. On the other hand, when the moon moves toward full, it’s so bright that our images can look like they were made during the day! Using the moonlight to help illuminate our foreground is a great strategy to create stunning astro-landscape photographs. And if you want to level up those images, you can add in some light painting—either as a fill light or as a key light.

Getting Started

Here are the four basic steps to creating a light-painted night scene:

  1. Compose.
  2. Focus.
  3. Determine ambient light exposure.
  4. Add light painting.

1. Compose

It all begins with finding your composition. Regrettably, in this techie genre of photography, we often spend more time thinking about our settings than we do our composition. Spend some time here. Try out different options before you commit.

2. Focus

Once you’ve found your composition, it’s time to get your focus. For more on this, see Chris Nicholson’s recent blog post “Staying Sharp: 8 Ways to Focus in the Dark.”

3. Determine Ambient Light Exposure

With your scene composed and properly focused, it’s time to set an exposure for the ambient light. What is ambient light, you ask? Ambient light is the available light in the scene. This is the sun during daytime exposures, the city lights in a nightime urban environment, your living room lamps if you are shooting indoors at night, or (in our case) the moonlight.

Getting your exposure correct for the ambient moonlight is critical. Each situation and phase of the moon will provide different light conditions, so test out different exposures rather than depending on formulas.

The easiest way to gain an accurate ambient exposure is to run a series of test shots at high ISOs. These test shots will take only seconds and will save you a ton of time. They can also alert you to composition issues in your scene long before you start into your minutes-long exposures. Once you determine your ambient exposure at a high ISO, it’s time to calculate the longer lower ISO exposure. For example, the original test shot of the image below was made at 4 seconds, f/5.6, ISO 6400, while the final low-ISO setting as seen below was 4 minutes, f/5.6, ISO 100.

Compose, focus, ambient light exposure. Fuji X-T2 with 16mm f/4 lens. 4 minutes, f/5.6, ISO 100.

Add in light painting. 4 minutes, f/5.6, ISO 100.

Final image. 21 stacked exposures, each shot at 4 minutes, f/5.6, ISO 100.

4. Add Light Painting

Now comes the fun part: crafting the light. Whether you are using a flashlight, an LED panel such as the Luxli Viola, or something as subtle as a tea lights, you can choose how best to balance your added light to the existing (ambient) light.

How do we do this? One of the simplest ways is to employ the age-old practice of lighting used by countless painters, photographers and videographers: using a key light and fill light.

  • Key Light: Also called the “main light.” This is the primary source of illumination. It is the brightest light in the scene. Wherever this light doesn’t reach becomes darker shadows.
  • Fill Light: This is the secondary source of illumination used to “fill” in the darker areas of the scene not illuminated by the key light. It’s usually one to two stops darker than the key light.

In this portrait above, the key light is to camera-left. This makes the image brighter on the left side. Notice the highlight under the model’s right eye and cheek. The fill light is at camera-right and pulled back a bit further to make the light a little less bright. Below is the diagram of this lighting setup.

While this image was made in the studio, you can accomplish the same type of lighting outdoors at night. The moonlight can be your key light and you can fill in the shadows with your light painting tool of choice. Or you can you use your light painting tool as the key light and the moon can you be your fill.

It’s all about the balance. If the light painting you are doing is subtle and the moonlight dominates the scene, then the moon is the key and the flashlight is the fill. If you the moonlight exposure is not as bright as the light you add in, then your painting becomes the key light.

Two Examples

I began with a 3-second exposure at f/8 and ISO 6400 to compose the scene and gain focus. Next I converted the high ISO test exposure to 3 minutes, f/8, ISO 100. The evening features a full moon, so the scene could have been brighter, but this exposure made the moonlit scene behind the truck a little darker than usual.

If I hadn’t been planning to light paint the scene, I would have made the exposure brighter, and the moon would have been the key light (not to mention the only light). But, by keeping it a little darker, I allowed the moon to become the fill light. The 3-minute exposure gave me plenty of time to walk around and paint the truck. The truck is the brightest element of the composition, so this makes my light painting the key light.

Moon as fill light, flashlight as key. Nikon D4 with 35mm f/2 lens. 3 minutes, F/8, ISO 100.

In this next example, I used the full moon as the key light and my flashlight as the fill. I first set up my composition. Then I focused. Then I started my high ISO test exposures, and converted my result to a low-ISO, long-exposure setting. I settled on 3 minutes, f/5.6, ISO 6400.

This created a natural-looking scene. The sky seemed bright, but not quite as bright as the middle of the day, and the distant mountain had a nice bright glow to it. The tree and the rock formation in the foreground, however, were in complete darkness, so they recorded as pure black. Time for the flashlight!

Standing to the right and little forward of the tree, I shined my Coast HP5R back at the formation. Adding too much light made the formation and the tree brighter than the background, which was not the affect I was looking for. After several attempts at light painting, I settled on an amount of illumination that kept the foreground just a bit darker than the background.

Moon as key light, flashlight as fill. Nikon D4s with 24mm f/2.8 lens. 3 minutes, F/5.6, ISO 200.

Bringing it into the Field

When you are out under a moonlit sky, try a brighter ambient exposure with less flashlight to keep the moon as the key light. Then try less ambient exposure and more flashlight so that the latter becomes the key light.

There is no right or wrong—only the way you want to interpret the scene!

Tim Cooper is a partner and workshop leader with National Parks at Night. Learn more techniques from his book The Magic of Light Painting, available from Peachpit.

UPCOMING WORKSHOPS FROM NATIONAL PARKS AT NIGHT