tripod

Five Questions: Tripod Cleaning, Condensation, Auto ISO and more

We get a lot of questions, we give a lot of answers, and we’re happy to share them all with you.

This installment of our “Five Questions” series features inquiries about keeping your tripod clean, predicting lens condensation, auto ISO, Super Resolution and computer displays.

If you have any questions you would like to throw our way, please contact us anytime. Questions could be about gear, national parks and other photo locations, post-processing techniques, field etiquette, or anything else related to night photography. #SeizeTheNight!


1. Sand & Salt & Tripods

Question:

I’m wondering if I haven’t cleaned or cared for my tripod enough. The lower leg sections have been a bit rough in movement, and although I’ve tried to wipe down or rinse, I do wonder if Moroccan sand, Death Valley dunes, Argentinian salt flats and just plain ol’ dirt is sneaking in. What’s the best way to care for a tripod? — Therese

If you’re shooting in a place like the sand dunes of Morocco, keeping your tripod clean will mean you’ll be keeping your tripod longer.

Answer:

Whenever you bring your tripod to very sandy destinations or submerge the legs in salty water, you should not collapse the legs until you can rinse them with tap water at home or the hotel. Then towel them off and let them air dry completely overnight.

If you needed to collapse your tripod while still in the field, then grit or corrosives may have gotten inside. In that case, try to do a more thorough job rinsing, and perhaps even disassemble the tripod legs and thoroughly rinse them individually.

If you’re in that type of environment for a few days or more, then also give the tripod a full rinse when you come home from your trip. That’s not common practice for most photographers, but it should head off any long-term complications you might otherwise encounter with dust, dirt and salt getting into the locks and inside the legs. — Gabe

2. Condensation Mitigation

Question:

Is there a good method of determining the likelihood of experiencing lens condensation during a night photography session? When (and when not) should I use a lens heater? — Jim B.

The photographic effects of unmitigated condensation.

Answer:

Checking a meteorological site for dew point and expected low temperature is the best way to anticipate a problem with lens condensation. If the expected low temperature is dropping toward the dew point, you will be likely to get moisture on your lens during an evening shoot.

To understand dew point, here is an explanation from the National Weather Service:

“The dew point is the temperature the air needs to be cooled to (at constant pressure) in order to achieve a relative humidity of 100 percent. At this point the air cannot hold more water in the gas form. If the air were to be cooled even more, water vapor would have to come out of the atmosphere in the liquid form, usually as fog or precipitation.”

In short, if the relative humidity is high and the temperature drops, these are the conditions where you are likely to experience condensation.

The best way to prevent condensation on your lenses is to apply your lens heater before condensation starts to form. If you anticipate it to be an issue, put your lens heater on the lens as soon as you take your gear out of the bag, which will ideally prevent the lens from dropping below the dew point. Waiting until after you already see dew on the front element is a recipe for spending most of the evening wiping the lens than shooting with it.

You already have a more high-tech dew solution, but night photographers should know there are also lower-tech alternatives. Simply attaching the lens hood will hold off dew for a while. And we highly recommend our good friend and Night Photo Summit speaker Kevin Adams’ LensMuff (below). It’s an adjustable and effective solution that does not require batteries, but instead relies on economical hand warmers. — Lance

3. Auto ISO a No-Go

Question:

How do I set auto ISO for dusk into night since the exposure changes so much? This also applies to the moonlit skies when the moon when rises or sets during a shoot, changing the ambient light. — Wendy K.

Answer:

I do not use auto ISO for still photography. I’d rather my exposure time (shutter speed) change and not the overall quality of my image (ISO).

However, if we’re talking about making time lapses, that’s another ball of yarn. In that case I might choose auto ISO so that I get more images as it gets darker instead of the fewer that would result from the shutter staying open longer.

If you are serious about day-to-night time lapses (or vice versa), you should consider getting something that does bulb ramping (aka “bramping”), such as the View intervalometer, ElysiaVisuals RamperPro3 Kit or MIOPS Smart+. These take a lot of the guesswork out of the process in lighting conditions that change radically. — Matt

4. When to Sharpen a Supersized Image

Question:

Thank you for the post on Super Resolution. Do you have any suggestions on when to apply sharpening to the original image? Should that be done before upsizing or after? — Kathy E.

Supersizing a Bryce Canyon photograph quadruples its size.

Answer:

When it comes to sharpening, I would always do that last, just like we have always advocated with any post-production process. Lots of things in post-production can change the apparent sharpness of an image, so you want to do those things before sharpening, so that you know how much sharpening you really need.

Likewise, sharpening changes the contrast of pixels at a micro level, and applying changes to those sharpened pixels later can introduce artifacts such as fringing and haloing where there wouldn’t have been any if your order of processing decisions had been different.

Always sharpen last. — Tim

5. Monitors of Mention

Question:

When Chris and Tim did the photo feedback session following their presentation at the Out of Chicago In-Depth conference, they mentioned a monitor brand that they are both happy with. If you would be so kind, please let me know that brand. I may be getting due for a monitor replacement. — Donald

Answer:

Tim and I both use BenQ monitors, in particular the SW2700PT (recently replaced in their lineup with the SW270C), which is designed specifically for photography. It’s a 27-inch display, which is plenty big for photo editing. Also, it covers 99 percent of the Adobe RGB color space, which is excellent for producing accurate color.

Another great feature is this: If you want to dig really deep on color accuracy, you can take advantage of BenQ monitors’ ability to store calibration settings right inside the display. This means you can set the monitor to make the color adjustments that result from your calibration profile, rather than having your computer’s operating system make those adjustments. This is referred to as “hardware calibration,” as opposed to the more commonly used “software calibration.” For more detail, you can read about this on BenQ’s website, but the takeaway is that this approach gives you better color depth, and theoretically means you won’t need to calibrate as often. — Chris

Chris Nicholson is a partner and workshop leader with National Parks at Night, and author of Photographing National Parks (Sidelight Books, 2015). Learn more about national parks as photography destinations, subscribe to Chris' free e-newsletter, and more at www.PhotographingNationalParks.com.

UPCOMING WORKSHOPS FROM NATIONAL PARKS AT NIGHT

Five Questions: Remote Setups, Induro Tripods, Acceptable Noise and More

Answering questions about night photography is our livelihood, and it’s our passion. We do it on workshops, we do it at conferences, we do it here. And we’re happy to do it in all those places.

This installment of our “Five Questions” series features inquiries about remote setups, multi-row night panoramas, tripods, high ISO noise and controlling a Luxli via Bluetooth.

If you have any questions you would like to throw our way, please contact us anytime. Questions could be about gear, national parks and other photo locations, post-processing techniques, field etiquette, or anything else related to night photography. #SeizeTheNight!


1. An Overnight Remote Setup

Question:

I live 5 miles from a spectacular 30,000-acre nature preserve of Sonoran desert. I have never seen a nighttime star or Milky Way image of this location, and I want to do one. The problem is that the preserve adamantly closes at sundown. I thought maybe I could take a camera and intervalometer and tripod just before sundown, set it up in an untraveled area and throw a bit of camouflage cloth over it. I can pull it off, but how do I keep my Nikon from powering down? If I use a muted wireless strobe to add a touch of fill, how do I keep the strobe from turning itself off ? Will an intervalometer let me program an 8- or 9-hour delay? — Jim

Answer:

The Vello Shutterboss II—set for a 9-hour delay.

First, is there any chance the preserve would give you special access, knowing what you’re trying to do, and that the photos could be used to help support the preserve? As my lawyer step-father always says, you never get what you don’t ask for.

That approach aside, and barring a coyote mistaking your tripod for a saguaro (if you catch my drift), I think your plan would work.

Yes, you can set an intervalometer to delay the start of its program. My Vello Shutterboss II allows me to set a delay of up to 100 hours, so 9 hours certainly wouldn’t be an issue. I would, however, make sure the batteries are fresh, just in case.

The camera should stay on without a problem, again, as long as the battery is fresh. (See a pattern?) If you want to be really sure, you could use an external battery, like the Tether Tools Case Relay. If you’re going to be running long exposures back-to-back all night, I would do the latter for sure, or just let the camera stop when it stops.

As for the strobe, it’s probably a nonstarter. If you have one that can use an external high-voltage battery pack, and/or if you can turn off low-power mode, or if the camera’s signal will wake the unit via the hot shoe, PC cord or wireless trigger, then technically you’re all set. But the bigger issue is that a flash would definitely be noticeable even from a distance. A flash in the dark is hardly discreet. It would also likely be quite startling to wildlife, so cue that coyote to exact its revenge. However, you might be able to use a Luxli Viola set at very low power—i.e., Low-level Landscape Lighting, which can be surprisingly discreet, as well as relatively non-distressful to critters.

Finally, before trying this on-location, I’d give it a test run overnight in your backyard. Set up exactly how you would in the preserve, and let it all run. Once you perfect the approach, then bring the setup out for its overnight wilderness experience.

I’m very eager to hear how this turns out. Please send the results! — Chris

2. Foreground and Background for Panos

Hovenweep National Monument, Utah. Two multi-row stitched pano frames shot at different exposures. © 2017 Gabriel Biderman. Nikon D750 and Nikon 14-24mm f/2.8 lens set at 14mm. Sky: 20 seconds, f/2.8, ISO 3200; foreground: 3 minutes, f/2.8 ISO, 1600.

Question:

Is it possible to shoot panos with a well-exposed, moonlit foreground, not move the camera, then after moonset shoot a Milky Way pano background, then blend them in post-production? — S.W.

Answer:

In short, yes! You got it right. If your tripod doesn’t move, then you can do exactly what you’re talking about, exactly as you described. Ideally your tripod head’s tilt angle will be parallel with the ground—in other words, no angle at all, just perfectly straight and level. Then you can make one pano pass for moonlight at a low ISO for the foreground and one after moonset at a high ISO for star points.

Here are a few of our blog posts that might help you make the panos:

3. Induro a Good Low-Cost Option?

The Induro CLT303 Classic Series 3 Stealth carbon fiber tripod.

Question:

I’m interested in purchasing a tripod, and I’m hoping that I can stretch my dollar. I have my eye on the Induro line, which Lance suggested as a reliable option in his book. I like to shoot wildlife (birds, especially) so I’m wondering if the Series 3 tripods (which I know would serve that purpose) would be stable enough for night photography, or do I need to go with Series 4 or 5? What are you using? — Christopher Z.

Answer:

I think that you’ll be fine with the Induro Series 3 tripod. For less money, you could consider the Series 2 or 3 Benro, but the former is a considerably better tripod. Also, check out their new Animal Series, featuring the Tortise, Bat and Rhino models.

There are a lot of good options out there, so it’s worth looking around.

I’ll offer two further suggestions:

  1. See our e-book Three Legs to Stand On: A Guide to Tripods. There’s a lot of info in there that you might find helpful.

  2. If or when you can, make a trip into Manhattan and visit B&H Photo, where you can put your hands on pretty much all the options, and also get expert in-person advice. If that’s not an option, try to attend a photography trade show or large conference where you can do the same.

I’m currently using (and am very happy with) a Gitzo Traveler tripod and Acratech head—but that’s a $1,100 combo. — Lance

4. How Much Noise is ‘Acceptable’?

© 2019 Gabriel Biderman. Nikon Z 6 with a Nikon 14-24mm f/2.8 lens. 15 seconds, f/2.8, ISO 12,800.

Question:

I’ve read your article “The Z 6 is the Best Camera for Night Photography.” I’ve been set to purchase a Nikon D750 because of its low noise, specifically at ISO 3200. But actually your observation of the “highest acceptable ISO” more precisely zeroes in on the most important camera characteristic for a Milky Way photographer. Since you’ve photographed the night with both cameras, what’s the highest acceptable ISO for the Nikon D750? — Bill W.

Answer:

The “highest acceptable ISO” is subjective. Your high ISO threshold might be different than mine, which might be different than Lance’s, etc. It’s all about what’s acceptable to you. Though I will say that for night photography—and especially for Milky Way images—we tend to be more forgiving, because the noise of the higher ISOs blends in with the natural granularity of stars.

Another thought to consider is that noise from the same high ISO is more prevalent in darker moonless images than in brighter moonlit images—especially if we need to open up the shadows in post-production.

That all being said, I am comfortable shooting my D750 at ISO 6400 and I try not to go any higher. ISO 6400 is very workable, but if I go to 12,800 then I need to really massage that image in post, or I need to shoot multiple frames for stacking sharp stars and reducing the noise with Starry Landscape Stacker.

However, while the D750 still holds its own at ISO 6400 and has excellent color and image quality, a lot of the rest of the technology behind it dates back to 2014. So I would consider investing in a D780 (if you want to stay on the DSLR route).

In his post “Best of Both Worlds,” Lance does an excellent job comparing the D750 versus the D780 versus the Z 6. We feel that the D780 is the perfect marriage of the D750 and Z 6. You get a very similar sensor to the Z 6, and improved live view and autofocus over the D750. — Gabe

5. Remote-Controlling a Luxli

Nelson ghost town, Nevada. © 2019 Chris Nicholson. Nikon D850 with a Nikon 24-70mm f/2.8 lens, light painted with a Luxli Viola (interior) and Coast HP7R (exterior). 16 minutes, f/4.5, ISO 64.

Question:

After your presentation at the Optic 2020 conference, I bought the Luxli Viola and am starting to play with it. I’m curious if you guys ever use the Luxli Composer app and Bluetooth control? There seems to be a dearth of instructional stuff on the many useful options. Perhaps all I need is to dial in the desired color temperature and “go for it”? — Steve W.

Answer:

I do use the Composer app! Not all the time, but it’s usually great when necessary. For example, I might want to place my Viola in a place that’s hard to reach, such as on top of some high rocks. Instead of climbing up and down every time I need to make a change, I can use the app to alter the settings remotely.

Another example is when putting the light someplace within the frame, where I might not want to walk through mid-exposure to turn it off—instead, again, I can do that remotely with the app. The image above is a good example of when I took that approach. Even at the dimmest setting, the Viola inside the General Store was too bright to leave on for the whole exposure. To avoid walking into the scene mid-exposure to turn it off, I used the Composer app to snuff the light after 8 minutes.

To learn how to use Composer, check out this YouTube tutorial that Luxli put together:

For our take on how to use Luxli lights, check out Matt’s 2017 blog post “How to Master Color at Night with the Luxli Viola.” — Chris

Chris Nicholson is a partner and workshop leader with National Parks at Night, and author of Photographing National Parks (Sidelight Books, 2015). Learn more about national parks as photography destinations, subscribe to Chris' free e-newsletter, and more at www.PhotographingNationalParks.com.

UPCOMING WORKSHOPS FROM NATIONAL PARKS AT NIGHT

Three Legs to Stand On: Helping You Choose and Use Your Tripod

Tripods hold a singular place in the growth of a photographer. Often at first they’re considered an obstacle to working quickly—if they’re considered at all. Then eventually they’re considered a necessary evil, grudgingly worth in dollars maybe somewhere between a filter and a small lens. Then later, we realize the true value of standing on three legs.

Eventually most photographers come to appreciate how a tripod makes them better. It makes them more stable, sure—but it also makes them more deliberate, more calculated, more consistent, more creative. A tripod becomes an ally.

We begin to view lesser tripods as deficient, and we see quality tripods as worth double what we think we can afford to pay. A great tripod—a BMW tripod, a Lexus tripod, heck even a Rolls-Royce tripod—comes to feel essential.

20170921_191636_HDR_for blog.jpg

The investment is wise. A good tripod will last far longer than today’s in-vogue digital camera, and will even outlive the efficacy of many lenses. It will go places with you. It will be solid, it will be your rock. It will pick up scratches and scars, growing proudly haggard as your skills and artistry develop and flourish. It will be with you through the long and glorious haul toward becoming the photographer you are meant to be.

But that all needs to start with buying a good one. Whether entry-level or expert-level, a tripod must be reliable and must meet the task of supporting your collection of cameras and lenses and the way you want to use them.

That can be a hard charge in this world of more tripod options than we can count—not to mention the hundreds of heads, and the innumerable accessories. So National Parks at Night is here to help. We have put together a 71-page e-book titled Three Legs to Stand On: A Guide to Tripods.

In the book you’ll find:

  • a primer on how to choose a tripod

  • an article on how to get the most from your tripod

  • a personal story about a lost tripod that found its way home

  • tripod field tips from all the NPAN instructors

  • a buyer’s guide breakdown of over 60 tripods, heads and accessories

  • and more!

Just like our recent guide to photographing meteor showers, we’re offering Three Legs to Stand On as a pay-what-you-want publication. Feel free to download it for free, or to indulge us with payment of what the book is worth to you.

Either way, we’re happy you’re interested, and we’re thrilled if we can help you decide which tripod to buy next and how to best use it in the field.

You can download the e-book by clicking here:

Seize the night! Seize the legs?

Chris Nicholson is a partner and workshop leader with National Parks at Night, and author of Photographing National Parks (Sidelight Books, 2015). Learn more about national parks as photography destinations, subscribe to Chris' free e-newsletter, and more at www.PhotographingNationalParks.com.

UPCOMING WORKSHOPS FROM NATIONAL PARKS AT NIGHT

Lost and Found in the California Desert: A Tripod and Ball Head Find Their Way Home

What are the odds?

I’m not generally someone who believes in fate, or that the things that happen to us in life are predetermined. But every once in a while something happens to make me question those beliefs.

I recently had such an experience in the California desert southeast of San Diego. It was, if you will, an anti-Lemony Snicket series of events.

Chris and I recently led two back-to-back workshops for Atlas Obscura in California’s Anza-Borrego Desert to photograph Ricardo Breceda‘s amazing animal sculptures of mostly extinct creatures that once roamed the area.

Jurassic Park in the Anza-Borrego Desert. Two life-size dinosaurs battle it out underneath the stars. Nikon D750 with an Irix 15mm f/2.4 lens, mounted on a Manfrotto 190go! tripod with an Acratech GPS ball head, light painted with a Luxli Viola. 25 seconds, f/4.5, ISO 4000.

Nearby Anza-Borrego Desert State Park is one of the remotest and hottest places in California, known primarily for spectacular wildflower displays called “super-blooms” in March and early April after an exceptionally wet winter. The park and the sculptures are the primary attractions of the area. It’s a great location for photographing the Milky Way, as Borrego Springs is an officially designated International Dark Sky Community, and the sculptures are cooperative subjects for light painting.

I had last visited Anza Borrego State Park in 1992—before the sculptures dotted the landscape—so I was eager to explore and to rediscover the area. Chris and I had arrived a couple of days early to scout and shoot for ourselves, and by the end of the first workshop we had been out late photographing for six nights in a row. We were having a blast, but we were tired.

Two bugs in battle. Nikon D750 with an Irix 11mm f/4 lens, light painted with a Luxli Viola. 25 seconds, f/4.5, ISO 6400.

As we were packing up to leave on that sixth night, I set my tripod on the ground to open the rear hatch of our car, and consciously thought that I had to make sure to put the tripod back in the trunk before we left. Somehow, I got distracted, and didn’t. I left my prized Gitzo 2545 Traveler tripod and Acratech GPSS ball head all alone in the desert to fend for themselves. Yes, I know. It was a bone-headed move, and I probably deserved what I got. But it was late, and I was exhausted.

Unfortunately, I didn’t realize my error until the next evening as we were preparing to go out for the night. Once I did realize, we looked everywhere we thought the tripod might be. The car. My room. Chris’ room. Our bags. The meeting space. The hotel lobby (had someone found and returned it?). We even checked the police station—you know, in case the tripod fell in with the wrong crowd. Finally, the previous night’s events played back in my head—I could see myself putting the tripod down, I could remember making a mental note to pick it up, but I couldn’t recall actually putting it in the car. So we hurried back to our last shoot location, the site of the magnificent gomphotherium.

Of course, it was too late. An entire night and day had passed, and someone had long since discovered and made off with my tripod. It wasn’t in front of the gomphotherium. It wasn’t beside the tortoises. It wasn’t under the camels. It was, quite simply, gone.

Chris standing beside the gomphotherium, an extinct elephant that once roamed Southern California. Nikon D750 with a Sigma 24mm f/1.4 Art lens, light painted with a Coast HP7R. 13 seconds, f/2.2, ISO 6400.

Luckily for me, Chris had a second tripod, and he let me work with it for the second workshop. I wasn’t very happy about the situation, but there wasn’t much point in getting angry or upset. Besides, I had a workshop to teach. It turned out to be a great group, and the skies cooperated with us. The time flew by, and it was time to say goodbye.

Then things got interesting. Thus begins the series of fortunate events!

Our fellow National Parks at Night instructor Gabe Biderman received an email from Acratech asking if one of us had lost a tripod in the desert! We have a partner relationship with Acratech, and Gabe has been our point person for contact with them. It seems that my tripod had been found by another photographer, who also happened to own an Acratech. His name is Aeon Jones. Aeon had been scouting the location for a landscape photography workshop that was part of the Palm Beach Photo Festival when he came across my tripod early in the morning—mere hours after I had left it there.

Poor Little Lost Tripod. © 2019 Aeon Jones.

Aeon wanted to get it back to its owner, and thought that perhaps it belonged to someone at the festival, so he carried it around all week hoping someone would recognize it. When no one did, he posted about it to Acratech’s Facebook page. Patty from Acratech saw the post, and wondered if the head had been registered. Aeon sent her the serial number, which showed up in Acratech’s records as having been shipped to NPAN.

By this point, the rest of the NPAN crew had heard my tale of woe, so Gabe already knew that the head was mine. Aeon wanted to be sure the tripod got back to its rightful owner, so, through Patty, he asked for me to confirm some details. I relayed what I knew about the tripod and the location where I lost it. Aeon knew he’d found his guy. He then put the tripod in the mail while he was traveling for a shoot in Moab. I arrived home from my next workshop at Maine Media to find the tripod outside my back door in the rain. The box was dented, soaked and falling apart, but the tripod and head were as good as new.

A bighorn sheep (aka “a borrego”) with the moon rising behind it. Nikon D750 with a Tamron 15-30mm f/2.8 lens, light painted with a Coast HP5R. 15 seconds, f/5.6, ISO 6400.

So back to my original question: What are the odds?

First, the tripod needed to be found by someone who 1) realized its value, 2) was honest and wanted to return it to its owner, and 3) had to be resourceful and dedicated in getting it back to me. Thankfully, Aeon was all of those. The odds that the tripod would be discovered by another photographer who also had a tripod with an Acratech head was unlikely, but luckily for me, that’s what happened.

After Aeon posted to Acratech’s Facebook page, Patty had to see the post and reach out to Aeon for the serial number, and that serial number had to have been registered in my name. I admit, I had not registered it—it was Acratech that kept good enough records to track me down. Once Patty discovered the owner, she had to take time out of her schedule to reach out to us, and then to connect Aeon and myself. From there, my tripod’s fate was in the hands of the U.S. Postal Service. The mail carrier left it on my porch in the rain where it could have been stolen while I was in Maine. But it wasn’t.

I have to admit that I never expected to see this tripod again, and I remember saying to Chris that the chances of someone trying to return it as opposed to keeping it or selling it on eBay were next to none. I thought that the chances of someone actually being able to track me down (my name wasn’t on the tripod) were even more remote.

Aeon Jones, you’ve restored this cynical photographer’s faith in humanity, and for that I thank you. I’ll always remember your good deed, and promise to pay it forward every time I get the chance. (I’m in California looking for lost tripods right now.)

By the way, Aeon told his side of the story on his own blog. To Patty, and the fine folks at Acratech: Thank you for maintaining good records, for responding to Aeon’s post, and for making heads so outstanding that another customer would want to make sure I got mine back.

Aeon Jones. You can read his side of the tale on his blog.

Lance Keimig is a partner and workshop leader with National Parks at Night. He has been photographing at night for 30 years, and is the author of Night Photography and Light Painting: Finding Your Way in the Dark (Focal Press, 2015). Learn more about his images and workshops at www.thenightskye.com.

UPCOMING WORKSHOPS FROM NATIONAL PARKS AT NIGHT

No Legs to Stand on: How to Take Night Photos Without a Tripod

About a month ago, fellow NPAN instructor Chris Nicholson and I had the honor of teaching at the Out of New York Photography Conference. During the event we led a night walk, but when we met the students, there was a surprise for us—none of them brought tripods!

Tripods had been listed as required gear on the instructions list, but … well, I guess things happen. We could have cancelled the walk, but Chris and I chatted and decided on a different tack: Let’s teach how to overcome the challenge of shooting at night without a tripod! There are thousands of makeshift tripods on the streets of NYC—so we went out to find them.

What happened next was a magical “letting go” and a total embrace of what the night has to offer. We started by leaning our cameras against poles, buildings and even mailboxes (yes, there are a few left in NYC!). We challenged the students to place the cameras higher and lower than their normal point of view, and the sidewalks and stairs became our stabilization. We searched for movement in cars, people and water fountains, and we braced our cameras against chairs, tables and benches.

It was one of the most fun nights out that I have had in a long time. We were constantly searching for something stable, and we were smiling back to each other when—Eureka! We got it! This forced all of us way out of our normal clicking boxes, which is always an excellent place to be.

With that in mind, I wanted to share a few of the tips that helped us survive a night without tripods. As much as good support is some of the most important night-photography gear, these tips will help you in a pinch, not to mention stretch your creative capacity.

Bursting for sharpness

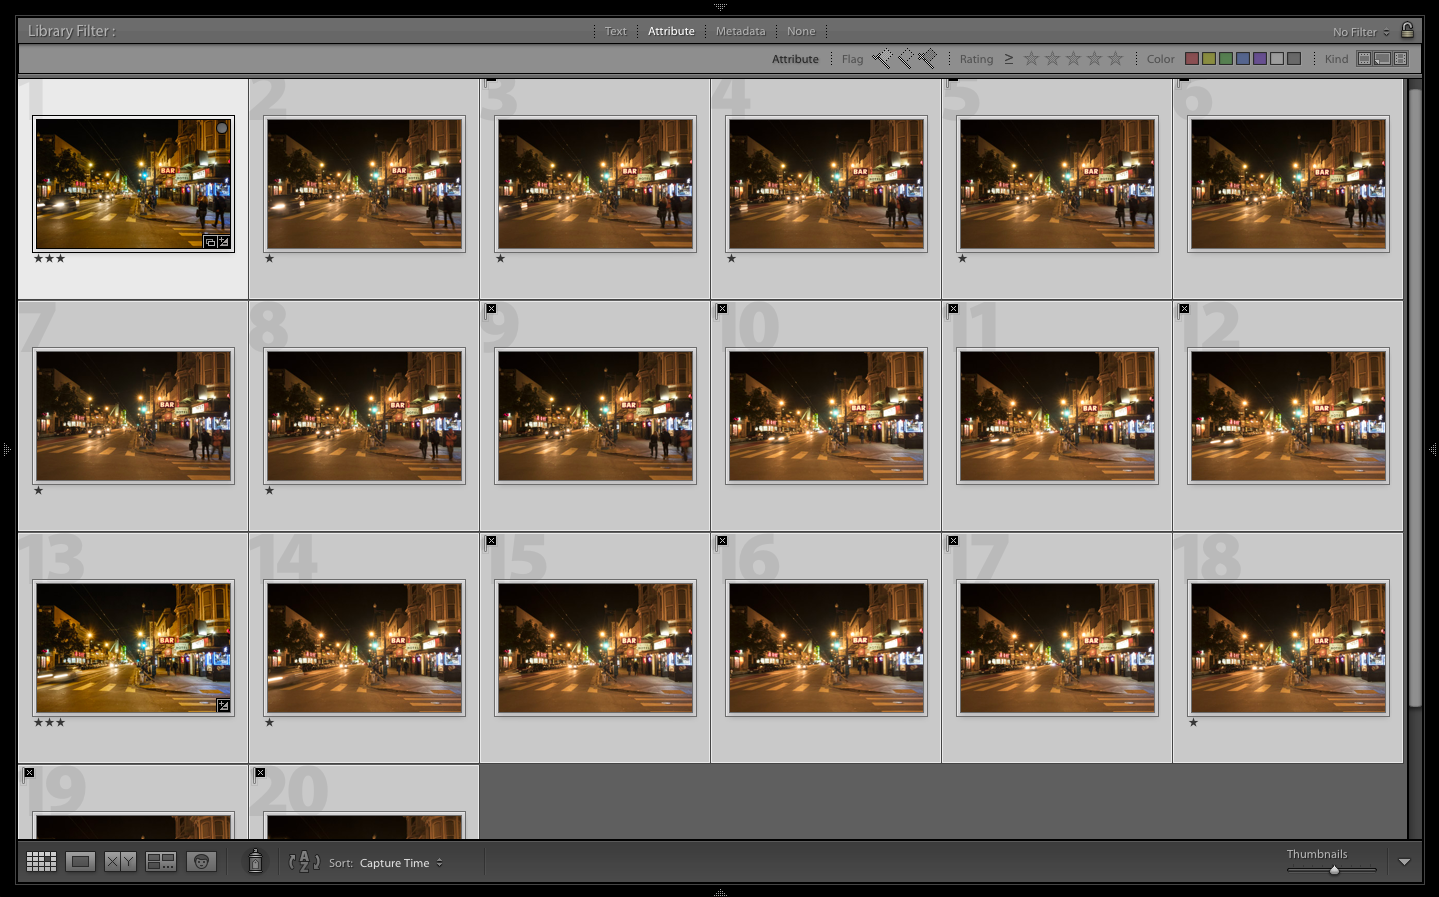
Burst Rate is your friend. I like it for a few different reasons—it greatly helps your “hit rate” when shooting handheld below 1/60 second (but no longer than 1/4 second). Set your camera to its fastest frame rate, hold the camera as still as possible, then fire off a bunch of frames.

Your first couple of shots will be blurry because of the shake created by triggering the shutter, as will your last few because of taking pressure off the shutter release. But if you keep your finger on the button for 10 to 15 shots—you’ll most likely get 2 or 3 in the middle that are acceptably sharp.

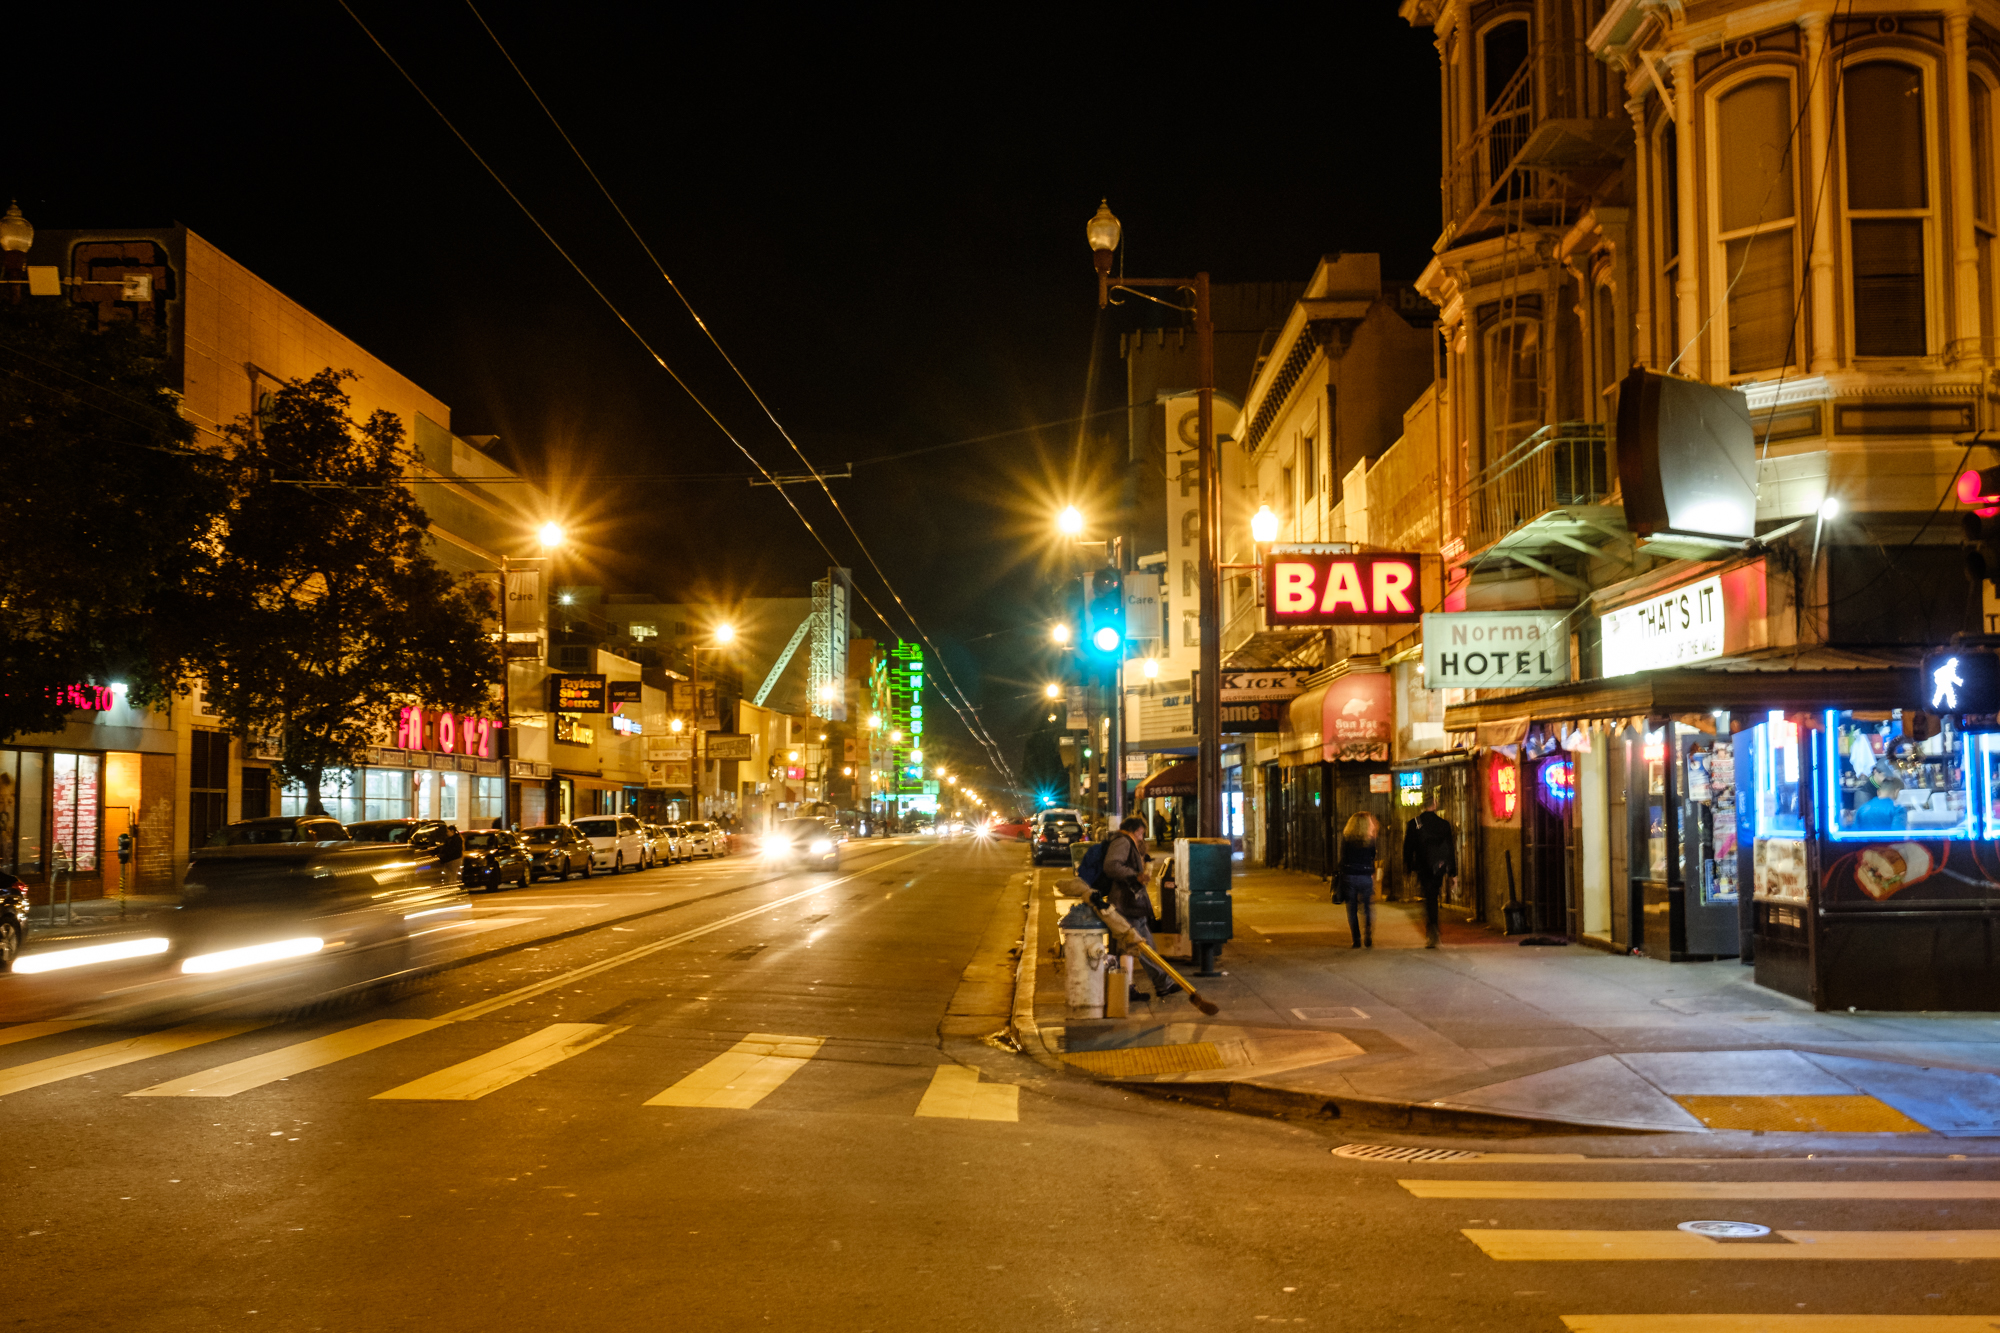
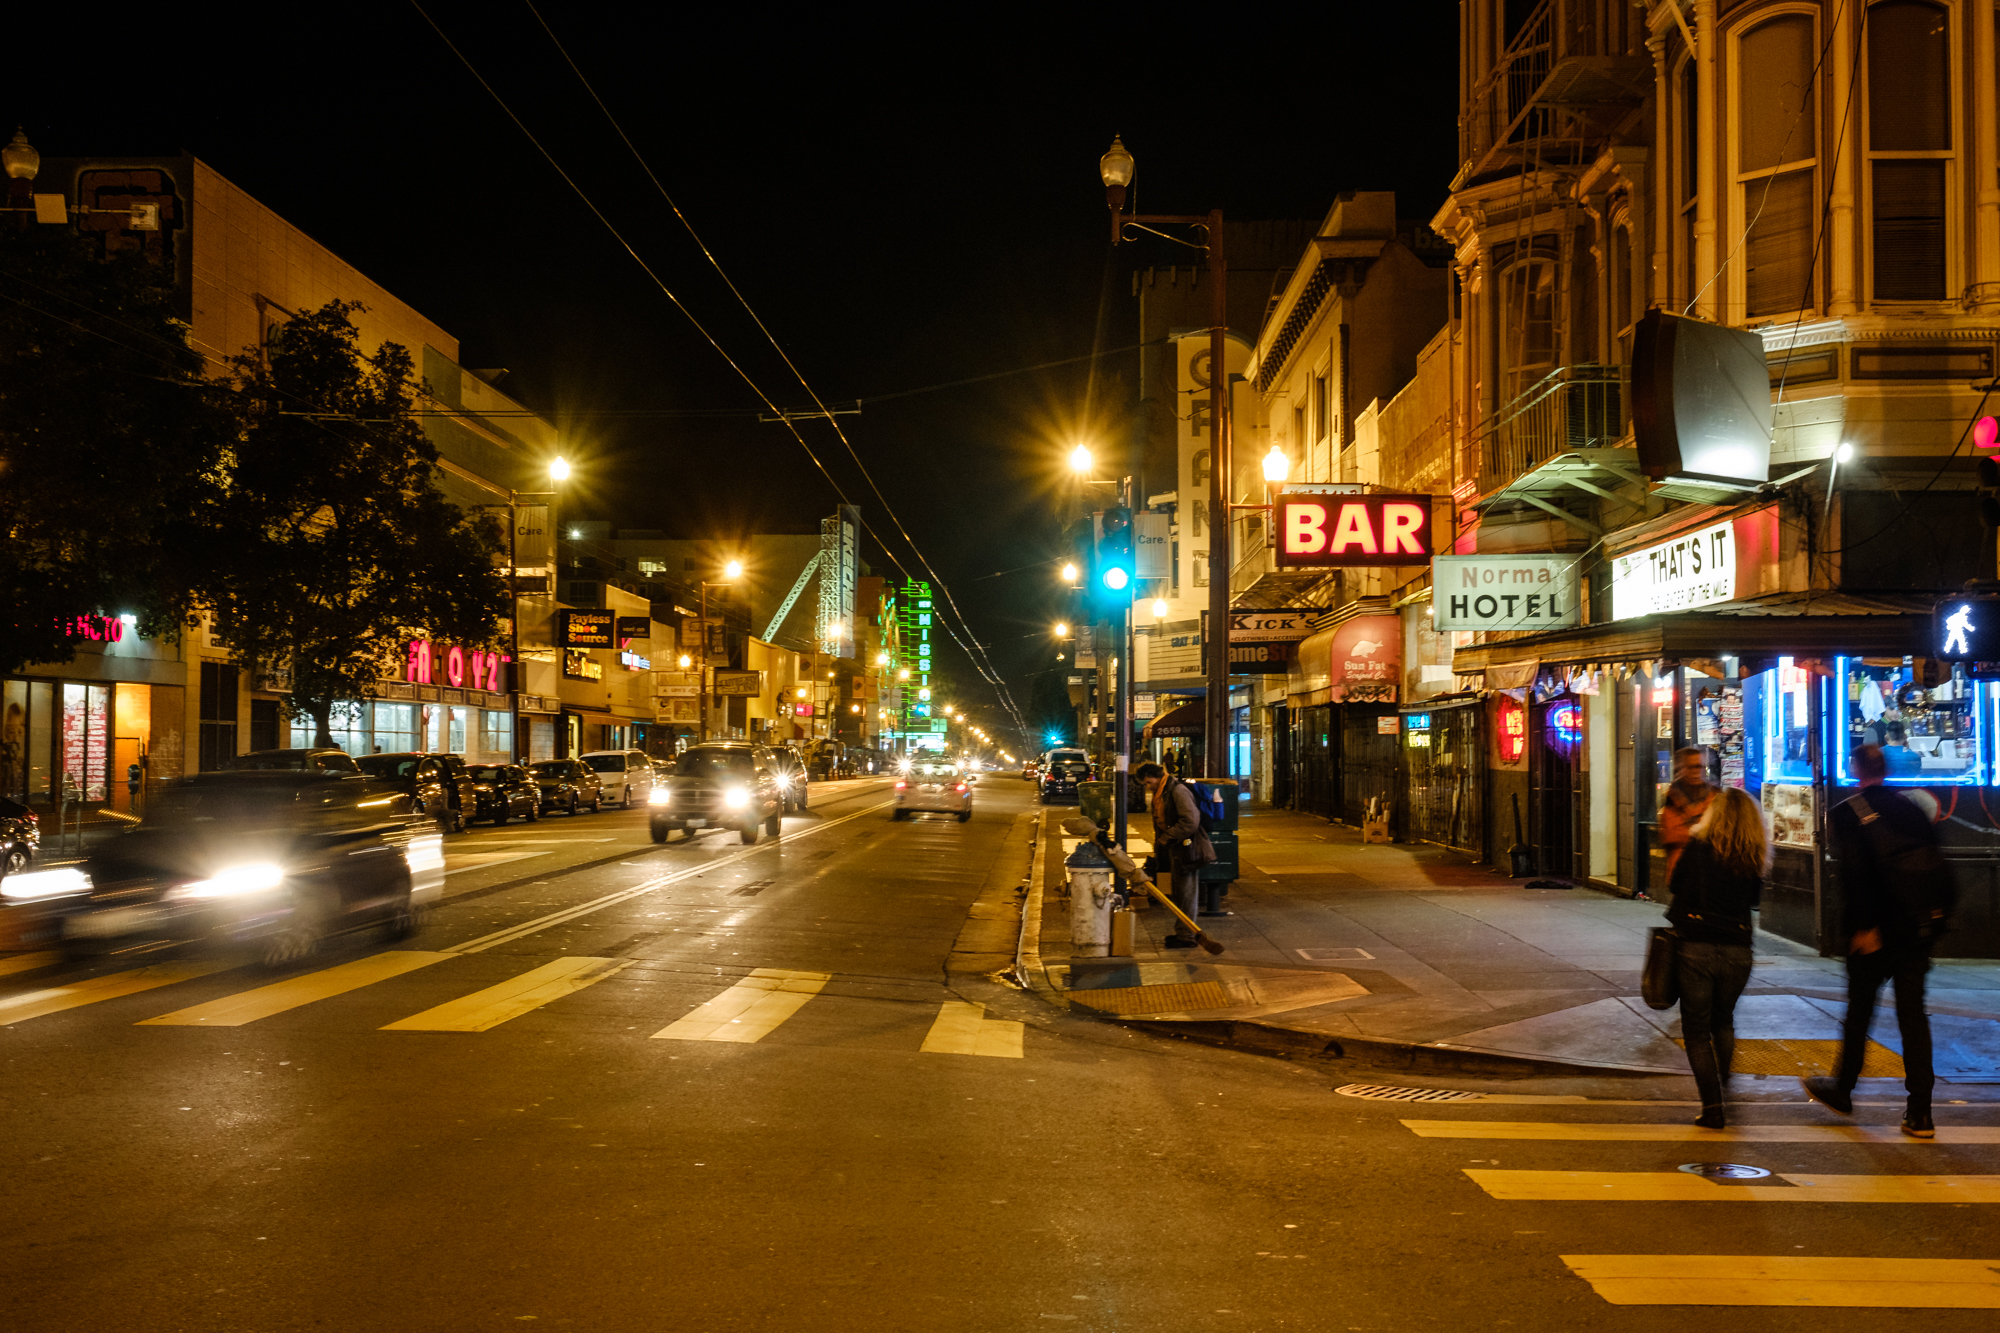
Above you can see the two bursts of approximately 10 shots I did at shutter speeds of 1/8 and then 1/4 to get more movement in the cars. The starred frames are the ones sharp enough to use and the ones flagged with an X are too blurry. (Click the “Next” arrow to see the two sharpest frames.)

To gain a little more stability, here’s a more advanced technique: If your camera has a strap, wrap the strap around your neck, and then extend your arms and the camera until the strap is taut (see below). The tautness will help you keep the camera a little more stable while shooting your burst.

And as for all those extra photos, you don’t necessarily need to delete them. It will require more editing afterward, but you could see how they look as an animated GIF. That is my second reason to shoot in burst mode—I love creating little GIFs or flip books of these moments.

Animated GIF created from a burst of photos.

Animated GIF created from a burst of photos.

Grounding for stability

Of course, everyone has their limit to how steady they can hold a camera. I can typically shoot as slow as 1/4 second, but if I need to go 1/2 second or 1 second, I’ll tuck in my arms and try to lean against a wall to create more stability. Breath in and then trigger that burst on the exhale. Your hit rate will be substantially less with these longer exposures—maybe 1 in 10 frames will be sharp enough to use.

I typically don’t advise hand-holding for exposures longer than 1 second. When opening the shutter for that long, you need find something solid to place your camera on. Be creative. In an urban environment, find stable objects like we used in NYC. In the wilderness, use the ground, a boulder, a ledge, a tree stump, a sturdy branch, etc.

Hand-held at 1/15.

Hand-held at 1/15.

If you happen to have a cable release, great—use it. But chances are, if you forgot your tripod then you probably didn’t bring your cable release! In that case, use the camera’s self-timer—generally 2 seconds is sufficient. That way any vibration caused by you pressing the shutter release will subside before the shutter opens.

Also, many modern cameras have a built-in intervalometer. This is a good solution for shooting car trails, or anything else with lots of constant motion. When using the built-in intervalometer, turn off the self-timer. Set the interval timer to fire every 2 seconds for 10 to 20 frames or more. The first shot might be blurry because of manually triggering the camera, but the subsequent ones should be sharp.

I hope these tips will help you keep on clicking for longer exposures even when you forget your tripod. We had so much fun that night that we are thinking of offering an annual no-tripod night walk—stay posted for that!

Traveling light

Lastly, one final tip. If you didn’t “forget” your tripod but rather just don’t like the idea of carrying one around, then at least consider investing in a travel or lightweight model. Even though the above tips can save your night, using the right tool for the job—a quality tripod—will guarantee you get the steadiest shot possible.

Our favorite travel tripod at NPAN is the Gitzo 2545, which weighs only 4 pounds and can hold up to 26 pounds of gear (which is well under pretty much any DSLR and lens combo). This tripod can easily fit into a messenger or tote bag and is a professional joy to always have with you. It is pricey, but that’s because it’s one of the best. Moreover, it will last you a lifetime.

If you are on a budget, check out the Manfrotto 190go! tripod (available in aluminum or carbon fiber), which you can match with the head of your choice.

Gabriel Biderman is a Brooklyn-based fine art and travel photographer, and author of Night Photography: From Snapshots to Great Shots (Peachpit, 2014). During the daytime hours you'll often find Gabe at one of many photo events around the world working for B&H Photo’s road marketing team. See his portfolio and workshop lineup at www.ruinism.com.

Upcoming workshops from National Parks at Night